


Table of Contents
- Why Real Estate Photo Editing Is Crucial for Home Sales
- 9+ Photo Editing Techniques for Irresistible Listing Photos
- Get Editing Help & Save Time With the Experts at PhotoUp!
In today’s highly visual real estate market, first impressions are made online—and in seconds. With buyers scrolling through dozens, if not hundreds, of listings, your property photos need to stand out instantly.
That’s where powerful photo editing techniques become not just helpful, but crucial.
In this guide, we’ll show you 9+ essential real estate photo editing techniques that will make your property photos look irresistible.
Before we get into the nitty-gritty, let’s discuss why you should invest time and effort into editing your real estate photography.
Why Real Estate Photo Editing Is Crucial for Home Sales
High-quality edited photos don’t just look good—they drive more views, generate higher engagement, and ultimately boost sales.


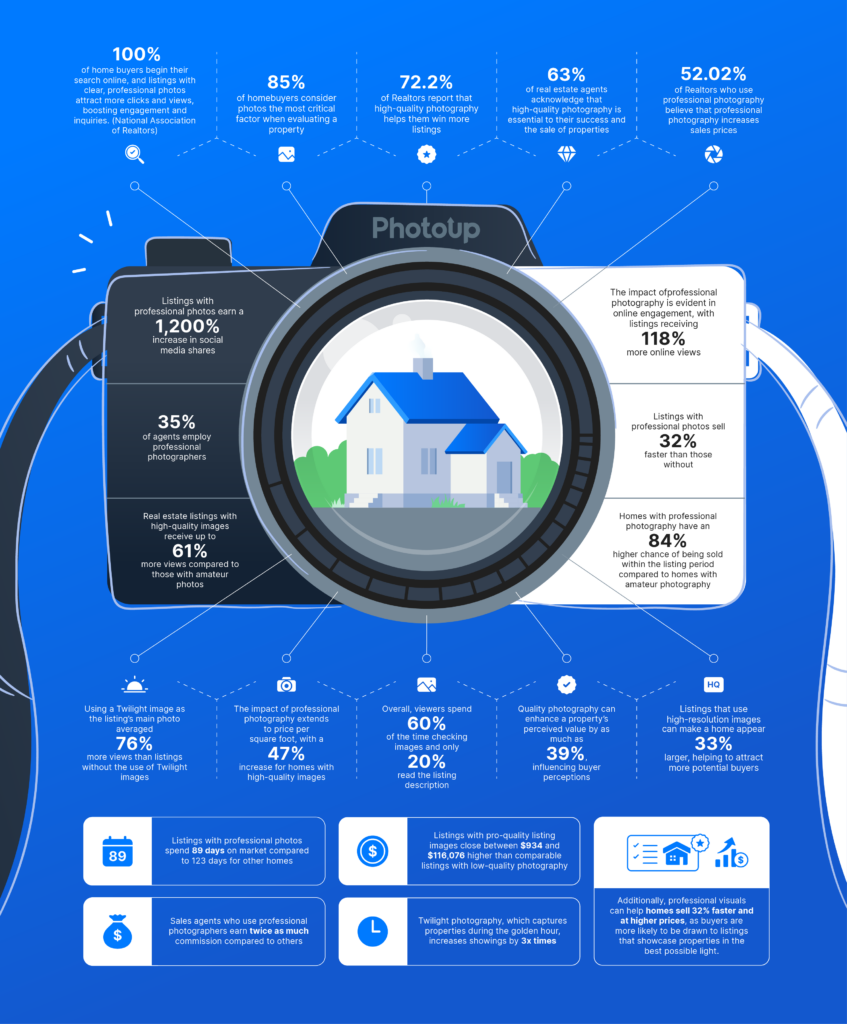
According to the National Association of Realtors (NAR), 100% of homebuyers use the internet in their home search, and listings with professional-quality images sell faster and for more money.
Here are more reasons why editing your real estate photos is more than just a “nice-to-have:”
✨ Boosts Visual Appeal
High-quality images help listings stand out in a sea of options. Eye-catching photos create a lasting first impression, which is critical in today’s scroll-heavy browsing behavior.
For instance, twilight photography, which captures properties during the golden hour, increases showings by 3x times.
Additionally, High Dynamic Range (HDR) photography, which enhances the lighting and color in images, can boost buyer interest and help sell a property 50% faster.
📈 Increases Views and Engagement
Properties with professionally edited photos receive significantly more online views. More views mean more potential buyers and more showing requests.
Recent studies show that listings with high-quality photos attract 118% more online views than those with lower-quality images.
💰 Helps Sell Faster—and for More
Homes with top-notch photos sell 32% faster than those without. Not only that, but they can also command higher asking prices by presenting the home in its best possible light.
In fact, studies have shown that professional photography extends to price per square foot, with a 47% increase for homes with high-quality images.
Realtors are backing this statement… 52.02% of Realtors who use professional photography believe that professional photography increases sales prices.
👌 Builds Trust
Crisp, clean, and realistic photos reflect professionalism and honesty—qualities that buyers look for in both listings and agents.
63% of real estate agents acknowledge that high-quality photography is essential to their success and the sale of properties.
Also, listings with professional photos earn a 1,200% increase in social media shares, which can help real estate photographers and agents boost their brand.
Here are some other powerful real estate photography statistics to consider:
9+ Photo Editing Techniques for Irresistible Listing Photos
With the benefits of post-processing in mind, let’s now explore 9+ essential real estate photo editing techniques that will make your listing photos irresistible.
1. Perspective Correction


Distorted lines from wide-angle lenses can make walls and door frames look warped.
Perspective correction straightens these vertical and horizontal lines, ensuring the room looks natural and professionally shot.
Why it matters: Gives rooms a balanced and accurate shape, making interiors more appealing and trustworthy.
To learn how to do this edit, you can check out our video tutorial on how to straighten verticals in Photoshop:
2. Sky Replacement


A gloomy or overcast sky can kill a buyer’s first impression. Sky replacement swaps in a vibrant blue sky with soft clouds or even a dramatic sunset.
A sky replacement can:
- Make the property look more appealing
- Offer a mood booster
- Provide real estate photographers more freedom when not having to worry about the weather or the time of day to do the photoshoot
With a few tricks, you can replace gray, cloudy, or overcast skies with summery, sunny ones in Photoshop.
Why it matters: Creates an inviting, warm atmosphere, even if the weather wasn’t cooperating during the shoot.
To learn this powerful edit, you can check out our video tutorial on how to replace a summer sky in Photoshop:
Additionally, if you don’t want to manually swap out dull skies with vibrant, blue ones, AgentUp Editing AI offers free sky replacements.
3. Day-to-Dusk Conversion


To take sky replacements one step further, twilight photos are highly engaging.
This technique transforms a daytime image into a stunning dusk scene, complete with glowing interior lights and a vibrant evening sky.
Using a twilight image as the listing’s main photo averages 76% more views than listings without the use of twilight images.
Why it matters: Dramatically increases clicks and engagement on listings—especially on social media.
To learn how to edit twilight photos, check out our video tutorial on how to edit a day to dusk image:
4. HDR Blending


High Dynamic Range (HDR) blending merges multiple exposures to capture the perfect balance of shadows and highlights, especially useful for rooms with large windows.
To create HDR images, you should shoot your subject in at least three bracketed images using different exposures. Then, all you have to do is merge the photos into one to show their highlights and shadows.
Why it matters: Ensures no part of the image is too dark or blown out, showing off every corner of the home.
For an introduction on how to do HDR blending, check out our video tutorial on how to edit HDR photos in Lightroom:
5. Color and Brightness Correction


Even high-end cameras can misinterpret color in certain lighting. Color and brightness correction ensures whites are true, and all tones look natural and vibrant.
Making adjustments to color, contrast, tone, and sharpness may seem obvious and simple. But with a few clicks of a mouse, these simple edits can transform an image from looking bland into a bright and appealing image.
Why it matters: It makes interiors look cleaner, more modern, and welcoming.
To learn how to adjust the colors and make your real estate photos pop, check out our tutorial on how to color correct in Photoshop.
Additionally, this video tutorial walks you through how to brighten a photo in Photoshop:
Have You Ever Thought To
Outsource Photo Editing?
Try it today with 5 free edits from three professional photo editors.

6. Object Removal


Unwanted items like trash cans, cords, or reflections can be distractions.
Some common situations where you may want to remove an object are:
- There’s a car in the driveway, blocking the wonderful view of the garden
- The TV cords show and make the image appear cluttered
- The granite counter would have been perfect if not for that old frying pan that was overlooked during the shoot
- There’s an ugly crack in the bathtub, or the wallpaper is coming off in the kitchen
- You failed to notice that someone passed by the property while making the shot
Fortunately, simple photo editing techniques like the Clone Stamp Tool will help remove these elements cleanly and seamlessly.
Why it matters: Keeps the focus on the property, not on flaws or clutter.
To learn how to use the Clone Stamp Tool to declutter your images, watch this video tutorial on how to remove cords in Photoshop:
7. Virtual Staging


Empty rooms can feel cold and hard to visualize. AI Virtual staging adds furniture and decor to show how the space can be used.
Here are some benefits of virtual staging:
- Helps buyers connect emotionally with the space
- Makes a home feel lived-in and inviting
- Buyers can see the home’s full potential and imagine themselves living there
- Saves money compared to traditional home staging. Virtual staging is actually up to 97% cheaper than traditional staging
With virtual staging, real estate listings stand out by offering beautifully designed interiors that buyers can relate to. It takes professional real estate photography to the next level.
PhotoUp can help you virtually stage your images and return them to you in less than 48 hours for the low cost of $5.00per image.
Why it matters: Helps buyers emotionally connect with the home and imagine themselves living there.
PhotoUp AI Virtual Staging Uploader
Watch our AI virtual staging uploader tutorial to see how easy it is to get your images virtually staged:
8. Window Masking


Often used in HDR editing, the window masking technique ensures the outside view through windows looks crisp and not blown out by light exposure.
Masked windows make interiors feel airy and connected to the outdoors. If there’s a nice view (trees, city skyline, water), showcasing it adds emotional value.
Why it matters: It adds depth to photos and highlights beautiful outdoor surroundings.
To learn this powerful edit, check out our video tutorial on how to make windows in Photoshop:
9. Lawn Enhancements


Grass greening and enhanced skies bring vibrance to exteriors. Unfortunately, dead patches can appear in dry seasons.
The good news is that you can use Lightroom and Photoshop to adjust the color of your lawn to enhance the landscaping of your photo.
Why it matters: First impressions start with the exterior—make it shine.
To learn how to create a green, beautiful lawn, check out our video tutorial on how to make grass green in Photoshop:
10. Sharpness and Noise Reduction


Photos can lose detail or become grainy, especially in low-light interiors.
Enhancing sharpness and reducing noise makes every surface and texture pop. It adds dimension, depth, and contrast along the edges of any object.
Why it matters: Gives your photos a crisp, polished look that screams professionalism.
For more details, check out our video tutorial on how to reduce noise in Lightroom and Photoshop:
Furthermore, this video tutorial walks you through how to sharpen an image in Photoshop:
And there you have it! You’ve now learned 10 photo editing techniques for captivating listing photos.
Remember that editing is not about deceiving buyers—it’s about showing the true potential of a space.
When done well, real estate photo editing enhances what’s already there and presents the home in its most flattering light.
Have You Ever Thought To
Outsource Photo Editing?
Try it today with 5 free edits from three professional photo editors.
Get Editing Help & Save Time With the Experts at PhotoUp!


If you’re a real estate photographer or agent looking to level up your listings, consider outsourcing your editing to PhotoUp.
With fast turnaround, affordable rates, and services like HDR blending, AI virtual staging, and sky replacement, your photos will not only look stunning—they’ll work harder for you.
Our team of highly talented real estate photo editors can help with, for example:
- Image brightness and exposure correction
- Color and tone adjustments
- Window masking and glare reduction
- Clutter and advanced object removal
- Line and angle corrections
- HDR editing and manual blending
- Harsh shadows and lack of light
- Sky replacements
- Twilight and day-to-dusk editing, etc.
We can handle all types of issues – from basic to complex editing!
Browse Top Dedicated
Real Estate Photo Editors
Ready-to-hire editors for real estate photo editing, and more.
Why Choose PhotoUp?
Here are some reasons why you should consider outsourcing your editing to PhotoUp:
One of the Most Affordable Photo Editing Services
Starting at just $1.50 per image for on-demand editing, PhotoUp offers cost-effective solutions that fit within any photographer’s budget.
With a dedicated editor, the price can go as low as $0.50 per image, depending on the editing batch.
Fast Turnaround Time
Get your edited photos back in less than 24 hours for basic editing and 48 hours for virtual staging, allowing you to meet tight deadlines without compromising quality.
User-Friendly System
Easily upload, manage, and store your photos with PhotoUp’s intuitive platform.
It also allows you to provide feedback and communicate with your editing team in just a few clicks.
High-Quality Edits All the Time
Whether you need basic corrections or advanced enhancements, PhotoUp ensures that your images are polished and professional, helping you stand out in the competitive real estate market.
Access to Dedicated Editors
PhotoUp offers access to Dedicated Editors who learn your unique editing style for maximum image consistency and brand recognition.
Our orders are rated “Good” or “Amazing” over 99% of the time.
A One-Stop Shop for Real Estate Marketing
On top of editing, PhotoUp also offers other powerful real estate marketing services like:
Adding these additional services to your toolkit will allow you to expand your product offerings and become more valuable to your agent clients.
Together with PhotoUp, you can quickly grow and scale your business!
How to Get Started
Getting started with PhotoUp is super easy! Here’s a step-by-step guide:
Step 1. Sign up for a free PhotoUp account.
Step 2. Upload your photos to our easy-to-use software.
Step 3. Choose the level of editing that you need and provide instructions (optional).
Step 4. Wait for PhotoUp professional editors to edit and return the photos in less than 24 hours (48 hours for virtual staging).
Step 5. Download and start using your beautifully edited photos.
PhotoUp Real Estate Photo Editing Uploader
Watch how easy it is to get started with PhotoUp in our real estate photo editing uploader tutorial:
It’s as simple as 1-2-3!
So, are you ready to elevate your real estate photography and save hours in post-processing?
Sign up for a free PhotoUp account today, and you’ll get 10 free credits you can use on any of our services!
We hope this guide helped you learn 10 photo editing techniques that will take your images from dull to stunning. Before you go, you may also want to check out the following resources:

