


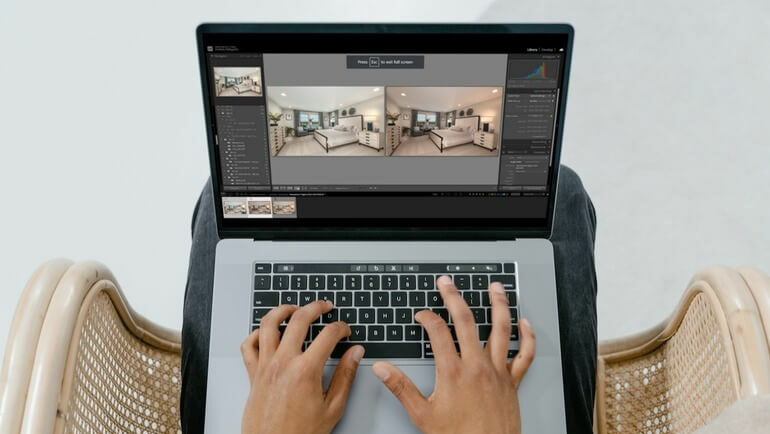
Are you wondering how to edit real estate photos so they’ll pop on social media?
If you’re a real estate photographer or agent who’s looking to market properties on social media, then you know how important it is to have striking and inviting images.
But how do you enhance the images to make them stand out online? The answer is simple; real estate photo editing.
In this post, we’ll share 15 tips to help you edit your photos and make your real estate photography pop on social media.
Let’s get started!
15 Tips on How to Edit Real Estate Photos for Social Media
Here are 15 highly effective and powerful tips on how to edit real estate photos for social media.
1. Follow the Image Requirements for the Specific Social Media Platform

Before even starting the editing process, it’s crucial to consider the image requirements of the social network where you’ll be sharing your images.
If you opt for Instagram, keep the following parameters in mind:
- Square, horizontal, or vertical images will be displayed as squares in your feed
- For an ideal square image, aim for a resolution of 1080×1080 with a 1:1 aspect ratio
- And portrait photos should have a resolution of 1080×1350 and a 4:5 aspect ratio
On the other hand, if you choose to use Facebook for showcasing your work, you’ll want to remember these image sizes:
- Facebook cover image resolution: 820×312
- Link photo resolution: 1200×630
- Photo post resolution: 1200×630
- Highlighted image resolution: 1200×717
- Photo ad resolution: 1200×628
By understanding and adhering to these guidelines, you can showcase your real estate photography in the best possible way on Instagram and Facebook.
2. Take Advantage of Natural Light

Natural light is crucial in real estate photography, it adds depth and clarity to your photos.
When you can, shoot during the natural light hours, which is typically between 10 am and 2 pm.
Also, if there are shadows in your photo, you can soften the harsh shadows with a tool like “Dodge and Burn.” To learn how to edit shadows in your images, check out our tutorial on how to remove shadows in Lightroom.
3. Crop and Adjust

To make your photos visually appealing, it’s essential to crop and adjust them. Any free editing software will allow you to perform basic edits, like cropping.
We use this technique mainly to guarantee the photo’s size and shape align with the listing page, ensuring a visually appealing browsing experience.
To make your social media posts look professional and captivating, it’s crucial to ensure that the property itself takes center stage in most of the frame, rather than being overshadowed by the backdrop.
So, experiment with cropping your photos to highlight the main feature of the room or the property.
4. Use the Correct White Balance
White balance is essential in real estate photo editing. It affects the color of the photo’s lighting, and using the wrong adjustment can affect the entire look of the photo.
It can result in a photo that looks too warm or too cool, which is unpleasing to the eye. Always make sure to adjust the white balance accurately to have a natural look.
You can adjust the white balance in your editing software or let the experts at PhotoUp help to make your images look realistic yet warm and inviting.
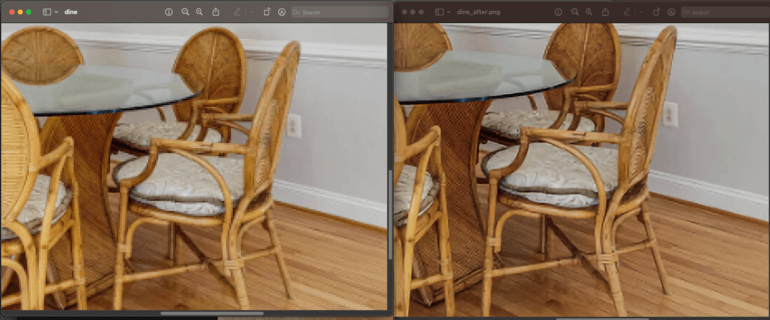
5. Remove Unwanted Objects and Distractions

The best photos are those with minimal distractions. It’s common to come across unsellable objects when photographing occupied properties, such as power cables, dustbins, or a car parked in the driveway.
These objects can easily spoil the view and distract from the primary subjects.
So, always make sure to remove these distractions and declutter your images before posting them on social media.
To see how to remove unwanted objects in your images, visit our blog post on how to remove a car from a driveway in Photoshop or watch the video tutorial below:
6. Correct Distortion

Wide-angle lenses could produce distortion on the edges of the photo. These distortions may not be noticeable during a live shoot, but they are apparent in the final photograph.
There are two main types of distortion to be aware of:
1. Barrel distortion: This type causes vertical lines to curve outward in the middle of your shot. It can often be noticeable and can affect the overall quality of your image.
2. Perspective distortion: With this type, lines appear to bend toward the center at unusual angles. It’s crucial to address any perspective distortion, especially when working with real estate images in Photoshop.
To deal with distortion in Photoshop, choose the image you need to adjust and press Filter > Distort > Lens Correction.
Have You Ever Thought To
Outsource Photo Editing?
Try it today with 5 free edits from three professional photo editors.

7. Boost Color and Vibrancy


To make your images pop with color, you can increase the vibrancy in your images.
Be careful not to go overboard, though, or your photo will look cartoonish. Remember that it’s not allowed to manipulate the listing’s actual appearance.
So, always stick to natural tones and avoid over-saturating the colors. Real estate photos should represent the actual look of the property yet in its best light.
For more details, visit our blog post on how to color correct in Photoshop.
8. Lighten Up Darker Rooms


Multiple rooms may offer darker and sadder vibes naturally. A proper Lightroom edit can give the room the warmth and coziness it deserves.
For example, using a graduated filter in Lightroom helps to adjust the brightness levels gradually and selectively.
9. Sharpen Your Images
To make your real estate images look crisper and clearer, you can sharpen them by using the Sharpen Tool in Photoshop.
Sharpening enhances the definition of edges in an image and adds more detail. Whether your images come from a digital camera or a scanner, most images will benefit from sharpening.
Overall, image sharpening adds texture and contrast to an image that can draw viewers’ attention to your photos and help them stand out from the crowd.
Make sure to be subtle in your approach so the photo doesn’t look over-edited. To learn how to get the right balance, check out our guide on how to sharpen an image in Photoshop.
10. Do a Sky Replacement


On bright, sunny days, colors shine in all their glory, while cloudy and stormy weather becomes the arch-nemesis of professional real estate photographers.
The dreary weather can make even the most luxurious property appear bland and unappealing.
But fret not! You have the power to transform grey, cloudy skies into vibrant sunny skyscapes.
By replacing a dull sky, the property will exude the charm of a bright summer day, allowing you to select from a captivating sunrise, a mesmerizing sunset, or a tranquil dawn sky.
To learn this powerful edit, visit our guide on how to do a sky replacement in Photoshop or watch the video tutorial below:
11. Correct Vertical and Horizontal Lines

To create visually appealing photographs, it’s crucial to ensure that both the vertical and horizontal lines are aligned.
Neglecting to address any slanted or uneven horizons during the editing stage can lead to confusion and an unprofessional impression for potential buyers.
Lines can be distorted in several ways, such as:
- The positioning of the camera
- An irregular-shaped room
- Also, the curvature of some camera lenses
Our brains naturally perceive the horizon as a straight line, even when it may not be the case. Hence, leaving a crooked horizon can evoke a subconscious dislike towards the image and its subject.
To see how to align verticals, you can check out our blog post on how to straighten verticals in Photoshop or watch the video tutorial below:
12. Remove Color Cast

The type and intensity of light in a scene affect how the colors are rendered in a photograph.
Let’s consider a few examples:
- Cloudy, gray skies can make a lively yellow wall inside a house look dull
- A beige-colored wall will look different in direct or indirect light
- And a fluorescent light tends to cast a cold, bluish effect on an image
Even the color settings on a camera can alter the natural colors of a scene. But color cast removal can bring back the property’s original colors.
Additionally, this real estate photo editing technique will neutralize and/or remove the undesired tint that obscures the actual colors.
To learn more, check out our video tutorial on how to remove color casts in Photoshop:
13. Make the Grass Green and Lush

Picture this: a warm and inviting home with a lush, green lawn that greets you with open arms. But what if your photos don’t align with the season?
Dead spots or brown grass can dampen the appeal. Fear not, for there’s an easy edit to make your images look amazing!
With the help of Lightroom and Photoshop, you can effortlessly enhance the color of your lawn, transforming your photo into a perfect landscaping masterpiece that will draw attention on social media.
To learn how to create a green beautiful lawn, read our blog post on how to make grass green in Photoshop or watch our video tutorial below:
14. Add People or Animals to Your Photos

The incorporation of people or animals in the image adds a personal touch that the audience might relate to.
If it is not easy to take a picture of real people, stock photography websites like Shutterstock or iStock are an option.
People and animals evoke emotions, and these could be utilized to add a touch of humanity to the photos.
Want to dive deeper into real estate photo editing? Read this article on how to edit real estate photos (top 11 techniques).
High-Quality & Consistent
Real Estate Photo Editing
Hire a dedicated editor with performance metrics from $7/hour.
15. Get Expert Real Estate Photo Editing Help


Always get a second opinion on your images; you might be too caught up in the editing phase. Reach out to fellow photographers or designers to review your work.
Another approach to achieve additional top-notch quality editing is the use of professional real estate photo editing companies like PhotoUp.
PhotoUp offers photo-editing services that will leave you with better professionally edited photographs that are sure to impress your social media followers.
Our skilled photo editors can help with the following issues:
- Improper exposure levels
- Harsh shadows, lack of light, etc.
- Blurred images that were taken without a tripod
- Images that need cropping or other effects
- Lawn greening and sky replacements
- Twilight editing
- Clutter and object removal
- Line and angle corrections
- And much more!
Browse Top Dedicated
Real Estate Photo Editors
Ready-to-hire editors for real estate photo editing, and more.
Best yet, our real estate photo editing services are affordable, starting at $1.10 per image depending on your subscription.
A Complete Real Estate Marketing Partner
Apart from photo editing, PhotoUp also offers additional real estate marketing services such as:
We have everything you need to make your images shine on any social media platform!
To recap, photo editing is necessary in today’s real estate marketing climate. When done right, it can enhance the attractiveness of your properties and make them stand out on social media.
So, sign up for a free PhotoUp account today, and let our professional editors help your real estate photography pop on social media and all other platforms!
For a limited time, you’ll even get 5 free edits when signing up for an account.
We hope this blog post helped you learn how to edit real estate photos for social media. Before you go, you should also check out these, related, resources:

