


Do you want to learn how to remove color cast in Photoshop?
Color cast in a photo can be considered an eyesore, especially in the real estate photography industry, where images need to look extra captivating. Fortunately, there are easy ways to remove color cast and boost the look of your images.
In this post, we’ll show you 2 techniques to easily remove or neutralize a color cast in Photoshop. We’ll also explain what a color cast is.
Let’s get started!
What Is Color Cast in a Photo?
Color cast is a tint of a specific color in a photograph that is often unwanted and distracting. Certain lighting can cause film and digital cameras to render a certain color cast.
For example, in the real estate industry, clients would consider color cast as an eyesore and rather distracting.
And we don’t want your clients to blame you for not providing them with satisfying images.
Luckily, there’s an easy fix to this problem!
Let’s show you how to remove color cast in Photoshop next.
How to Remove Color Cast in Photoshop (2 Techniques)
If a color cast makes your photo look unnatural, try correcting it with any of these two simple techniques.
You can either watch the video tutorial or continue reading the text below:
Removing Color Cast in Photoshop: Technique 1
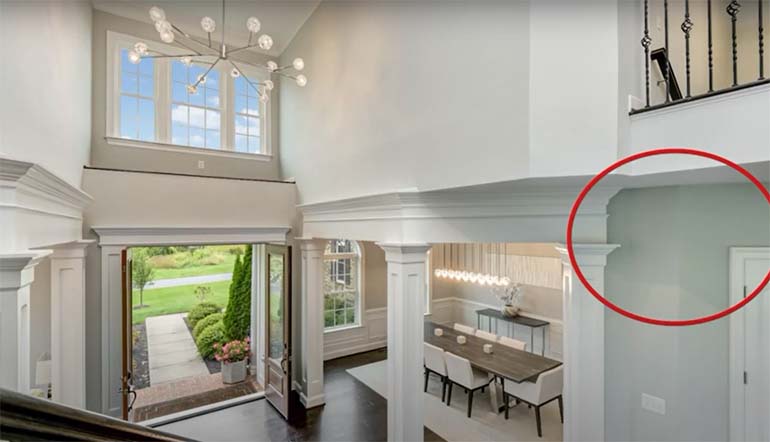
As you can see, a blue cast is prominent on the right-hand side of this photo, which we’ll show you how to remove:
Step 1. To get started, right-click and open your image in Photoshop. Duplicate the Layer for safety.
Step 2. Next, use the Pen Tool to make a selection of the cabinet.
Step 3. Change the Blend Mode to Color.
Step 4. Select a Soft Round Brush. When clicking the Alt-tab on your keyboard, you’ll see that the cursor changes and is temporarily changing the brush to an Eye Dropper.
Step 5. Now, pick a color that is close to the real one and adjust the Opacity as needed.
Step 6. Do the same process for the white appliances. If you happen to brush over some areas that shouldn’t be included, we can fix that using a Layer Mask.
Step 7. Lastly, Mask Out the areas that shouldn’t have been included and need to be restored.
More Than Industry Leading
Real Estate Photo Editing
PhotoUp is the end-to-end business platform for real estate photographers.

Removing Color Cast in Photoshop: Technique 2
For this example, it would be rather tedious to paint over the wall and ceiling, so we’ll start by making a virtual copy.
Step 1. Get started by making a Virtual Copy.
Step 2. Next, using the White Balance Selector, try to Color-Correct the bluish area.
Step 3. Now, select both copies and Open Them as Layers in Photoshop.
Step 4. We’ll Manually Blend Out the two exposures. First, add a Layer Mask, and then by using a
Soft Round Mask, gently paint over the blue areas.
Step 5. Lastly, make sure the areas are blended properly.
And that’s it! You’ve now learned how to remove color cast in Photoshop.
Browse Top Dedicated
Real Estate Photo Editors
Ready-to-hire editors for real estate photo editing, and more.
Outsource Real Estate Photo Editing to PhotoUp

These 2 techniques are both effective ways of removing color cast in images. With practice, you’ll get faster and faster at editing your photos.
However, practice takes time!
If you’re looking to save time and ensure professional-quality results, consider outsourcing your photo editing needs to the experts at PhotoUp.
PhotoUp specializes in real estate photo editing, providing services such as:
- Color correction
- Sky replacements
- Image enhancement
- Window masking and glare reduction
- Clutter and advanced object removal
- Line and angle corrections
- HDR editing and manual blending
- Twilight and day-to-dusk editing, etc.
With PhotoUp, you can focus more on shooting properties and less on tedious editing tasks.
Our team of experts ensures that your images are polished to perfection, ready to attract potential buyers and clients starting at the low cost of $1.10 per image depending on the subscription.
But it doesn’t stop there…
A One-Stop Shop for Real Estate Marketing
On top of that, PhotoUp is a one-stop shop for real estate marketing and also offers additional services such as:

We have everything you need to create impressive photography and market real estate in one user-friendly platform!
How to Get Started
Getting started with PhotoUp is super easy!
All you need to do is sign up for a free PhotoUp account. This will give you access to our easy-to-use photo management system, where you can upload photos, provide instructions and feedback, and lastly download your beautifully edited images.
PhotoUp Real Estate Photo Editing Uploader Demo
To see how easy it is to use our software, have a look at our real estate photo editing uploader demo:
It’s really as simple as 1-2-3 to get beautifully edited images in less than 24 hours!
So, are you ready to take your photography to the next level?
Sign up for a free PhotoUp account today, and let our experts handle all your real estate photo editing needs!
For a limited time, we even offer 5 free credits when signing up for an account you can use to try any of our services.
Get started with PhotoUp today!
We hope this guide helped you learn how to remove color cast in Photoshop. If you found this guide useful, you may also want to check out the following resources:

