


Table of Contents
Do you want to learn how to do a sky replacement in Photoshop? Often, the most impactful adjustment you can make to a real estate photograph has nothing to do with the real estate itself.
To sell a property faster, you need to create a feeling that home buyers can’t resist. They need to be able to imagine themselves living in that property.
So in this post, we’ll show you how to do a sky replacement in Photoshop to enhance your real estate photographs and help you sell a property faster.
But before we show you how to make your property irresistible to home buyers, let’s first look at the benefits of sky replacement in real estate photographs.
A Beautiful Sky Captivates Buyers’ Attention


Taking the time to brighten up the sky may sometimes feel unnecessary or like too much work, but a beautiful sky has a remarkable effect on prospective home buyers.
Not only will they be much more receptive to what you are selling, but they’re also likely to spend longer looking at the image if the sky is clear, bright, and welcoming.
More importantly, a clear blue sky will show off your property in a whole new light and help you to sell it faster!
More Powerful Benefits of Making a Sky Replacement
Sky replacement can enhance a photograph by placing animate or inanimate objects like rainbows, birds, moving clouds, airplanes, and more.
To give you a better overview, here are some benefits of sky replacement in real estate photographs:
- Makes your property look more appealing: With a sky replacement, you can tweak your property photograph to look more appealing to prospective home buyers
- Provides real estate photographers more freedom: You don’t have to worry about the weather or choosing the best time of the day. Instead, you can set up a shoot and take your photos at a time that suits you the best
- Mood booster: Nothing affects a person’s mood more than the weather. Blue skies lift our spirits, while grey heavy skies drag us down. So, if you want to lift the mood and the feel of a real estate photograph, you should turn your attention to the sky
- Offers unlimited possibilities: There’s nothing you can’t do when editing your photographs in Photoshop. For instance, you can choose a clear blue sky, white puffy clouds, a dramatic sunset, or a starry night. Whatever feeling you want to create, can be recreated in Photoshop
Best of all, you are in complete control over every aspect of your real estate image.
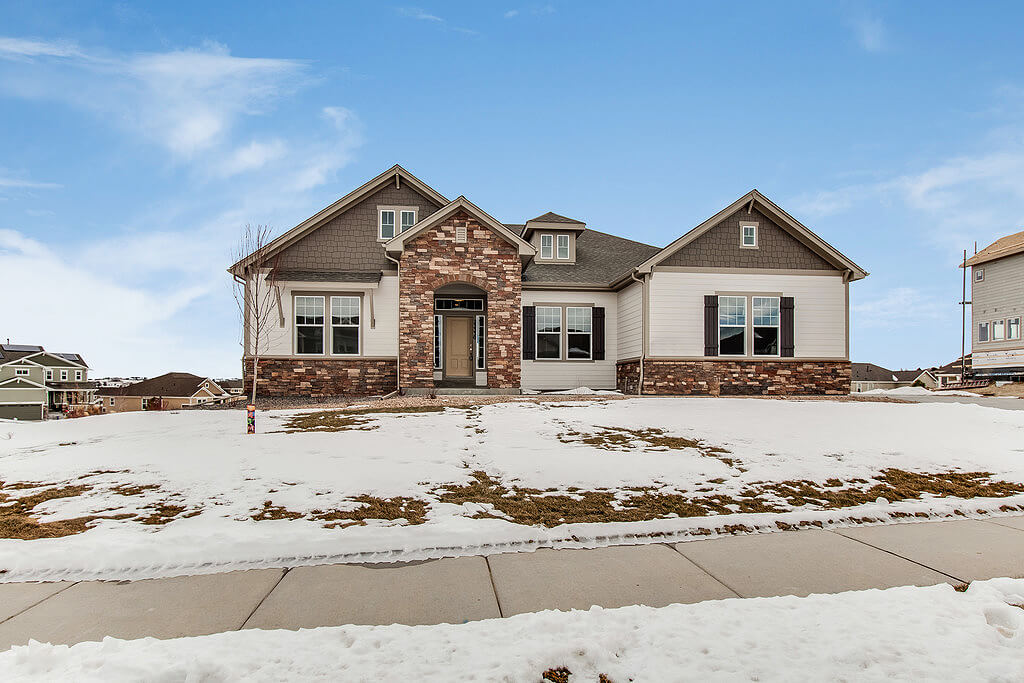
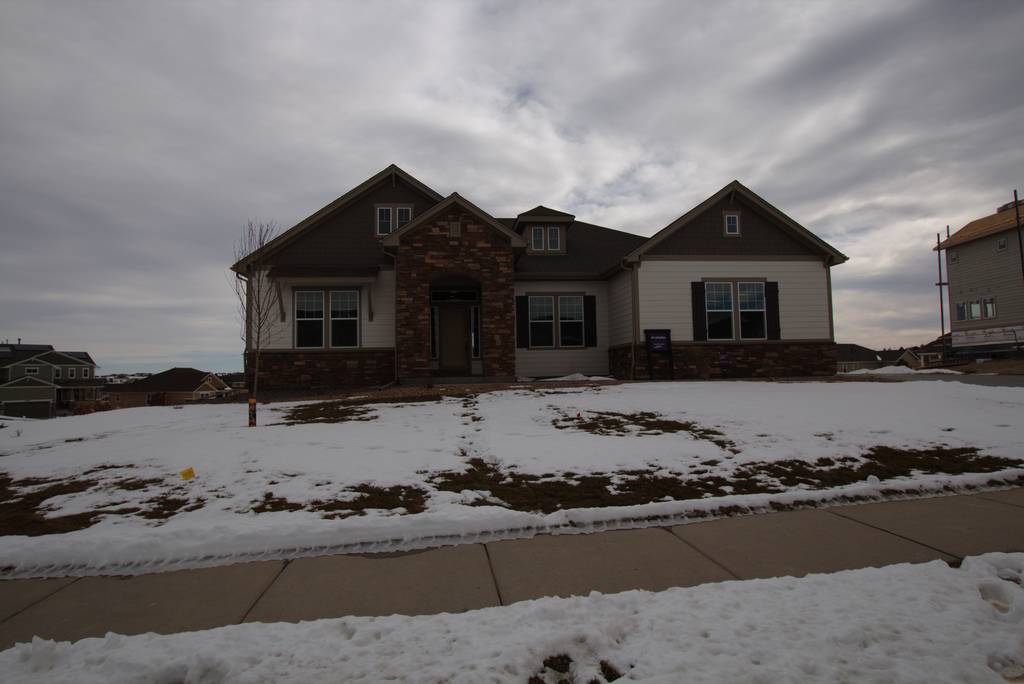
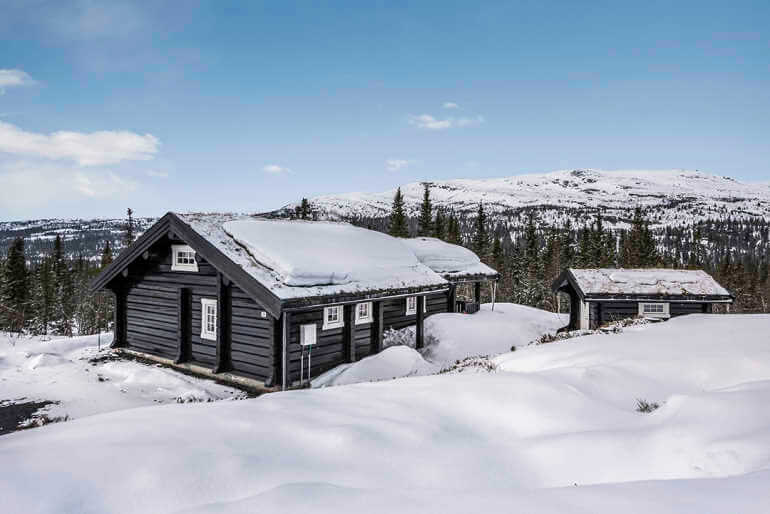
With that said, let’s get back to the tutorial and take a look at how to do a sky replacement in Photoshop. And in this case, replacing a winter sky!
More Than Industry Leading
Real Estate Photo Editing
PhotoUp is the end-to-end business platform for real estate photographers.

How to Do a Sky Replacement in Photoshop (10 Steps)
There are some basic steps you need to understand in Photoshop to achieve a beautiful, realistic sky replacement for your online real estate image, which we’ll walk through in this video tutorial.
If you don’t want to watch the video, you can read the text below.
Replacing a Winter Sky in Photoshop
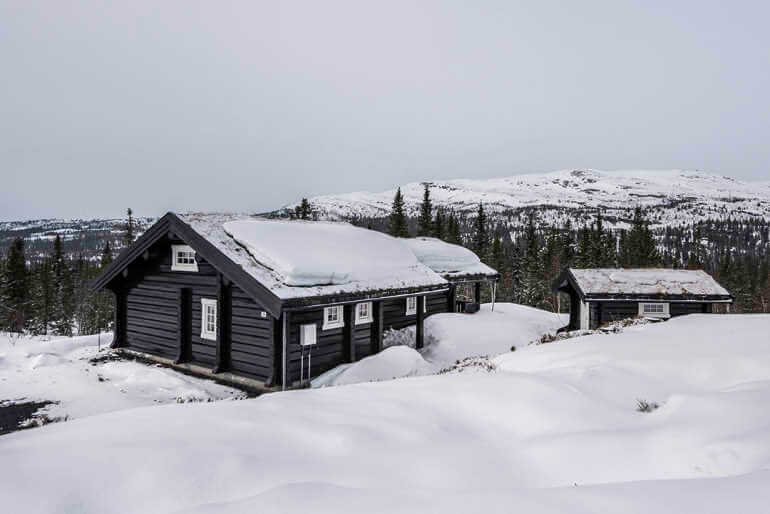
Before you begin, select a winter sky that you’d like to use as a replacement.
A pro tip is to scroll through stock photos or your own images until you find the kind of sky you’re looking for.
Alright, let’s get started!
Step 1. In Lightroom, start by doing the usual basic adjustments to the photo. Make sure that the snow in your photo has a neutral color that’s not too cold or too warm.
Step 2. Move the photo into Photoshop by right-clicking on the image and selecting Edit in Photoshop.
Step 3. Now, duplicate the photo. Go to the channel tab, and duplicate the Blue channel, as that will help you to process the sky replacement.
Step 4. Adjust the level by pressing CTRL + L on the keyboard. And move the slider to adjust the levels until you’re satisfied.
Step 5. Next, you want to make the Non-Sky area black for easy contrast. (Pro-tip, use a Dodge brush to lighten up the sky for easy selection).
Step 6. In the next step, you want to load that channel as a selection. Once you’ve loaded the channel, hold down the ALT button while clicking the Masking button.
Step 7. Import the sky you’ve chosen into Photoshop as a layer, and place it underneath the duplicate layer you created earlier. Then, adjust its position to look natural.
Step 8. For best results, add a white gradient on the horizon by adding a new blank layer on top of the sky replacement layer.
Step 9. Finally, use a Gradient Tool (G) with a white foreground, which will blend the sky nicely into the mountain view.
Step 10. When you are done, save the new image.
As simple as that!
That’s the basic process of how to do a sky replacement in Photoshop.
Enhance Your Real Estate Photographs With PhotoUp
If you’re looking to do a sky replacement, but don’t have the time or the expertise to learn Photoshop yourself, PhotoUp’s professional real estate photo editors will do it for you in a heartbeat.
Browse Top Dedicated
Real Estate Photo Editors
Ready-to-hire editors for real estate photo editing, and more.
All you need to do is sign up for a free account, place your first order, and your photographs will be delivered in less than 24 hours.
We’ll be more than happy to take that task off your plate while using all the tools at our disposal to make your real estate images look better than ever.
User-Friendly & Intelligent Platform
With PhotoUp’s user-friendly software, you can easily upload and receive photos, send instructions, and leave feedback.
It also allows you to track and manage team members and clients, and deliver photos directly to your clients.
Here’s how to get started with PhotoUp:
Step 1. Sign up for a free PhotoUp account.
Step 2. Upload your photos to our easy-to-use software.
Step 3. Choose the level of editing that you need and provide instructions (optional).
Step 4. Wait for PhotoUp professional editors to edit and return the photos in less than 24 hours (48 hours for virtual staging).
Step 5. Download and start using your beautifully edited photos.
PhotoUp Real Estate Photo Editing Uploader Demo
Watch how easy it is to get started with PhotoUp in our real estate photo editing uploader demo:
It’s as easy as 1-2-3!
PhotoUp Offers More Than Just Editing
PhotoUp offers so much more than just editing! We are a complete one-stop-shop for real estate marketing services and also provide powerful tools such as:
You can find everything you need to enhance and market real estate photography in one user-friendly software.
Get started with PhotoUp today and create the kind of real estate photos that lead to valuable sales.
Did we mention that you get 5 free credits you can use on any of our services when signing up for an account?
We hope you found this guide on how to do a sky replacement in Photoshop useful. Before you go, you may also want to check out the following resources:

