


Table of Contents
- What to Emphasize in Real Estate Photo Editing
- What to Avoid in Real Estate Photo Editing
- Striking the Right Balance: Realism Meets Enhancement
- Bonus: Real Estate Photo Edits That Add Extra Shine
- Want to Take Your Real Estate Photos to the Next Level?
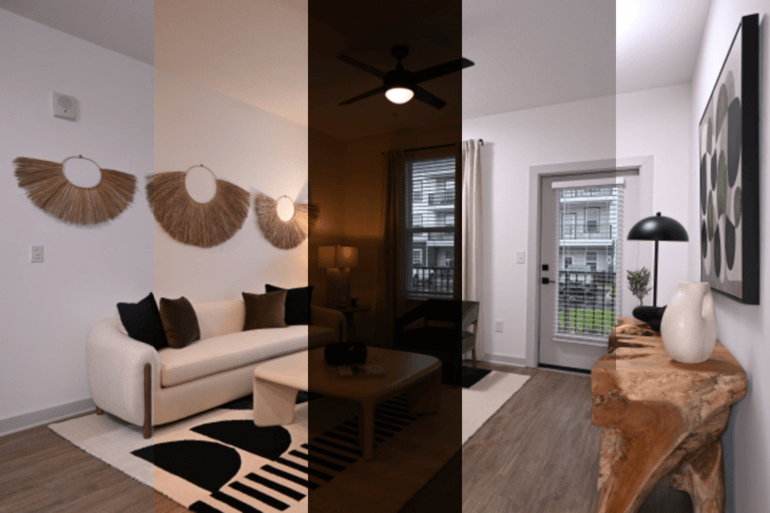
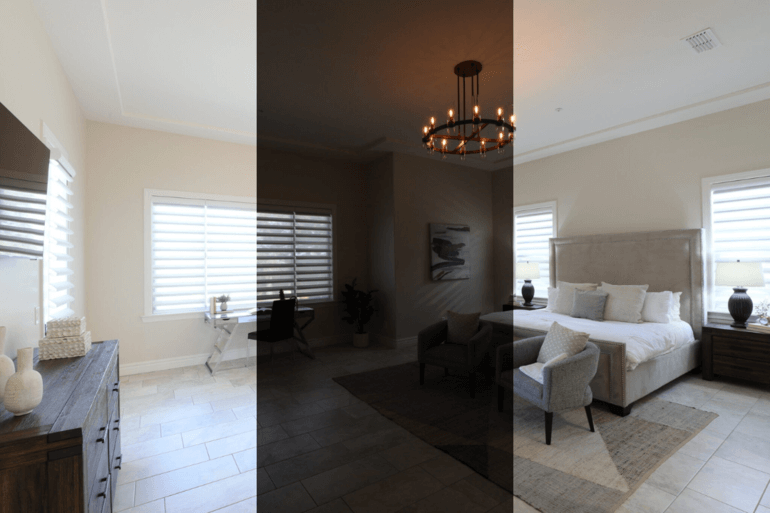
In today’s market, real estate photo editing isn’t just a nice-to-have—it’s essential.
But great real estate photo editing isn’t about over-the-top enhancements or dramatic filters. It’s about knowing what to emphasize and what to tone down to showcase the property at its best while maintaining authenticity and compliance with real estate marketing standards.
In this article, you’ll learn what to highlight, what to dial back, and why balance is the key to stunning and effective real estate photography.
Let’s begin by taking a look at what to highlight when editing property photos.
What to Emphasize in Real Estate Photo Editing🌟
Professional visuals can help homes sell 32% faster and at higher prices, as buyers are more likely to be drawn to listings that showcase properties in the best possible light.
When editing real estate images, the goal is to enhance the home’s best features without misrepresenting the property.
Here’s what you should bring into focus:
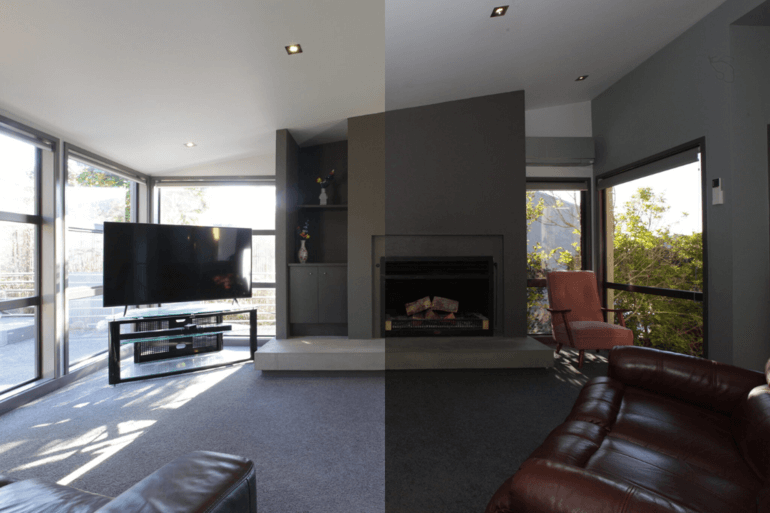
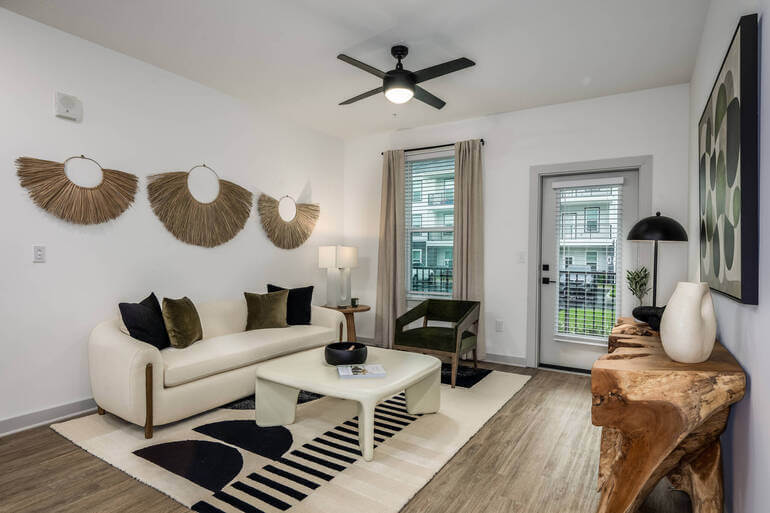
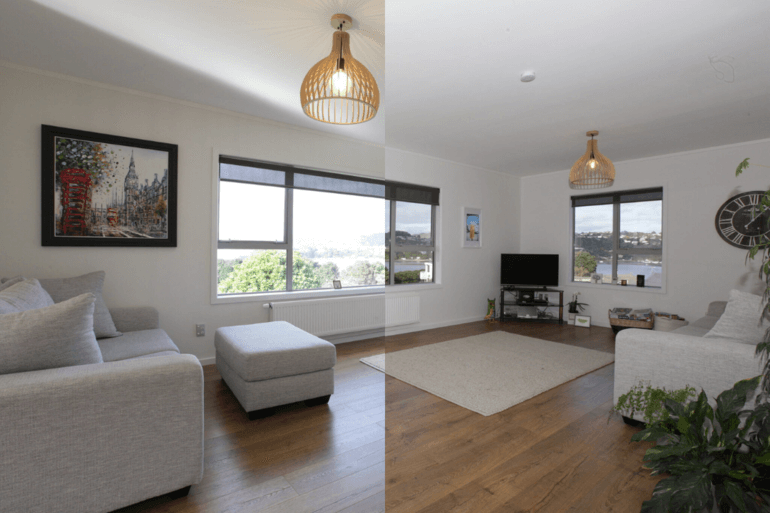
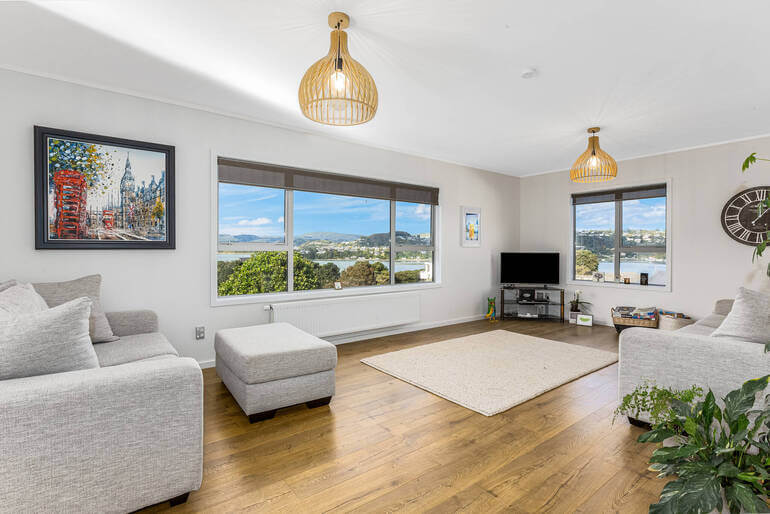
1. Natural Lighting & Brightness
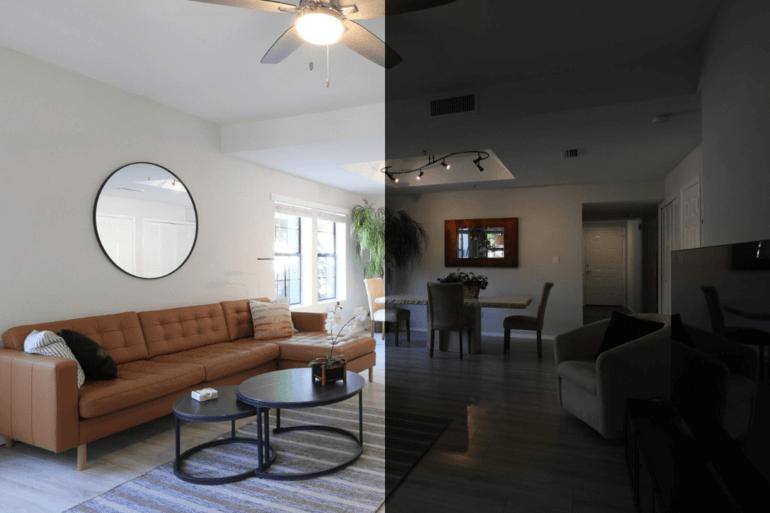
Bright, naturally lit spaces feel more welcoming and spacious. Dim or uneven lighting can make even the most beautiful homes look gloomy.
Consider this editing approach for natural and well-lit real estate photos:
- Use exposure and brightness tools to lift dark areas while avoiding overexposure
- Adjust white balance for accurate color tones
- Additionally, use HDR (High Dynamic Range) editing to balance shadows and highlights, especially for interior shots with windows
Always keep lighting looking natural. Artificial brightness can make walls look washed out or surfaces over-sharpened.
Here are some tutorials that can help you achieve the correct brightness and bring out the details in your photos:
- How to brighten a photo in Photoshop
- How to adjust white balance in Photoshop
- How to easily edit HDR real estate photos
2. Sharpness & Clarity
Clear, crisp photos symbolize professionalism and give buyers a sense of detail and quality. Blurry or grainy images create doubt and disinterest.
Do this to sharpen your images:
- Apply sharpening selectively—focus on key architectural elements like windows, cabinetry, or flooring
- Avoid over-sharpening, especially in wide shots, which can create unnatural halos around objects
Use clarity and structure tools with moderation to avoid making materials like wood or stone appear fake or overly gritty.
For more details, check out our guide on how to fix pixelated pictures in Photoshop.
3. Color Accuracy and Enhancement
Accurate colors are the backbone of real estate photo editing. It helps buyers understand the home’s true palette, while subtle enhancements make photos more vibrant and appealing.
Use this editing approach:
- Calibrate colors to reflect how the space looks in real life
- Slightly enhance greens in landscaping or blues in the sky to add visual pop
- Tone down overly saturated wall colors indoors that may distract from the room itself
Consistency across images in a listing matters. If the living room walls appear beige in one photo and gray in another, it may confuse or mislead buyers.
Here are some guides that can help you ensure accurate colors and captivating real estate photos:
- How to color correct in Photoshop
- How to make grass green in Photoshop
- How to do a sky replacement in Photoshop
- Removing Color Cast in Photoshop Using 2 Simple Techniques
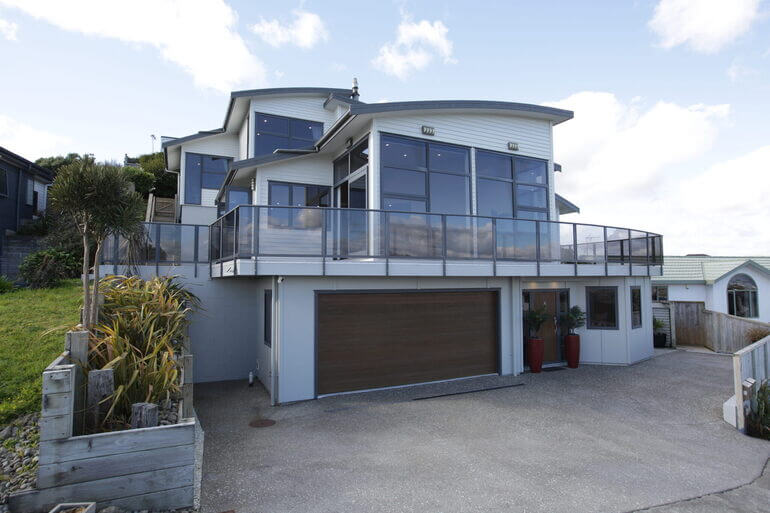
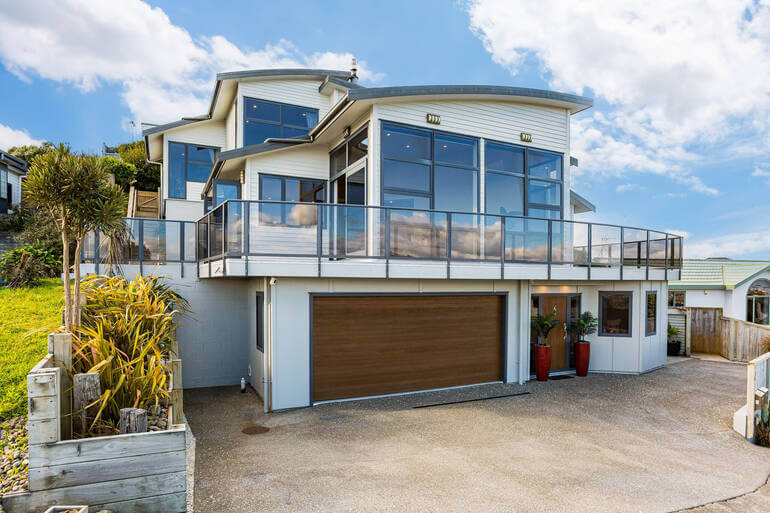
4. Sky and Window Views
A clear blue sky or a sunset scene elevates curb appeal. Similarly, showing pleasant views through windows can make interior spaces more desirable.
Do these edits to create stunning exterior shots and beautiful indoor window views:
- Replace dull or overcast skies with realistic, high-quality sky replacements—stick to clear blue skies for daytime or warm tones for twilight shots
- Use window masking to reveal scenic outdoor views while reducing glare
Avoid dramatic skies with lightning, auroras, or overly saturated sunsets—they can feel fake and violate real estate photography ethics.
To help you edit perfect skies and window views, you can check out these tutorials:
- How to replace a summer sky in Photoshop
- How to edit a day to dusk image
- How to mask windows in Photoshop
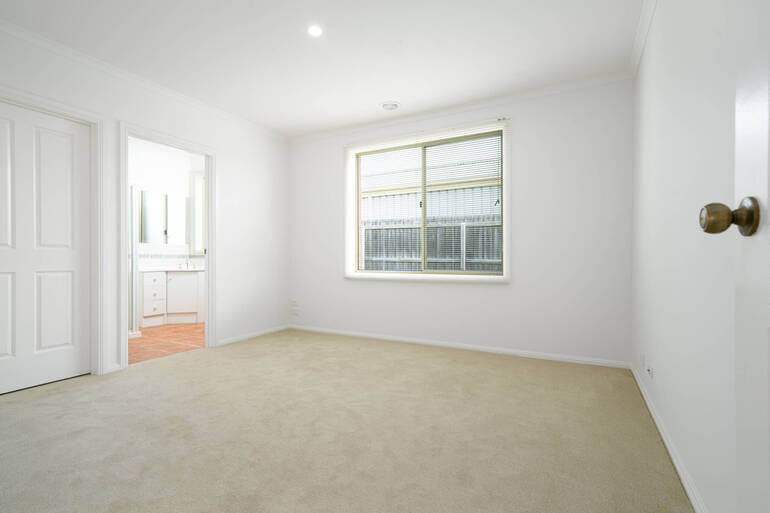
5. Cleanliness and Visual Flow
Clean, uncluttered visuals help buyers envision themselves in the space. Clutter or distractions break the mental flow and diminish appeal.
Other people’s personal belongings can feel off-putting to buyers who have a vision for their future home in mind.
Here are some great editing tips to help you clean up your photos and create a good visual flow:
- Remove temporary items like trash cans, wires, magnets on fridges, or pet bowls using object removal tools
- Smooth out wrinkled bedspreads or dirty floors with retouching
- Straighten vertical and horizontal lines for balanced, symmetrical compositions
Be cautious not to remove permanent or structural elements that could mislead buyers (like columns, air conditioning units, or fencing).
Check out these guides to learn how to perform these powerful edits:
Now that you know what to emphasize when editing your real estate photography, let’s take a look at what to avoid.
Have You Ever Thought To
Outsource Photo Editing?
Try it today with 5 free edits from three professional photo editors.

What to Avoid in Real Estate Photo Editing🚫
While enhancement is crucial, knowing what to avoid or dial back is just as important to maintain trust and authenticity.
Here are some issues to avoid or tone down in post-processing:
1. Over-Saturation
Oversaturated photos can look cartoonish and misrepresent the property. Bright reds, neon greens, or glowing blues are a turnoff.
Common Mistake: Trying to make everything “pop” with heavy saturation often backfires—especially on walls, plants, and furniture.
Better Strategy: Use vibrancy instead of saturation for a more controlled and natural color lift.
2. Unrealistic Sky Replacements
While a sunny and natural-looking sky can improve a shot, exaggerated or “fantasy” skies are misleading. Purple sunsets, starry skies, or auroras are inappropriate.
Common Mistake: Using the same dramatic sky replacement for every listing regardless of time of day or weather.
Better Strategy: Choose sky replacements that match the natural lighting and direction of shadows in the photo.
3. Overly Perfect Surfaces
Polishing floors or walls to glass-like perfection may raise red flags. Buyers expect some natural wear in lived-in homes.
Common Mistake: Excessive use of skin-smoothing-like tools on hardwood floors, countertops, or bricks.
Better Strategy: Enhance textures naturally and remove only temporary imperfections like scuffs or stains—not the character of the material itself.
4. Artificial Lighting Effects
Adding fake lights, glow, or heavy vignettes may give the photo a surreal or dated feel.
Common Mistake: Adding “lens flares” or spotlight effects to make a room appear brighter or fancier than it is.
Better Strategy: Use natural light editing techniques or soft fill lighting to maintain realism.
5. Furniture or Structural Misrepresentation
It’s unethical and non-compliant to alter permanent structures or remove obstacles like walls, beams, or built-ins.
Common Mistake: Using Photoshop to make small rooms look bigger by moving walls or resizing furniture.
Better Strategy: Use wide-angle lenses and proper perspective correction during shooting. AI Virtual staging can also help, but it must be disclosed clearly in the listing.
Avoiding these editing mistakes will help you align with the ethical guidelines of real estate photo editing and avoid disappointing potential buyers.
Striking the Right Balance: Realism Meets Enhancement
The best real estate photo edits make you look twice, but don’t make you question what’s real.

Buyers want to be inspired, but they also want honesty. By emphasizing the right features and toning down distractions without misleading, photographers and editors build trust with agents and clients alike.
Here are a few golden rules to follow:
- Less Is More: Subtle edits are often the most powerful
- Consistency Is King: Cohesive edits across all images help tell a unified visual story
- Compliance Counts: Follow MLS rules and ethical guidelines—don’t remove or misrepresent
By striking the right balance between enhancement and authenticity, your edits won’t just impress—they’ll earn buyer confidence and elevate your reputation in the market.
If you feel unsure about how to follow MLS rules, check out our blog post on how to ensure legal compliance in real estate photo editing.
Bonus: Real Estate Photo Edits That Add Extra Shine🪴
Listings with high-quality visuals receive 118% more online views compared to those with lower-quality images.
To ensure images that pop, here are some commonly used, compliance-friendly edits that enhance photos without overstepping:
| Day-to-Dusk Editing: Convert a daytime photo into a warm, glowing twilight image. Great for curb appeal! |
| Lawn Enhancement: Add greener grass or patch up brown spots for a healthy, vibrant lawn. |
| Fireplace Enhancement: Add a cozy fire in fireplaces (with transparency) for warmth and ambiance. |
| TV Screen Replacement: Add a nature or neutral image to turned-off TVs for a polished finish. |
| Decluttering Edits: Remove unnecessary objects to make spaces feel more open and natural. |
Final Thoughts: Editing That Sells
Real estate photo editing is both a craft and a strategy. The smartest editors know that great listings come from showcasing what’s already wonderful about a property—and subtly enhancing it to inspire buyers without distorting reality.
When done right, edited photos spark emotional reactions, create mental ownership, and get more clicks, tours, and offers. When done poorly or unethically, they create disappointment and mistrust.
So whether you’re a photographer, editor, or real estate agent, remember: edit with honesty, enhance with care, and always aim for that sweet spot where beauty meets truth.
Have You Ever Thought To
Outsource Photo Editing?
Try it today with 5 free edits from three professional photo editors.
Want to Take Your Real Estate Photos to the Next Level?🎯
Partnering with a professional editing team like PhotoUp ensures your photos strike the perfect balance between enhancement and authenticity—without sacrificing turnaround speed or compliance.
Our team of professional photo editors can help you with the following edits:
- Exposure and color correction
- Advanced object removal
- Perspective correction
- Noise reduction and image sharpening
- Lawn greening and landscape enhancement
- HDR editing
- Manual blending
- Panorama stitching
- Flambient editing
- And much more!
We can help you with any type of editing, no matter how small or large, or complex, with a fast turnaround time of 12-24 hours.
Why Choose PhotoUp?
Here are some reasons why you should consider outsourcing your editing to PhotoUp:
✔ Affordable Pricing – Starting at just $1.50 per image for on-demand editing, PhotoUp provides budget-friendly editing solutions for real estate professionals.
✔ Fast Turnaround Times – Get professionally edited images back in less than 24 hours, ensuring quick and efficient marketing.
✔ Advanced Editing Techniques – From virtual staging and sky replacements to twilight conversions and HDR blending, PhotoUp offers a wide range of editing services tailored to real estate photography.
✔ User-Friendly Platform – Easily upload images, manage orders, and provide feedback through PhotoUp’s intuitive online system.
✔ Dedicated Support – PhotoUp’s team of expert editors and customer service professionals ensures high-quality results and personalized service.
✔ Access to Dedicated Editing – With a Dedicated Editor, you get access to an editor or team of editors who are 100% dedicated to your business and learn your style. This ensures maximum image consistency, which can help you improve your brand.
Wait! There are more reasons to choose PhotoUp…
Browse Top Dedicated
Real Estate Photo Editors
Ready-to-hire editors for real estate photo editing, and more.
Real Estate Marketing Ecosystem

Furthermore, PhotoUp has built an entire ecosystem around real estate photography. We also offer other powerful marketing services like:
We have everything you need to enhance and market real estate photography in one user-friendly software!
How to Get Started
If you’re wondering how to get started with PhotoUp, it’s super easy!
Here’s all you need to do:
Step 1. Sign up for a free PhotoUp account.
Step 2. Upload your photos to our easy-to-use software.
Step 3. Choose the level of editing that you need and provide instructions (optional).
Step 4. Wait for PhotoUp professional editors to edit and return the photos in less than 24 hours (48 hours for virtual staging).
Step 5. Download and start using your beautifully edited photos.
PhotoUp Real Estate Photo Editing Uploader Tutorial
To see how easy it is to get started with PhotoUp, check out our real estate photo editing uploader tutorial:
As simple as that!
Let your next listing shine—with the right emphasis and just the right touch of restraint.
Sign up for a free PhotoUp account today and take your real estate photos to the next level!
For a limited time, you’ll receive a bonus of 10 free credits you can use on any of our services when signing up for an account.
We hope this blog post helped you learn what to emphasize and tone down in real estate photo editing for stunning listings. Before you go, you may also want to check out the following resources:

