


Table of Contents
- What Causes Pixelated and Grainy Pictures?
- How to Fix Pixelated Pictures in Photoshop (2 Effective Ways)
- How to Quickly & Easily Reduce Noise in Photoshop
- Pixelated Pictures FAQ
- Leave the Real Estate Photo Editing to PhotoUp!
Don’t let pixelated photos ruin the beauty of your listing! Poor printing, downloading, and resizing, as well as poor light conditions, can lead to distracting distortions.
But fear not, we’re here to show you how to fix those pixelated and grainy pictures in Photoshop.
With these simple tricks up your sleeve, your real estate shots will always look sharp and stunning. But before we get into the nitty-gritty, let’s take a look at what causes pixelated pictures.
What Causes Pixelated and Grainy Pictures?
As a real estate photographer, it’s important to understand the concept of digital image quality. Images are composed of tiny square dots called pixels, and their size and density determine the level of detail.
High-resolution images are known for their greater detail and clarity. However, pixelation can occur when an image loses resolution, resulting in a blocky and distorted appearance.
This becomes noticeable when you zoom in on an image and see blurry, blocky squares as the individual pixels.


There are several reasons why images can lose resolution and become pixelated, including:
- Downloading Low-Res Images: When you download an image from a remote location to your device, it may appear pixelated if the original image has a low resolution. And displaying it on high-resolution screens or enlarging it exacerbates this issue.
- Compressed Images: Image files are often compressed to reduce their size for storage and faster downloading. However, heavy compression can lead to a significant loss of image details, resulting in pixelation.
- Resizing Images: Increasing the dimensions of an image requires interpolation of existing pixels to fill in the additional space. This process reduces the overall resolution and leads to a loss of image detail, also causing pixelation.
- Bad Printer Settings: Scaling up an image to fit different print dimensions may result in interpolation by the printer, leading to pixelation and loss of image quality. Selecting lower print quality settings can also contribute to reduced sharpness and clarity, resulting in pixelation.
It’s crucial to be aware of these factors and take the necessary steps to avoid pixelation if you want to ensure high-quality images for your clients.
How to Fix Pixelated Pictures in Photoshop (2 Effective Ways)
As mentioned, blurred and grainy images can have a multitude of negative effects on the quality of your real estate photography.
Luckily, there are some quick and easy solutions to fix pixelated photos using Photoshop. So, let’s dive in and explore two methods to fix a pixelated image in Photoshop.
We’ll also show you how to reduce noise in an image, which is another factor that will lower the quality of your images.
1. The Gaussian Blur Method
Let’s start by using the Gaussian Blur Method to fix those pesky pixels.
Step 1. To get started, launch Photoshop and Open your pixelated image.
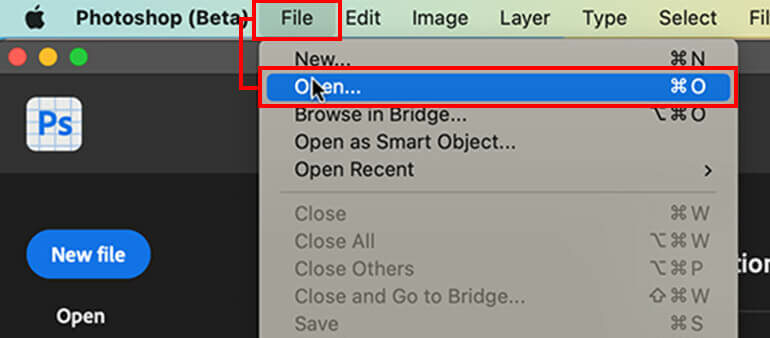
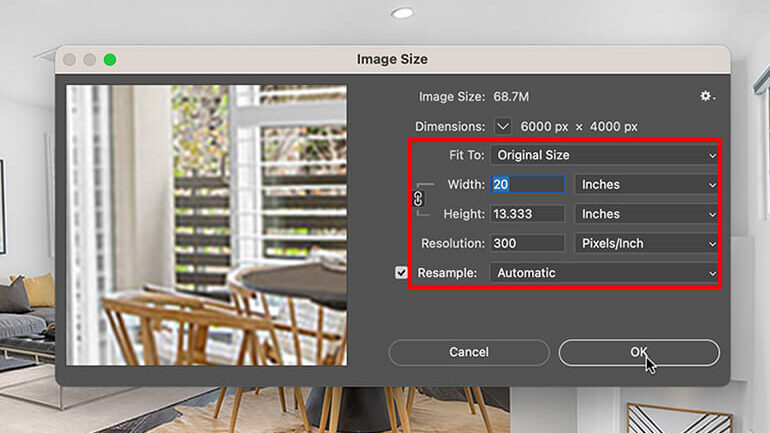
Step 2. Now, you need to resize your image. Go to Image and click on Image Size.
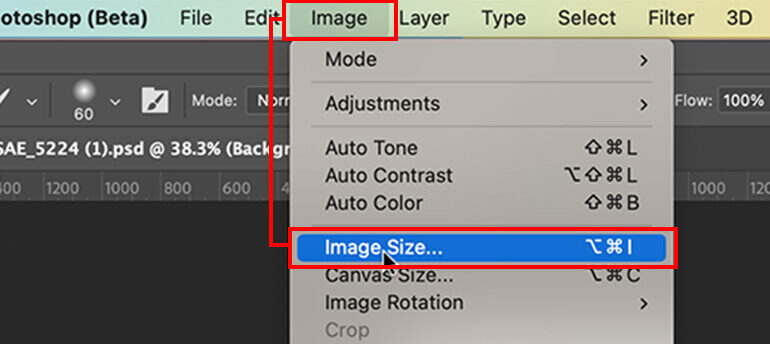
Increase the size by entering higher values in the dialog box. Ensure that the values align with your image requirements.
Step 3. Duplicate the Layer to preserve the original image. Navigate to Layer, then click on Duplicate Layer.
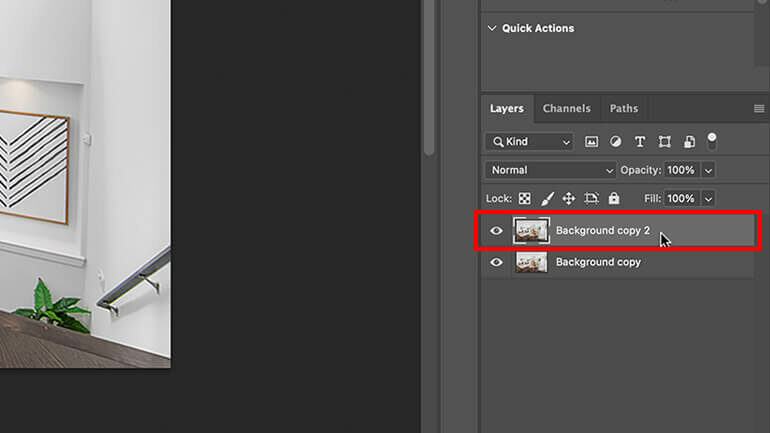
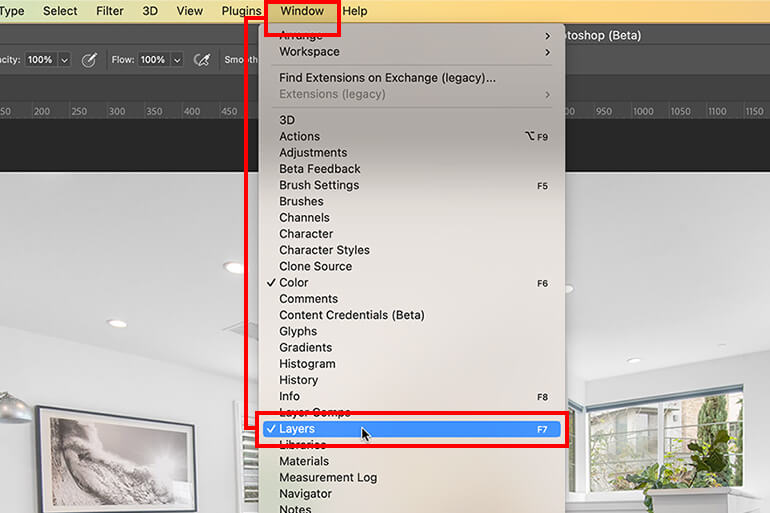
Step 4. Choose the duplicate layer from your Layers panel. If you can’t locate the Layers panel, you can go to Window and select Layers.

Step 5. Next, navigate to the Menu bar at the top of the workspace and click on Filter.
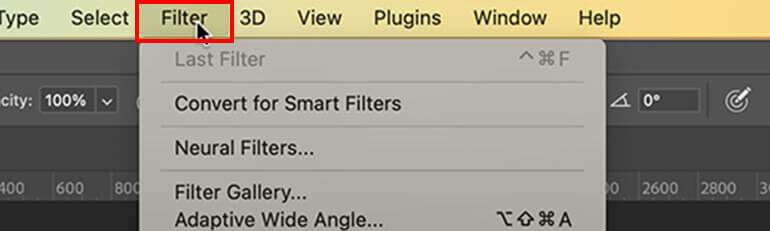
Step 6. From the drop-down menu, choose Blur and then select Gaussian Blur.
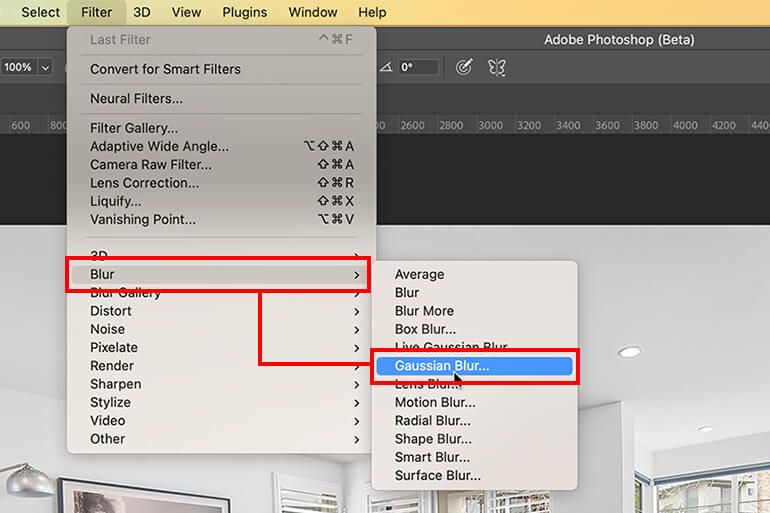
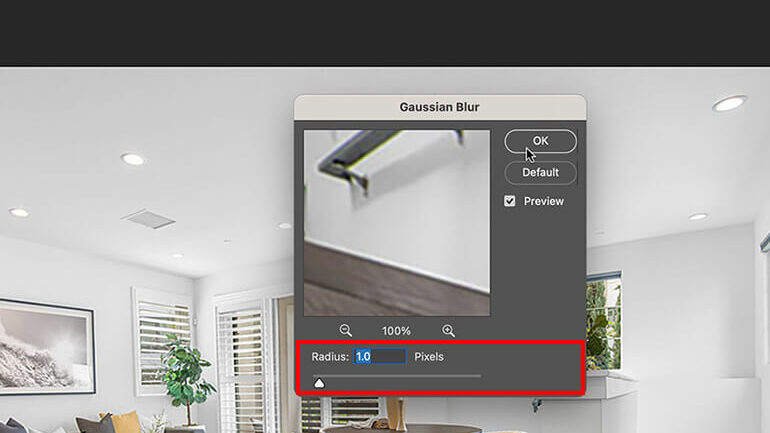
In the Gaussian Blur window, you can adjust the slider to achieve your desired smoothing effect. Once you’re satisfied, click OK.
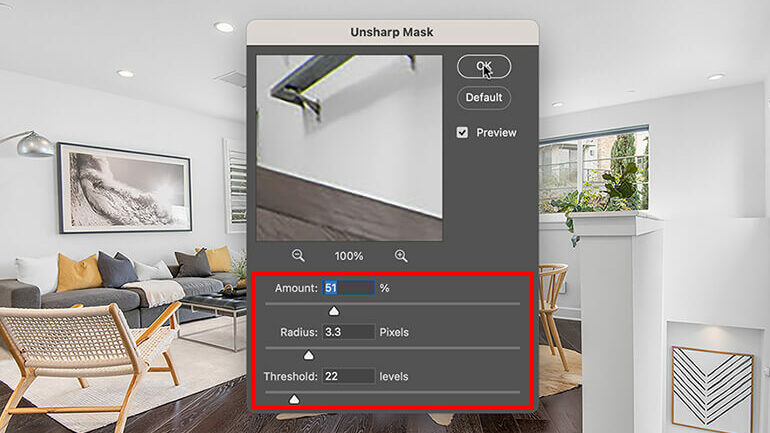
Step 7. Now, return to the menu, click on Filter again, and this time, choose Sharpen.
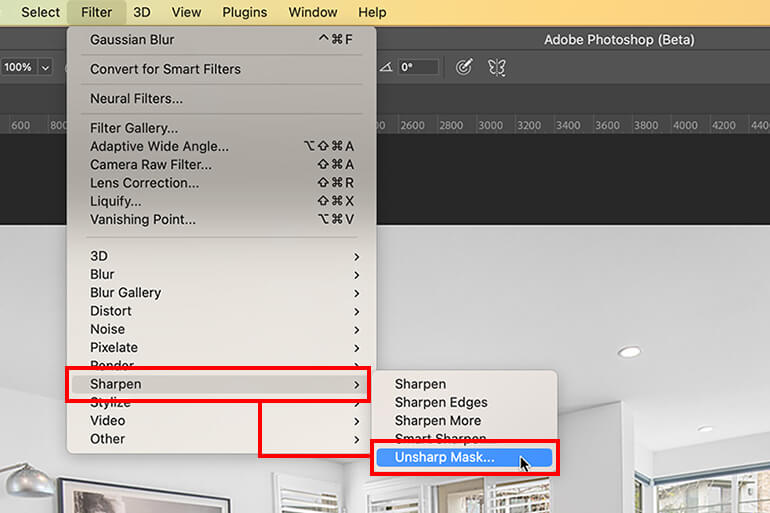
Step 8. Lastly, from the drop-down menu, select Unsharp Mask and fine-tune the scroll bar until you achieve the desired outcome for sharpening your image. Then, click OK.
Have You Ever Thought To
Outsource Photo Editing?
Try it today with 5 free edits from three professional photo editors.

2. The Sharpness Tool
We’ve already touched on this briefly, but let’s continue this tutorial by showing you how to fix pixelated pictures in Photoshop using the Shapness tool.
Step 1. Start by Duplicating the Layer to preserve the original image. Navigate to Layer, then click on Duplicate Layer.

Step 2. Now, choose the duplicate layer from your Layers panel. If you can’t locate the Layers panel, you can go to Window and select Layers.
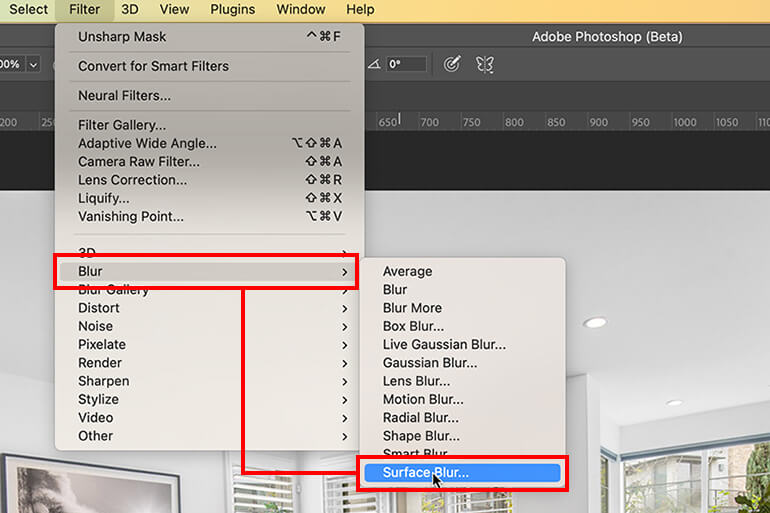
Step 3. Once you’ve chosen your duplicate layer, it’s time to apply Surface Blur. With the duplicate layer selected, click on Filter from the menu bar.
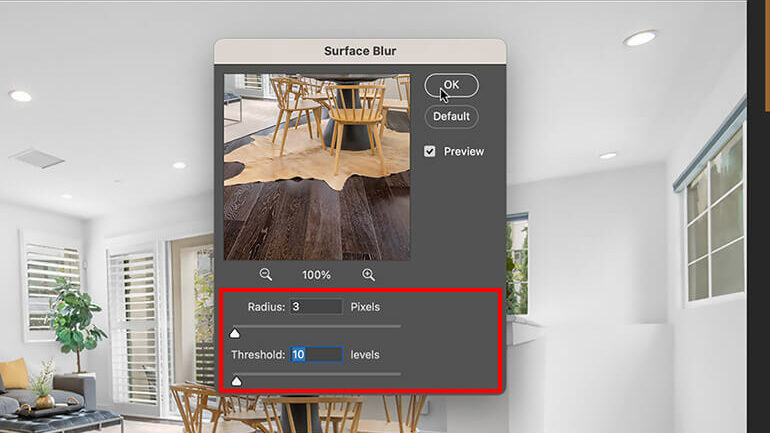
Choose Blur, and then select Surface Blur from the menu.
Adjust the blur by modifying the Radius and Threshold values. Once satisfied, proceed to the next step.
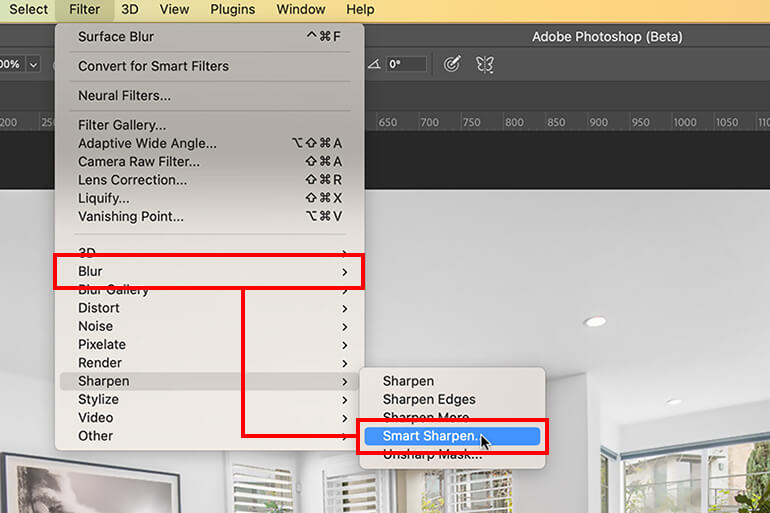
Step 4. It’s now time to enhance the Sharpness. Click on Filter in the menu bar. Then, navigate to Sharpen and select Smart Sharpen. Adjust the settings to refine the sharpness of your image.
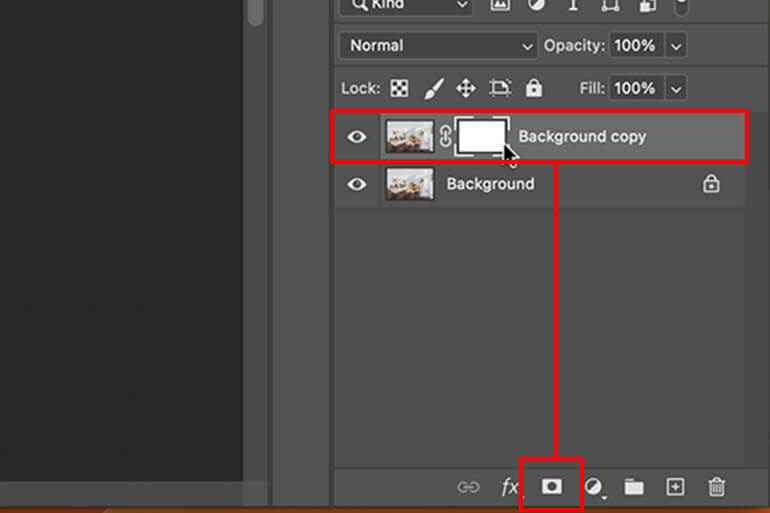
Step 5. Next, add a Layer Mask. A layer mask allows you to control the visibility of certain parts of the image. Locate the Layer Mask icon at the bottom of the Layers panel, and click on it to add a layer mask.
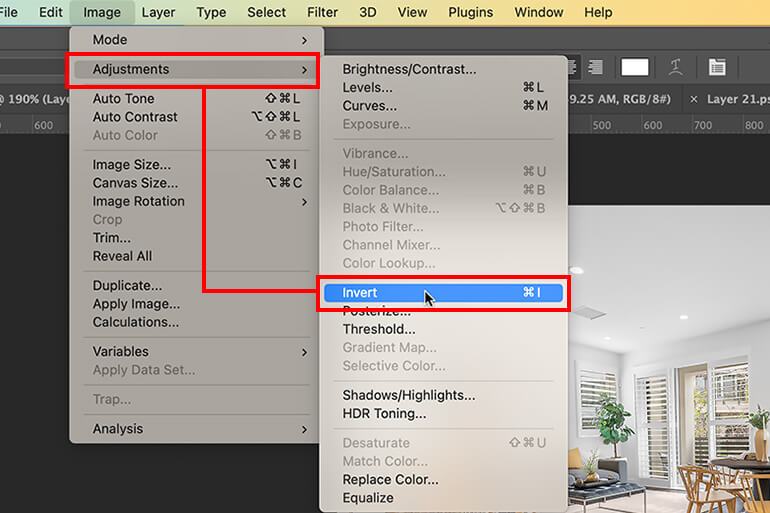
Step 6. Once you’ve added a layer mask, you need to invert it.
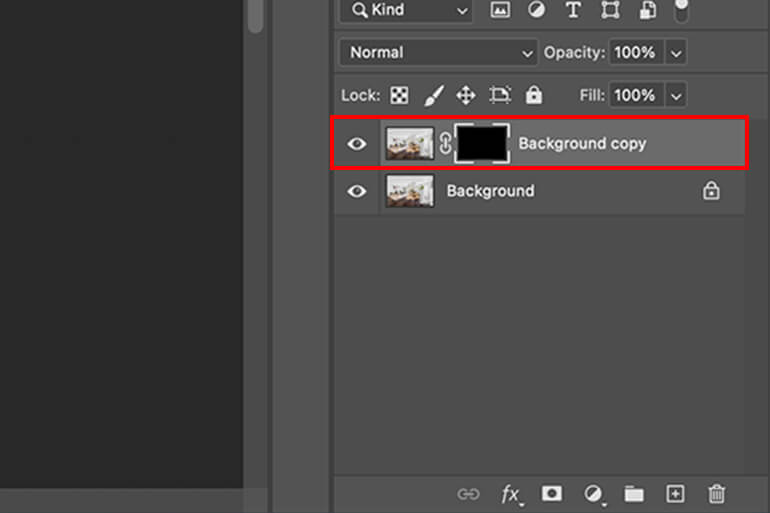
Invert the layer mask by going to Layer, choosing New Adjustment Layer, and clicking on Invert.
Step 7. In the next step, we’ll reduce Blurriness with the Brush tool. Select the Brush tool from the Toolbar and use it to reduce the blurriness of your image selectively.
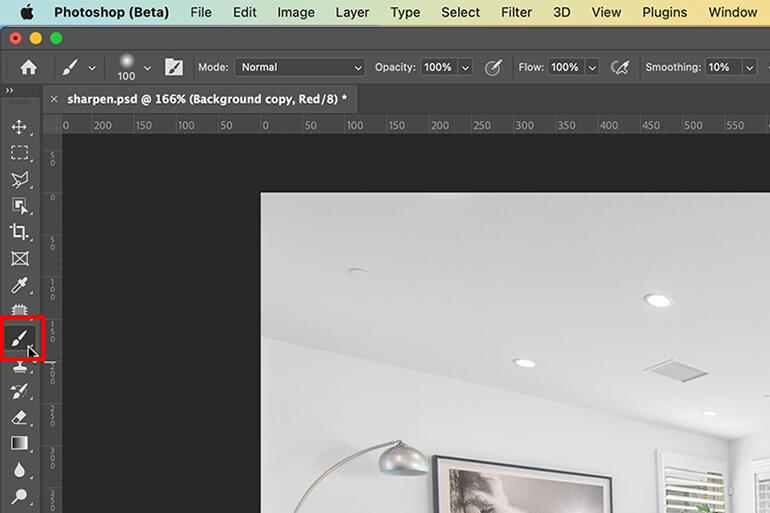
Lastly, you can also adjust the color balance if needed.
By following these steps, you can easily enhance the quality of your images using Photoshop’s Gaussian Blur and Sharpness features.
That said, another issue that can make your images look bad is noise, so let’s take a look at how to reduce noise in your real estate images next.
How to Quickly & Easily Reduce Noise in Photoshop
Dealing with image noise can be one of the biggest challenges for photographers. Image noise refers to those pesky random fluctuations in color and brightness that can ruin an otherwise crisp and stunning photograph.
It’s a common issue in digital photography, often caused by the camera’s sensor or image processing software.
To learn how to easily reduce noise in your images, you can either watch the video or continue reading the text below (the video starts with how to reduce noise in Lightroom, so if you want to see how to do it in Photoshop, you can just skip ahead to the 1:08 mark in the video):
Step 1. To begin, import the RAW photo into Photoshop. It will open with Camera Raw. Let’s now zoom in so we can see the noise.
Step 2. Next, go to Detail and Manual Noise Reduction. You will see the same sliders as in Lightroom. Bring Luminance to around 50 and see how it affects the photo.
Then, move it around to find the right amount for your photo. Click the drop-down menu for even more options and bring back some detail if necessary.
Step 3. Again, if you have color noise in your photo, you can reduce that using the Color slider.
Here’s a before and after comparison. This is the image before noise reduction.
And this is the image after noise reduction.

In addition, Photoshop also has a new feature where you can let AI do the noise reduction for you. Simply, click the Denoise button, and the noise will be reduced.
And that’s how you can quickly and easily perform noise reduction in Photoshop!
Follow these steps to enhance your real estate photos using Photoshop like a pro. Don’t forget to resize the image and utilize different tools to sharpen individual pixels.
Additionally, you can play around with exposure, contrast, light, and shadow adjustments to mask any remaining pixelated areas.
Pixelated Pictures FAQ
What makes a photo pixelated?
Pixelation occurs when an image is resized beyond its limits, resulting in blurry, blocky squares. These squares, known as pixels, are the building blocks of an image and contain color information.
However, as the image size increases, so does the pixel count, causing a loss of detail and distracting distortions.
What is the difference between blur and pixelated image?
Generally, a pixilated image will not appear blurry, with a few exceptions. Specifically, the fine lines that add contrast to the subject matter in an image do not appear crisp and clear – they lack that desired sharpness and look jagged.
A blurry print simply is a print that looks blurry due to the image being out of focus.
How do you prevent grainy blurry or pixelated images?
To avoid pixelated or grainy images, you should, first of all, invest in a quality camera and use uncompressed RAW image format. You can also try to lower your ISO when shooting, ensure proper lighting situations, shoot or expose to the right, and more.
For more information, you can visit our blog post on 7+ best ways to reduce noise in photos.
What is the relationship between resolution and image noise?
The ratio measurement directly impacts the amount of noise in the image. When there’s noise in a cross-sectional image, it ultimately diminishes the overall picture quality while also impeding the contrast resolution.
High-Quality & Consistent
Real Estate Photo Editing
Hire a dedicated editor with performance metrics from $7/hour.
Leave the Real Estate Photo Editing to PhotoUp!
If you don’t have the skill or time to do the photo editing yourself, don’t worry!
PhotoUp’s team of professional real estate photo editors can quickly enhance and clean up your images, making them look their best.
With our advanced photo-editing software, keen attention to detail, and artistic expertise, we’ll help you achieve stunning, high-quality images.
Our skilled photo editors can help with the following issues:
- Improper exposure levels
- Harsh shadows, lack of light, etc.
- Blurred images that were taken without a tripod
- Images that need cropping or other effects
- Lawn greening and sky replacements
- Twilight and day-to-dusk editing
- Manual blending and pano stitching
- Clutter and advanced object removal
- Line and angle corrections
- And much more!
Browse Top Dedicated
Real Estate Photo Editors
Ready-to-hire editors for real estate photo editing, and more.
Getting started is simple.
All you need to do is sign up for a free PhotoUp account, upload your images, provide us with your instructions, choose your export settings and turnaround time, and lastly, download your beautifully edited images!
Best yet, our real estate photo editing service is affordable, starting at the low cost of $1.10 per image depending on your subscription and complexity level.
PhotoUp Real Estate Photo Editing Uploader Demo
To see how easy it is to get started with PhotoUp, check out our real estate photo editing uploader demo:
It’s really that simple to get beautifully edited images returned to you in less than 24 hours!
Furthermore, PhotoUp offers so much more than just real estate photo editing…
Your Real Estate Marketing Partner

PhotoUp is a complete one-stop-shop for real estate marketing and also offers services such as:
- AI Virtual staging
- Virtual house tours
- Home walk-through videos
- Single property websites
- And Property flyers
We have everything you need to edit and market real estate under one roof!
So, what are you waiting for?
Sign up for a free PhotoUp account today, and let us help you enhance the quality of your images!
Plus, for a limited time, we even offer you 5 free edits when signing up for an account.
We hope this blog post helped you learn how to fix pixelated pictures as well as reduce noise in Photoshop. If you found this tutorial useful, you may also want to check out the following resources:

