


Table of Contents
- Why Is Real Estate Photo Editing So Important?
- The Ultimate Real Estate Photo Editing Checklist
- Real Estate Photo Editing Tools and Services
- Bonus Tip: Don’t Do It All Yourself – Use PhotoUp!
In real estate photography, capturing a great shot is only half the battle. To ensure every detail is perfect, use a photo editing checklist to help you transform good photos into great marketing tools.
Whether you’re a seasoned real estate photographer or an agent taking your own listing photos, photo editing is where raw shots become polished, persuasive visuals.
To help you achieve that, we’ve created the ultimate real estate photo editing checklist. This guide will walk you through everything from basic corrections to advanced enhancements so that you can deliver perfect property photos every time.
Why Is Real Estate Photo Editing So Important?

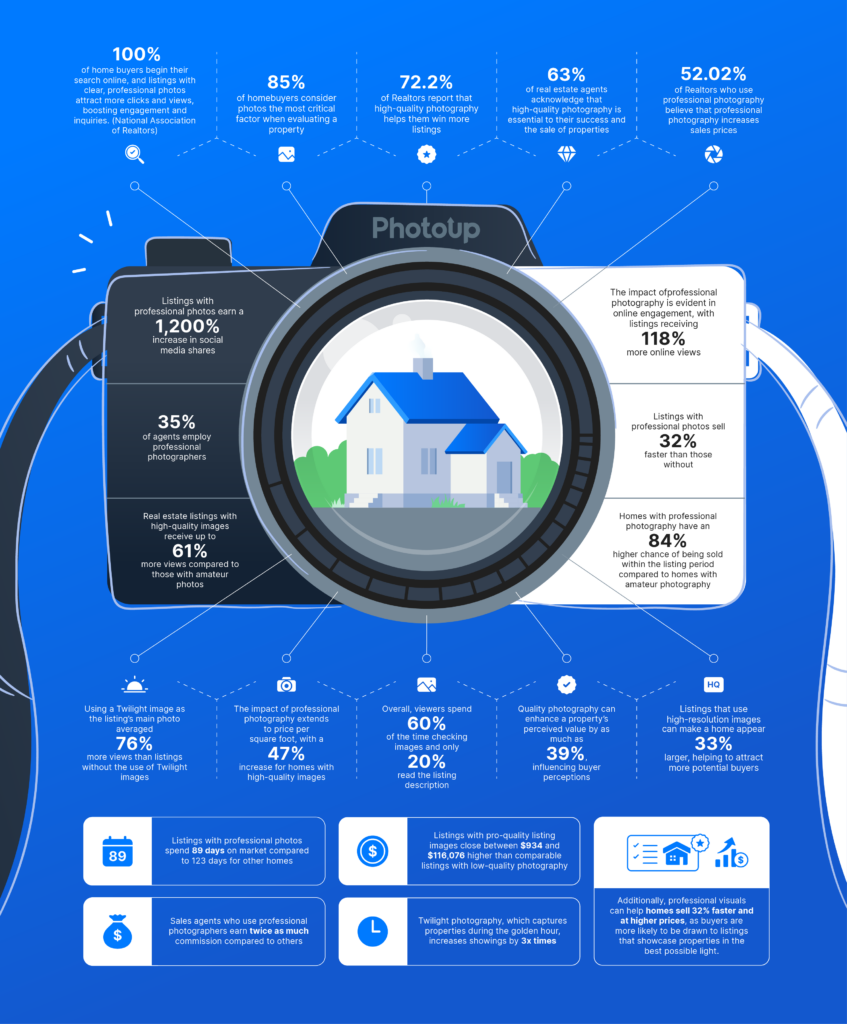
Before diving into the checklist, it’s crucial to understand the why behind real estate photo editing. Here are some key benefits to consider:
| Increased Buyer Engagement: Edited photos help listings get more clicks, shares, and showings. High-quality photos attract significantly more attention, with homes receiving 118% more online views compared to those with lower-quality images. |
| Faster Sales: According to studies, homes with professional-quality photos sell faster and often for a higher price. Professional visuals can help homes sell 32% faster and at higher prices, as buyers are more likely to be drawn to listings that showcase properties in the best possible light. |
| Better Branding: High-quality visuals build credibility and make agents or agencies look professional. 63% of real estate agents acknowledge that high-quality photography is essential to their success and the sale of properties. |
| Time Savings for Agents: Photographers who deliver polished photos reduce the workload of real estate professionals. Another aspect to consider is the fact that sales agents who use professional photographers earn twice as much commission compared to others. |
Here are some other compelling real estate statistics that showcase the impact of professionally edited listing photos:
With these compelling benefits in mind, it’s clear that investing in real estate photo editing isn’t just about aesthetics—it’s a strategic move that drives results.
Let’s now dive into our photo editing checklist!
The Ultimate Real Estate Photo Editing Checklist
Real estate photo editing isn’t just about slapping on a filter or boosting brightness. There’s an art and science to it.
This ultimate photo editing checklist will provide you with 20 editing techniques and steps to ensure high-quality, captivating real estate photography.
1. To Get Started, Organize and Back Up Files

Organizing and backing up files ensures no images are lost and your workflow stays efficient. Before starting any editing, we recommend that you:
- Organize images into property-specific folders
- Rename files logically (e.g., 123MainSt_LivingRoom_01.jpg)
- Back up original RAW files to avoid data loss
A well-organized file system saves time during editing, reduces stress, and ensures every photo needed for the listing makes it to the final gallery—important when buyers are browsing for specific features (e.g., updated bathrooms, backyard views).
2. Select Your Best Shots

Only high-quality, well-composed shots should make it into the final listing. From hundreds of images, select only the best:
- Sharp, well-composed shots with good lighting
- A variety of angles showing full rooms and flow
- Photos that highlight key selling points like views, updated kitchens, or open floor plans
- Avoid redundancy—quality beats quantity
Buyers make judgments within seconds. A curated set of striking images grabs attention and keeps users scrolling. Too many mediocre images, however, may overwhelm or disinterest viewers.
3. Straighten Horizons and Correct Perspective for Natural-Looking Images


To ensure vertical and horizontal lines—like walls and countertops—look straight and true. This is especially important for interiors with tight spaces.
Uneven horizons or distorted walls are telltale signs of amateur photography. That said, make sure to adjust this using:
- Transform tools in Lightroom or Photoshop to straighten vertical and horizontal lines
- Perspective correction for wide-angle lens distortion, making walls appear straight and true
Crooked lines can make a space feel unstable or visually uncomfortable, even subconsciously. Correcting them enhances professionalism and helps viewers trust what they see.
To learn how to do perspective correction, you can check out our video tutorial on how to straighten verticals in Photoshop:
4. Crop and Align Your Images to Improve Composition and Remove Distractions


Crop your images to improve composition, eliminate distractions, and emphasize important features. Proper alignment ensures visual consistency across the listing.
Keep in mind:
- Rule of thirds
- Avoid cutting off architectural features
- Maintain uniform aspect ratios (3:2, 4:3, or square for certain platforms)
A clean, focused image draws attention to key selling points—like a fireplace, vaulted ceiling, or open-concept kitchen. Balanced framing feels more natural to buyers.
To learn how to properly crop your images, check out our tutorial video on how to scale an image in Photoshop without distorting:
5. Adjust Exposure and Contrast for Balanced and Inviting Images


It’s crucial to adjust exposure and contrast to ensure that details are visible and lighting feels balanced and inviting.
Even with perfect lighting, minor tweaks are usually needed:
- Brighten underexposed shots
- Reduce highlights to recover window detail
- Boost shadows slightly for visibility in darker areas
- Adjust contrast to add depth without over-processing
A natural, bright look sells better than overly dramatic edits.
In other words, underexposed images make rooms look dark and uninviting, and overexposed images can wash out important features.
Overall, correcting exposure highlights the home’s warmth and potential. For more details, check out our guide on how to change exposure in Photoshop (3 simple ways).
The Ultimate All-in-One
Real Estate Photographer Business Platform
Grow a successful real estate photography business with PhotoUp.

6. Ensure Neutral and Clean Tones With White Balance Adjustment


Color accuracy is key – it makes spaces feel more inviting. Correcting color temperature will ensure that whites look neutral and colors are true to life.
White balance removes yellow, blue, or green color casts. This is what to do:
- Use the Eyedropper Tool on a neutral white or gray surface
- Match wall and floor tones to real-life hues
- Keep whites clean and accurate—buyers want to see true finishes
A yellow cast can make walls look dingy. A blue cast can make interiors feel cold.
Accurate white balance conveys a clean, welcoming atmosphere—something every buyer wants to see.
To learn more, check out our video tutorial on how to adjust white balance in Photoshop:
7. Perform Color Correction to Remove Unwanted Tints and Color Shifts


Next, apply color correction techniques to fine-tune colors so they’re vivid but realistic and to correct any color shifts. Consistency in color across a listing is crucial.
Remember to enhance, but don’t exaggerate:
- Slightly boost saturation or vibrance to make the space pop
- Correct any unnatural tints from indoor lighting (e.g., tungsten or fluorescent)
- Ensure skin tones, if any people are in the shot, look natural
Proper color enhancement makes spaces pop without appearing unnatural. Buyers respond emotionally to colors—warm, bright interiors feel cozy and livable, while balanced tones help them visualize their own decor.
To learn how to adjust colors in your property photos, check out our guide on how to color correct in Photoshop.
8. Perform Lens Corrections for Realistic Images


It’s important to remove optical distortions from wide-angle lenses, such as barrel distortion, vignetting, and chromatic aberration.
Most real estate photographers use wide-angle lenses that can introduce:
- Barrel or pincushion distortion
- Vignetting (dark corners)
- Chromatic aberration (color fringing)
These corrections ensure that the rooms look like they do in real life. Warped walls or colored fringes can confuse the viewer or create mistrust in the image’s accuracy.
To learn how to do this edit, check out our video tutorial on how to do lens correction in Photoshop:
9. Improve Image Quality With Noise Reduction and Sharpening


Noise reduction and sharpening techniques are crucial to smooth out grainy areas and sharpen key details like fixtures or furniture edges.
Especially in low-light situations, noise can degrade image quality. This is what you can do to adjust this:
- Apply luminance noise reduction carefully
- Use detail sharpening to enhance edges, but avoid making the image look crunchy
- Zoom to 100% to ensure a natural result
Crisp, clean photos suggest high-quality finishes and craftsmanship. Grainy or soft images can make a space appear older or poorly lit, even if it’s not.
For more details, check out our video tutorial on how to reduce noise in Lightroom and Photoshop:
We have now come halfway through our photo editing checklist – we hope you have found it useful so far. Let’s move on to how to make sky replacements.
10. Do a Sky Replacement (If Needed)


Dull, overcast skies can make exterior shots look lifeless. The sky replacement technique is great for swapping a dull or overcast sky with a vibrant blue one.
You should replace skies when:
- The weather was gloomy on the shoot day
- You want to add visual interest without misleading potential buyers
- You didn’t have time to wait for better weather for your shot
A bright sky enhances curb appeal and sets a positive tone for the property. It makes exteriors feel fresh, sunny, and inviting—even if the shoot took place on a cloudy day.
Modern tools like Photoshop’s AI Sky Replacement or AgentUp’s Editing AI can make this quick and realistic. The latter even offers free sky replacements.
To perform this edit manually, you can also watch our video tutorial on how to replace a summer sky in Photoshop:
11. Perform Day-to-Dusk Conversion for Captivating Images


Twilight conversions are a favorite for enhancing curb appeal. According to recent studies, twilight photography, which captures properties during the golden hour, increases showings by 3x times and views by 76%.
In summary, twilight images:
- Add warmth and ambiance
- Show properties in a romantic light
- Work well for evening social media ads
- Buyers associate twilight photos with elegance and comfort
Dusk images evoke emotion and showcase a property’s nighttime ambiance—perfect for social media, luxury listings, or showcasing exterior lighting.
To learn how to do this editing technique, check out our video tutorial on how to edit a day to dusk image:
12. Utilize Flambient Editing for Natural-Looking Interior Images


Flambient editing is used to combine the accuracy of flash lighting with the warmth and shadows of natural light.
For natural-looking interiors, you should:
- Blend flash and ambient exposures to get the best of both worlds
- Flash keeps colors accurate; ambient preserves mood and shadows
This technique produces balanced, natural-looking images that show off the space without harsh lighting. It ensures accurate colors and consistent brightness, increasing buyer trust.
To learn how to perform this editing technique, check out our video tutorial on how to edit flambient real estate photos:
13. Leverage HDR Blending for Detailed Images


HDR blending is great for blending multiple exposures for scenes with bright windows and dark interiors to create crisp images.
HDR reveals detail in both shadows and highlights, helping buyers see inside and outside simultaneously—especially helpful in homes with scenic views or large windows.
For high-contrast scenes (e.g., windows with bright exteriors):
- Blend multiple exposures (typically 3-5)
- Ensure smooth transitions between shadows and highlights
Avoid overdone HDR looks with halos or unnatural tones. For more details, see our video tutorial on how to edit HDR photos in Lightroom:
14. Use Object Removal and Decluttering for Distraction-Free Images


Object removal is typically needed to eliminate distracting elements such as trash cans, cords, stains, or personal items.
Minor distractions can ruin a photo’s flow:
- Remove power cords, light switches, wall blemishes, trash cans, and stray items
- Consider virtual decluttering for occupied or messy homes
Buyers want to visualize their lives in the space. Clutter and unsightly items can break that mental picture. Clean, distraction-free images keep the focus on the home itself.
To learn how to use the Clone Stamp Tool to declutter your images, watch this video tutorial on how to remove cords in Photoshop:
15. Perform Window Masking for Clear Views


Window masking is essential to show the view outside a window clearly while keeping the interior properly exposed.
Masked windows make interiors feel airy and connected to the outdoors. If there’s a nice view (trees, city skyline, water), showcasing it adds emotional value.
Highlight the view through windows by:
- Masking in a properly exposed exterior
- Retaining the natural look (no blown-out whites or black windows)
This step adds realism and makes interiors feel connected to the environment.
To learn this powerful edit, check out our video tutorial on how to make windows in Photoshop:
16. Do Lawn Greening and Outdoor Enhancements to Boost Curb Appeal


The grass isn’t always green and lush. There are times you need to fix dead grass, brown patches, and faded driveways to boost curb appeal.
A lush green lawn and vibrant exterior signal care and maintenance. Buyers often equate a well-kept yard with overall property quality.
Make exteriors shine by:
- Greening dull or patchy grass
- Adding blue to pools, cleaning up driveways or dead leaves
- Enhancing landscaping subtly for curb appeal
Don’t overdo it—aim for a natural look. To learn how to create a beautiful green lawn, check out our video tutorial on how to make grass green in Photoshop:
17. Use Vignette Effects to Create Depth
Vignette and lighting effects are used to subtly darken corners and draw focus toward the center of the image.
Used sparingly, a vignette helps guide the viewer’s eye and adds visual depth. It gives the image a professional touch that subtly enhances viewer engagement.
Add a subtle vignette to:
- Focus the viewer’s attention
- Create depth in the image
However, using gentle—harsh vignettes can look dated.
18. Ensure Consistency to Build Trust and Ensure Professionalism


Image consistency is important when editing real estate photos to ensure all images in a listing feel like they belong together.
A consistent style (in lighting, color, and tone) builds trust and professionalism. Inconsistent images can confuse viewers or make the listing feel disjointed.
With this in mind, make sure:
- All images have similar brightness, color, and tone
- The flow of images feels natural when scrolling through
- Styles match your brand (warm, bright, cool, luxurious, and more)
Overall, a consistent gallery builds trust and professionalism.
19. Leverage Virtual Staging (If Applicable)


Empty rooms often feel smaller and lack warmth. AI Virtual staging helps buyers visualize how furniture fits and how the space can be used.
It adds emotional appeal and can significantly boost interest. For empty properties:
- Virtually stage with realistic furniture and decor
- Match the style to the target demographic (modern, rustic, family-friendly, etc)
- Make sure shadows, angles, and scale are accurate
Note: Always disclose that an image is virtually staged. For more information, you can visit our blog post on how to disclose virtual staging.
20. Always Do a Final Review and Check Your Export Settings

Do a final review to ensure every image is polished, properly sized, and ready for the MLS or web. Create two versions if needed: web-optimized and print-ready.
Before delivering:
- Review at 100% zoom for imperfections
- Check for color or exposure inconsistencies
- Export in the correct format:
- JPEG at 3000–4000px width for MLS
- sRGB color profile
- File size under 20MB per image (MLS limit)
High-resolution, web-optimized images load faster, look better on every device, and reflect professionalism. Proper formatting helps your listing get approved faster and look its best online.
And there you have our real estate photo editing checklist! Follow these steps, and you’ll be well on your way to creating captivating listing photos that will attract more views and buyers.
Before we leave this topic, let’s provide you with some examples of tools and services to make this happen.
Have You Ever Thought To
Outsource Photo Editing?
Try it today with 5 free edits from three professional photo editors.
Real Estate Photo Editing Tools and Services
To streamline your editing workflow and produce stunning real estate images, it’s important to have the right tools and services at your fingertips.
Here are some popular software and editing tools to consider:
🛠 Software:
| Adobe Lightroom Classic: Excellent for batch processing and global edits. |
| Adobe Photoshop: Essential for blending, masking, and object removal. |
| Luminar Neo: AI-enhanced editing tools and sky replacement. |
| PhotoUp Platform: Lets you upload photos, order editing, AI virtual staging, 360 tours, floor plans, and more in one dashboard. |
| AgentUp Editing AI: Allows you to edit your real estate photos on the go in as little as 5 minutes. |
Whether you prefer hands-on editing or automated solutions, these tools and platforms offer everything you need to enhance your photos and boost your real estate marketing efforts.
Final Thoughts
Editing real estate photos is both a science and an art. Following this real estate photo editing checklist ensures you never miss a step, whether you’re handling edits yourself or reviewing outsourced work.
Perfect property photos don’t just show a home—they sell a lifestyle, tell a story, and spark desire. That’s the power of polished, professional real estate photography.
By delivering consistent, high-quality images that stand out online, you’ll not only impress clients—you’ll also help homes sell faster and for more money.
Bonus Tip: Don’t Do It All Yourself – Use PhotoUp!


If you’re a busy real estate photographer or agent, you don’t have to do it all.
PhotoUp offers fast, affordable, and professional real estate photo editing with a 12 to 24-hour turnaround, including:
- Exposure and color correction
- Advanced object removal
- Perspective correction
- Noise reduction and image sharpening
- Lawn greening and landscape enhancement
- HDR editing
- Manual blending
- Panorama stitching
- Flambient editing
- And much more!
We can help with any type of editing, no matter how small or large, or complex.
Why Choose PhotoUp?
Here are some reasons why you should consider outsourcing your editing to PhotoUp:
✔ Affordable Pricing – Starting at just $1.50 per image for on-demand editing, PhotoUp provides budget-friendly editing solutions for real estate professionals.
✔ Fast Turnaround Times – Get professionally edited images back in less than 24 hours, ensuring quick and efficient marketing.
✔ Advanced Editing Techniques – From virtual staging and sky replacements to twilight conversions and HDR blending, PhotoUp offers a wide range of editing services tailored to real estate photography.
✔ User-Friendly Platform – Easily upload images, manage orders, and provide feedback through PhotoUp’s intuitive online system.
✔ Dedicated Support – PhotoUp’s team of expert editors and customer service professionals ensure high-quality results and personalized service.
✔ Access to Dedicated Editing – With a Dedicated Editor, you get access to an editor or team of editors who is 100% dedicated to your business and learn your style. This ensures maximum image consistency which can help you improve your brand.
Wait! There are more reasons to choose PhotoUp…
Browse Top Dedicated
Real Estate Photo Editors
Ready-to-hire editors for real estate photo editing, and more.
Real Estate Marketing Ecosystem

Furthermore, PhotoUp has built an entire ecosystem around real estate photography. We also offer other powerful marketing services like:
We have everything you need to enhance and market real estate photography in one user-friendly software!
How to Get Started
If you’re wondering how to get started with PhotoUp, it’s super easy!
Here’s all you need to do:
Step 1. Sign up for a free PhotoUp account.
Step 2. Upload your photos to our easy-to-use software.
Step 3. Choose the level of editing that you need and provide instructions (optional).
Step 4. Wait for PhotoUp professional editors to edit and return the photos in less than 24 hours (48 hours for virtual staging).
Step 5. Download and start using your beautifully edited photos.
PhotoUp Real Estate Photo Editing Uploader
To see how easy it is to get started with PhotoUp, check out our real estate photo editing uploader tutorial:
As simple as that!
So sign up for a free PhotoUp account today and impress your clients with every listing!
For a limited time, you’ll receive a bonus of 10 free credits you can use on any of our services when signing up for an account.
We hope this ultimate real estate photo editing checklist will help you create captivating listing photos that will lead to more views and sales. Before you go, you may also want to check out the following resources:

