


Table of Contents
- Why Plant & Grass Color Correction Matters
- How to Do Plant & Grass Color Correction in Exterior Photos
- How to Green Grass in Photoshop (Video Tutorial)
- Seasonal Edits Allow for Year-Round Listings
- Save Time and Money by Outsourcing to PhotoUp
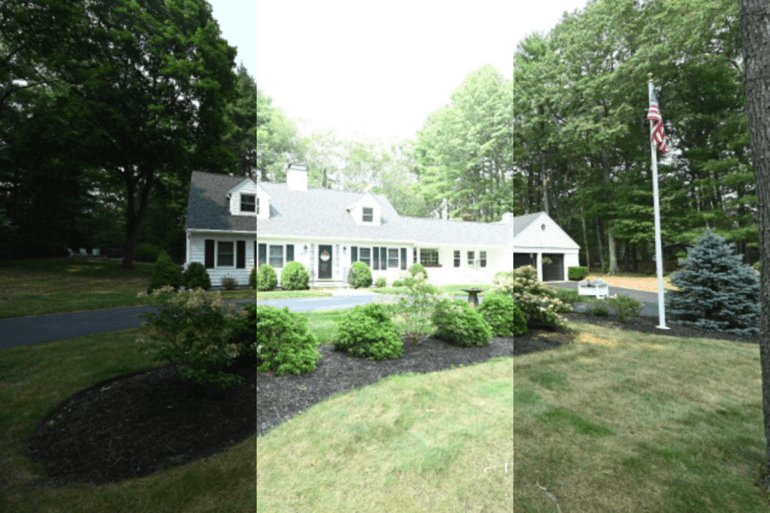
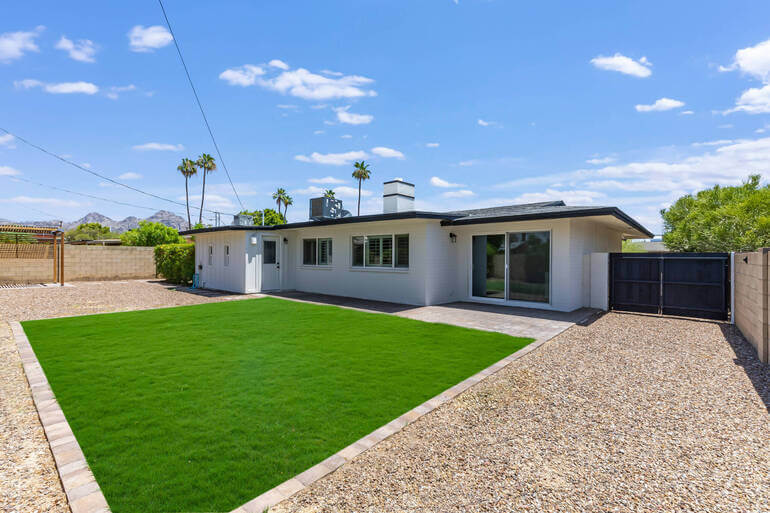
Dull, yellowish grass or lifeless plants can make even the most beautiful property look neglected or outdated. On the other hand, lush green lawns and vibrant landscaping immediately signal care, warmth, and curb appeal—qualities that attract buyers and increase a property’s perceived value.
That’s why plant and grass color correction is a critical step in real estate photo editing.
In this guide, we’ll walk you through how to do plant and grass color corrections the right way with the help of some powerful editing techniques and explain why it matters.
Let’s get started!
Why Plant & Grass Color Correction Matters🌿
According to the National Association of Realtors (NAR) studies, professional, high-quality photos can increase a listing’s views by up to 118%. The photos of a home are often the very first thing potential buyers see, and they can make or break their decision to schedule a showing.
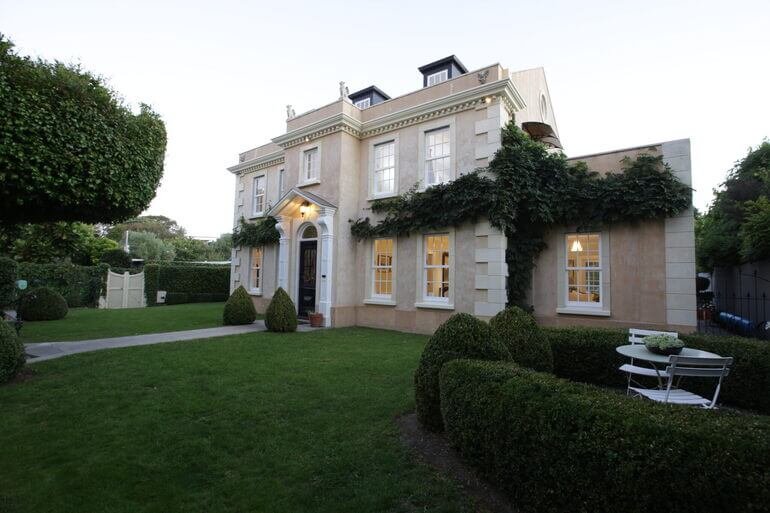
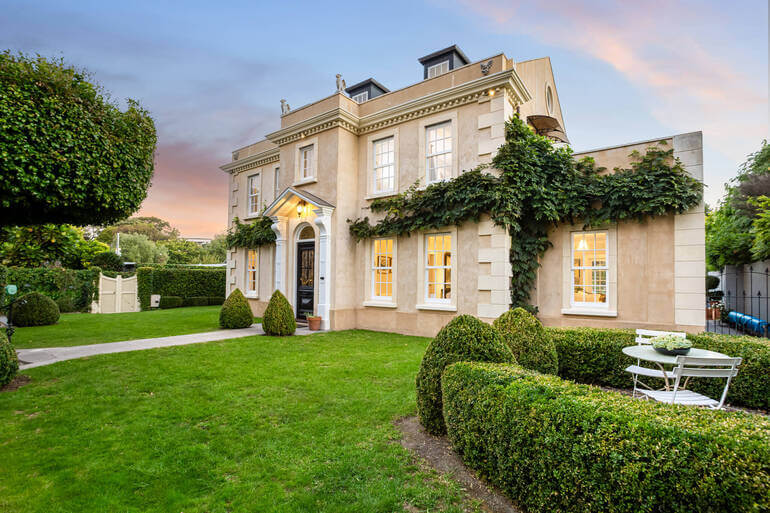
One of the most overlooked yet impactful aspects of real estate photography is the color and vibrancy of plants and grass in exterior shots.
Imagine a home listed in early spring, before the grass has turned green, or after a long, dry summer when the lawn is patchy and brown.
Even if the property is well-maintained, those photos can give potential buyers the impression that the home has been neglected.
When the outdoor spaces look healthy and vibrant, buyers feel more emotionally connected to the home and are more likely to schedule an in-person tour.
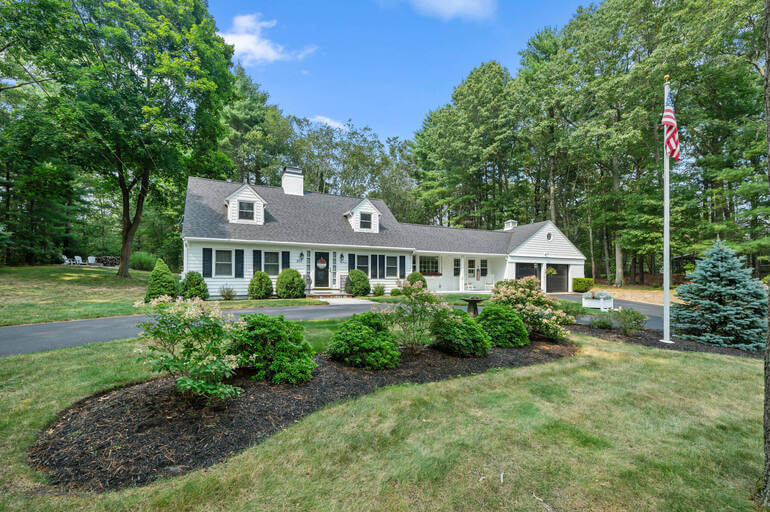
A Lush, Green Lawn Creates Emotional Appeal and Boosts Engagement
Color correction is not just about making the grass greener; it’s about creating a visual experience that captures attention and builds desire. The right edits help:
- Highlight curb appeal and landscaping investments
- Make seasonal photos more marketable year-round
- Evoke feelings of comfort, health, and vibrancy
- Increase listing engagement and potential offers
Ultimately, correcting plant and grass colors helps a property stand out from the competition in crowded online marketplaces.
Now, let’s take a look at a step-by-step guide on how to create a green, lush yard using some effective real estate photo editing techniques.
Have You Ever Thought To
Outsource Photo Editing?
Try it today with 5 free edits from three professional photo editors.

How to Do Plant & Grass Color Correction in Exterior Photos🌱
Real estate photo editing requires a careful balance between enhancement and authenticity.
Over-saturating colors or making them unnaturally bright can turn buyers away just as quickly as dull, lifeless greenery. Here’s how to do it the right way:
1. Start With a Balanced Base Image
Before you begin editing, make sure the image has proper white balance and overall exposure.
An image with a strong blue or yellow cast will affect how natural the greens appear.
Use tools like Lightroom or Photoshop to correct the overall tones before moving to specific areas like grass and plants.
Here are two tutorials that will help you adjust white balance and exposure in your real estate photos:
Pro tip: Adjust the temperature and tint sliders first to achieve a neutral base.
2. Isolate the Greenery for Targeted Editing
To avoid affecting other parts of the image, use layer masks or adjustment brushes to isolate just the grass, trees, and plants.
This gives you more control and ensures edits stay realistic.
For example:
- Use the Luminance Range Mask in Lightroom to select only green and yellow hues
- In Photoshop, try the Color Range Selection Tool to precisely target vegetation areas
For more details, you can check out these tutorials:
- How to Use a Layer Mask in Photoshop
- How to Use the Brush Tool in Photoshop
- How to Color Correct in Photoshop
3. Adjust Hue, Saturation, and Luminance
Once the greenery is isolated, focus on three key settings:
- Hue: Shift yellows slightly toward green to eliminate brownish or burnt-looking patches
- Saturation: Increase slightly to bring vibrancy back, but avoid overdoing it to keep a natural look
- Luminance: Brighten the greens slightly to make them appear fresh and lively
Pro tip: Remember, subtlety is key. A slight tweak often makes a big difference while maintaining a realistic appearance.
4. Blend With the Overall Scene
After editing the plants and grass, zoom out and look at the entire image. The greenery should blend naturally with the rest of the photo.
If it stands out too much, reduce the effect using opacity sliders or make minor adjustments to match the lighting and mood.
5. Finish With Final Touches
Lastly, consider enhancing other aspects of the outdoor space to complete the look. You can, for example:
- Brighten the sky or add a virtual twilight effect for a luxurious feel
- Sharpen details of landscaping features like flowerbeds, walkways, or patios
- Crop and straighten the image for perfect framing
Here are some useful tutorials to help you perfect your images:
- How to Do a Sky Replacement in Photoshop
- How to Edit Twilight Real Estate Photos in Photoshop
- How to Fix Pixelated Pictures in Photoshop
- How to Correct Perspectives in Photoshop
By refining these final touches, you ensure the exterior photo feels polished and professional.
How to Green Grass in Photoshop (Video Tutorial)
To see how this process is done in action, you can check out our video tutorial on how to green grass in Photoshop:
And there you have it!
You’ve now learned how to do plant and grass color corrections the right way in real estate photo editing.
Before we leave this topic, let’s take a look at why seasonal edits are beneficial for agents when marketing listings for sale.
Seasonal Edits Allow for Year-Round Listings🏡

One of the biggest advantages of plant and grass color correction is the ability to extend a property’s marketability year-round.
For instance, professional editors can do the following tweaks to ensure real estate photos can be used to market listings year-round:
- Winter Listings: Add a touch of greenery to barren landscapes to create warmth
- Early Spring Photos: Correct grass from a pale yellow to a soft, fresh green
- Summer Droughts: Even out patchy, dry lawns for a lush appearance
- Autumn Marketing: Blend green grass with warm fall foliage for a balanced seasonal vibe
This flexibility allows agents to reuse listing photos across seasons, saving money on new photo shoots and keeping marketing consistent.
Final Thoughts: Green Grass Increases Buyer Perception and Engagement
Plant and grass color correction may seem like a small detail, but in real estate marketing, it can have a major impact on buyer perception and engagement.
Healthy, vibrant landscaping draws attention, highlights a property’s potential, and helps listings sell faster and for higher prices. In fact, professional real estate photography can help sell a home 32% faster.
With the right tools and techniques, you can achieve natural, stunning results—but if you’d rather save time and hassle, PhotoUp’s professional editors are ready to help.
Let’s show you how to outsource your editing needs to PhotoUp.
Have You Ever Thought To
Outsource Photo Editing?
Try it today with 5 free edits from three professional photo editors.
Save Time and Money by Outsourcing to PhotoUp🌱
While these editing techniques are incredibly effective, they can also be time-consuming—especially for busy real estate photographers or agents managing multiple listings.
That’s where PhotoUp comes in!
As a trusted partner in real estate photo editing, we offer:
- Expert color correction for plants, grass, and other key elements
- Basic and advanced real estate photo editing
- Affordable, pay-as-you-go pricing, ideal for photographers and teams
- A fast turnaround time of 12-24 hours to get listings live quickly
- A dedicated team of editors who understand the nuances of real estate marketing and can focus 100% on your business
By outsourcing your editing needs, you can focus on what you do best—capturing stunning images and growing your business—while PhotoUp ensures every photo is polished and market-ready.
And there’s more…
Browse Top Dedicated
Real Estate Photo Editors
Ready-to-hire editors for real estate photo editing, and more.
We Do More Than Just Photo Editing
We do more than just real estate photo editing! PhotoUp is a complete real estate marketing partner and also offers other powerful services like:
We have everything you need to enhance and market real estate photography in one user-friendly software!
Adding these marketing services to your toolkit can also help you be more useful to your clients and ultimately grow your business.
How to Get Started
Getting started using PhotoUp’s real estate photo editing service is super easy.
This is all you need to do:
Step 1. Sign up for a free PhotoUp account.
Step 2. Upload your photos to our user-friendly software.
Step 3. Choose the level of editing that you need and provide instructions (optional).
Step 4. Wait for PhotoUp professional editors to edit and return the photos in less than 24 hours (48 hours for virtual staging).
Step 5. Download and start using your beautifully edited photos.
As simple as that! So, what are you waiting for?
Sign up for a free PhotoUp account today and let our expert editors help you create captivating real estate photos that sell a lifestyle!
For a limited time, you even get 10 free credits you can use on any of our services when signing up for an account.
We hope this post helped you learn how to do plant and grass color corrections the right way in real estate photo editing. Before you go, you may also want to check out the following resources:
- Real Estate Photography Pricing in 2026
- How to Create Magazine-Worthy Real Estate Photos
- Real Estate Editing on a Budget: Top Services Under $2 Per Image
- 10 Advanced Photoshop Techniques for Stunning Listing Photos
- From Drab to Dreamy: Mastering Day to Dusk Conversions for Real Estate Listings
.

