


Table of Contents
- What Is Twilight Real Estate Photo Editing?
- Take Advantage of the Golden Hour to Shoot Exterior Photos
- The Power of Twilight Editing for Real Estate Sales
- Editing Twilight Real Estate Photos in Photoshop
- Leverage Professional Twilight Editing With PhotoUp!
Do you want to learn how to edit Twilight real estate photos in Photoshop? Why is this a good idea?
Having a Twilight image as the listing’s main photo averaged 76% more views than listings without the use of Twilight images. This editing technique also gives a luxurious vibe to a property, which can lead to a higher sales price.
In this post, we’ll show you how to edit Twilight real estate photos in Photoshop. We’ll also cover what Twilight photo editing is and elaborate further on why it’s so powerful for real estate sales.
Let’s dive in!
What Is Twilight Real Estate Photo Editing?

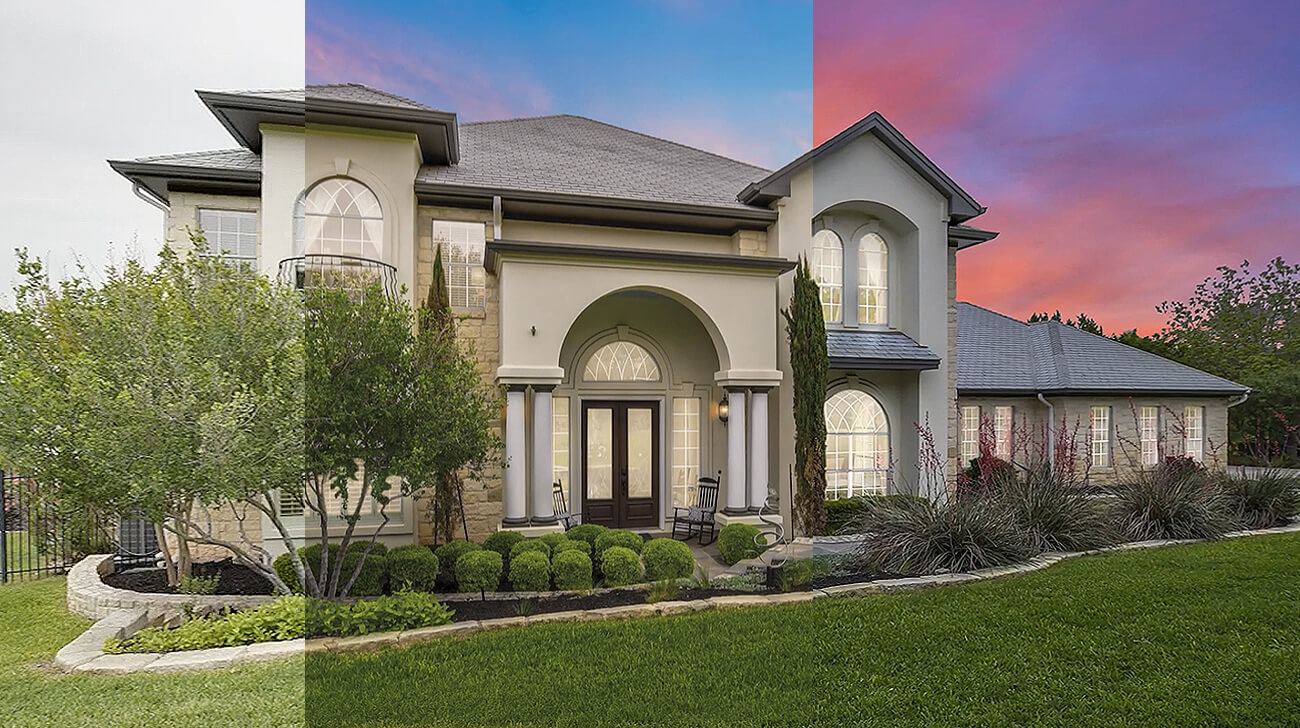
Twilight is the process of taking an exterior photo of a home taken during a sunset or sunrise — the golden hour and editing it to enhance or alter its colors and/or light to give it a romantic glow.
This type of photography offers the perfect combination of vivid blue and purple skies and enhanced warm interior lighting.
With a simple exterior shot and some editing, you can create stunning pictures that will showcase the property’s best features, leaving you out-of-this-world results!
Take Advantage of the Golden Hour to Shoot Exterior Photos
When it comes to capturing the beauty of real estate properties, timing is everything! Knowing when and how to use natural light can make all the difference.
During the golden hour—which occurs just before sunrise or sunset—the sunlight takes on a special quality that reveals vibrant colors, inviting warmth, and beautiful details in your shots.
But there’s only so much time available during this magical moment…


That’s where Twilight real estate photo editing is here to save you. It allows photographers to recreate that warm and mysterious glow throughout any shot at any time.
But is it worth the time and effort? The simple answer is YES! Let’s take a closer look at why this editing technique is so powerful for real estate sales.
The Power of Twilight Editing for Real Estate Sales


Editing Twilight real estate photos is a great way to make them stand out since the majority of real estate photographs are taken in broad daylight.
In fact, research shows that only about 8% of all real estate listings contain Twilight images, so using them will automatically make you stand out from the competition.
While regular daylight photography is an excellent approach to showcasing every detail and vivid color of an image, it doesn’t always result in an interesting photo that will capture a buyer’s attention.
Especially when listing after listing shows pretty much the same scenes. When Twilight photos are utilized, Twilight usage overwhelmingly leans towards higher-priced homes with 59% towards homes $500k+, 32% for homes $300-$500k, and 8% for homes $100-$300k.
That’s a huge boost in the sales price!
Here are more impressive twilight real estate statistics to consider:

Additionally, Twilight images often have a unique quality that can be difficult to capture in a standard photo. They have a romantic feel to them that’s very appealing, and investing in the editing process can help bring out that quality even more.
Furthermore, elegant nighttime photos can also give sellers and agents the chance to highlight aspects of a house that are hidden during daylight. Or that might not look all that great on their own.
Have You Ever Thought To
Outsource Photo Editing?
Try it today with 5 free edits from three professional photo editors.

Editing Twilight Real Estate Photos in Photoshop
Now, let’s show you how to edit a Twilight or day to dusk image using Photoshop next. You can either watch the video or follow the steps outlined below:
Start Editing the Windows
Step 1. Import your image into Lightroom and do basic adjustments. Make it a little darker as it’s a dusk image.
Step 2. Next, create a Virtual Copy.
Step 3. On that copy, adjust the glow of the windows to make it look like the light is on. Boost the Exposure and Temperature to create a glowing effect.
Step 4. Now, move your images into Photoshop.
Step 5. In Photoshop, make the Window Layer on top and add an Inverted Mask (press and hold the ALT key while clicking the Masking button).
Step 6. Select the windows using the Pen Tool (P), then press the Delete button.
Step 7. Next, add an Outer Glow using the Layer style.
Step 8. Within the Layer Style, use the Sliders to adjust to an appropriate level.
Next, Edit the Sky
Once you’re happy with the windows of the house, it’s time to work on the sky:
Step 1. Duplicate the base photo and go to the Channel panel and duplicate the Blue channel.
Step 2. Adjust the Levels in the Sky by pressing CTRL – L on your keyboard.
Step 3. Select the Non-Sky area, make it black, and use the Dodge Brush (O) to lighten the sky.
Step 4. Now, you want to Load the Channel as a Selection, and then click the Masking button.
Step 5. Next, Import the dusk sky photo that you want to use behind the building.
Step 6. Adjust its position and make sure to Blend it properly with the house. E.g you may want to use the Burn Tool to darken the house overall. Then, Save the new image.
Step 7. Back in Lightroom, you can make one or two adjustments to the white balance until you’re happy with the final product.
Use the Dusk Scene to Showcase the Property
Keep in mind that you’re showcasing a home for a potential buyer and not trying to create an award-winning nature photograph.
The dusk scene is there to show off the best features of the property and put the viewers in a calm, welcoming state of mind, so they look favorably on the listing.
The goal is to make home buyers think of themselves as living in this incredible home and taking in the beautiful evening sunset.
High-Quality & Consistent
Real Estate Photo Editing
Hire a dedicated editor with performance metrics from $7/hour.
Leverage Professional Twilight Editing With PhotoUp!


If you don’t have time to edit Twilight real estate photos, PhotoUp’s team of professional editors is eager to take your real estate photo editing off your hands.
PhotoUp has more than 10 years in the business and employs several hundred photo editors around the world, so it’s hard to match PhotoUp’s quality, service, and pricing.
No matter what kind of editing you’re looking to outsource, PhotoUp’s editors will make sure your photos are of the highest quality.
For example, our real estate editors can help you with:
- Image correction and enhancement
- Color and tone adjustments
- Window masking and glare reduction
- Clutter and object removal
- Line and angle corrections
- Improper exposure levels
- HDR editing
- Harsh shadows, lack of light, etc.
- And more.
Browse Top Dedicated
Real Estate Photo Editors
Ready-to-hire editors for real estate photo editing, and more.


Plus, PhotoUp also offers additional services such as:
We have everything you need to enhance and market real estate listings under one roof!
Easy & Quick Ordering Process
Getting started using PhotoUp’s real estate photo editing service is super easy.
All you need to do is sign up for a free PhotoUp account, upload your images, choose export settings and turnaround time, and that’s it!
Check out our real estate photo editing uploader tutorial to see how easy it is to get started:
And that’s it!
Sign up for a free PhotoUp account today, and ensure the highest quality Twilight real estate photo editing! For a limited time, we even offer you 5 free credits when signing up for an account.
We hope this blog post helped you understand how to edit Twilight real estate photos in Photoshop. If you enjoyed reading this post, you may also want to check out the following resources:

