


Table of Contents
- Do You Have to Edit Your Real Estate Photos?
- 10 Photo Editing Hacks for Perfect Listings Every Time
- Save Time and Money by Outsourcing to PhotoUp
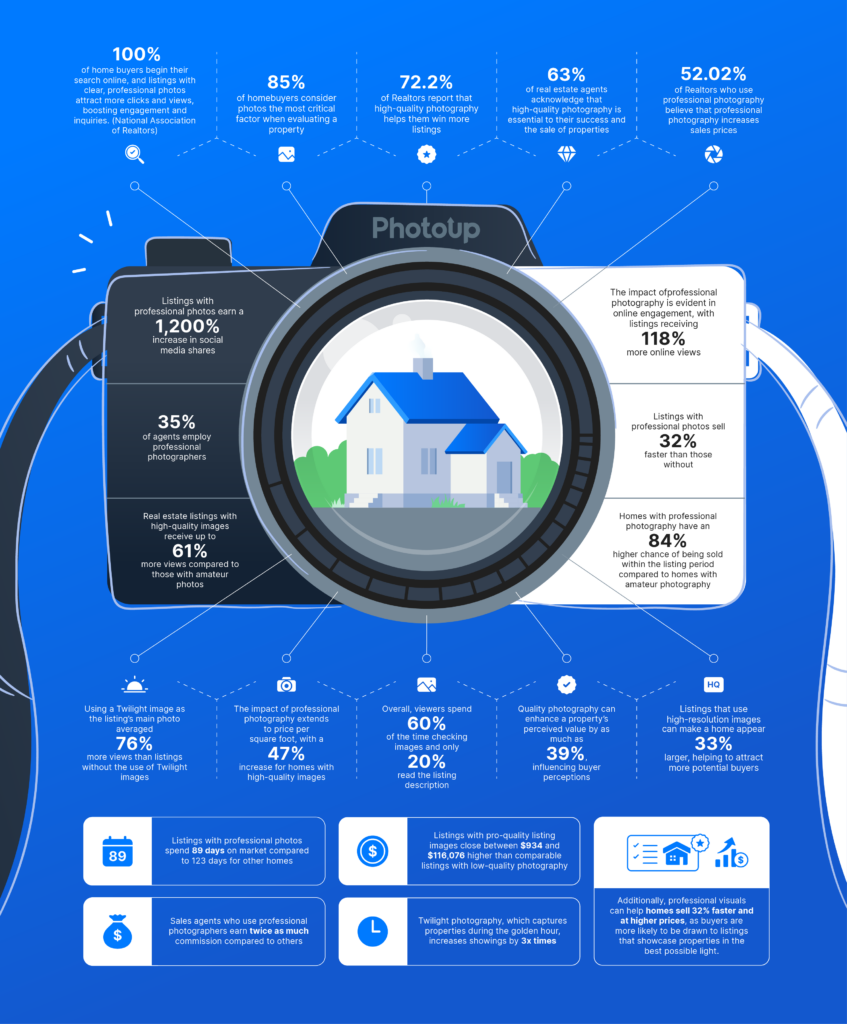
In the competitive world of real estate, first impressions matter—and nothing grabs attention faster than a stunning, professionally edited photo. Editing is crucial because listings with high-quality photos receive 118% more online views compared to those with lower-quality images.
While shooting high-quality images is essential, it’s the post-processing work that brings them to life.
Whether you’re a seasoned photographer or a real estate agent looking to polish your property listings, these 10 real estate photo editing hacks will help you create irresistible visuals that sell homes faster.
Before we get into the nitty-gritty, let’s answer the question of whether you really have to edit your real estate photography.
Do You Have to Edit Your Real Estate Photos?

Real estate photo editing is crucial for producing captivating listing photos because it transforms ordinary images into visually stunning representations that grab buyers’ attention.
By enhancing lighting, correcting colors, straightening perspectives, and replacing dull skies, editing ensures each property looks its absolute best.
In a competitive market where 100% of buyers start their search online, high-quality, professionally edited photos can make the difference between a listing that gets overlooked and one that sparks immediate interest.
Here are some other powerful real estate photography statistics to consider:
Ultimately, real estate photo editing helps showcase a home’s full potential, driving more clicks, showings, and faster sales.
Let’s now move on to the reason you’re here – to learn some amazing real estate photo editing hacks.
10 Photo Editing Hacks for Perfect Listings Every Time
Here are 10 real estate photo editing hacks that will help you create captivating listing photos and sell more homes at higher prices.
1. Fix Perspective Distortion for Natural-Looking Property Photos


Wide-angle lenses often cause vertical lines to tilt, making walls and doors appear slanted.
Luckily, this problem can be easily addressed during post-processing through a technique known as perspective correction.
This method adjusts any distortion or skewed angles, bringing the horizontal and vertical lines back into proper alignment with the frame to create a more natural-looking photo.
In Photoshop, you can use the Free Transform Tool to fix these lines. To see how to align verticals, you can check out our video tutorial on how to straighten verticals in Photoshop:
2. Use HDR Blending for Balanced Lighting


Shooting bracketed exposures and blending them can reveal details in both bright windows and dark interiors.
This HDR blending technique is used to blend multiple images, taken at different exposures, and later combine them in post-processing to create one perfectly blended image.
This is a brief video tutorial on how to get started editing HDR photos in Lightroom:
3. Replace a Dull Sky to Make the Scene Pop


Cloudy or washed-out skies can ruin an otherwise great shot. A vibrant sky replacement can make the whole scene pop. It can:
- Make the property look more appealing
- Offer a mood booster
- Provide real estate photographers more freedom when not having to worry about the weather or the time of day to do the photoshoot
Luckily, you can replace the sky with a few not-too-difficult editing tricks and make your dull sky look picture-perfect.
To learn how to transform dull winter skies into bright and inviting ones, check out our video tutorial on how to do a sky replacement in Photoshop:
4. Perform Day-to-Dusk Conversions for Captivating Images


Twilight photos evoke emotion and highlight exterior lighting, often attracting more clicks.
According to recent studies, listings with twilight photos average 66% more views than those without.
Turning day shots into dusk by darkening the sky, switching on interior and exterior lights, and adding warm color tones is a fantastic way to show off a property’s lighting and create an enticing atmosphere that will draw viewers in.
To learn how to do this effectively, check out our video tutorial on how to edit a day to dusk image:
Have You Ever Thought To
Outsource Photo Editing?
Try it today with 5 free edits from three professional photo editors.

5. Apply Brightness and Color Correction for True-to-Life Tones


Brightness and color correction are the backbone of all image enhancement. Color correction can be done in Lightroom and Photoshop.
Bad lighting can throw off colors, especially interior walls and furniture. Proper color correction ensures a natural look.
Altogether, these basic retouching techniques can turn a mediocre photo into a captivating one that will capture buyers’ attention and help your clients sell their listings.
To learn how to adjust the colors and make your real estate photos pop, check out our tutorial on how to color correct in Photoshop.
Additionally, this video tutorial walks you through how to brighten a photo in Photoshop:
6. Use the Flambient Technique for Crisp Images


Blending flash and ambient exposures can create rich, natural-looking interior photos without harsh shadows.
It balances the strengths and limitations of the flash and ambient shots, combining them to create the best possible results – a final clean, detailed, and crisp-looking image.
Editing flambient images incorporates the use of layers, window pulls, and brushing out identified parts of the image.
To get started, you can watch the video tutorial on how to edit using the flambient method:
7. Declutter Your Images for Clean and Inviting Interior and Exterior Photos


Power cords, garbage bins, and personal items can distract from the home’s appeal. Removing them keeps the space clean and inviting.
These annoyances can be edited in Photoshop by using the Clone Stamp Tool.
Simply choose the “Clone Stamp Tool” and pick the source area by pressing the “Alt key.” Then, you can start cloning over the object that you wish to remove.
To learn how to use the Clone Stamp Tool to declutter your images, watch this video tutorial on how to remove cords in Photoshop:
8. Green the Lawn to Improve Curb Appeal


Sometimes, you need to take photos in the wrong season when the lawn has dead spots. Or when there hasn’t been a lot of rain, and the grass is brown.
Brown, patchy grass can make exteriors look neglected. Enhancing lawn color improves curb appeal instantly.
You can use Lightroom and Photoshop to adjust the color of your lawn to enhance the landscaping of your photo.
To learn how to create a beautiful green lawn, check out our video tutorial on how to make grass green in Photoshop:
9. Sharpen the Image to Improve Overall Quality


A slightly underexposed or soft image can be corrected with a touch of brightness and sharpening.
With sharpening techniques, you can add dimension, depth, and contrast along the edges of any object.
With this simple technique, you can make dull images pop, whether it’s a real estate listing or an artsy masterpiece, you can create truly captivating photos.
In this video tutorial, we’ll show you how to sharpen an image in Photoshop using 4 easy steps:
10. Mask Windows for Clear Views


Properly exposed windows add realism and depth to interior photos.
By masking windows in interior shots, you can capture the beauty of the space while also capturing the breathtaking views outside.
It’s a great way to draw people in and make the property look absolutely amazing!
In this video tutorial, we’ll show you a quick and easy way to mask windows in Photoshop:
And there you have it! You’ve now learned 10 real estate photo editing hacks to create perfect and impressive listing photos.
These simple yet powerful editing techniques will help your agent clients sell listings faster and at higher prices, most likely leading to repeat customers and referrals.
Have You Ever Thought To
Outsource Photo Editing?
Try it today with 5 free edits from three professional photo editors.
Save Time and Money by Outsourcing to PhotoUp
While these editing hacks can dramatically improve your real estate photos, they can also be time-consuming, especially when managing multiple listings.


That’s where PhotoUp comes in!
PhotoUp offers professional real estate photo editing starting at just $1.50 per image for on-demand editing, with a 12- to 24-hour turnaround.
Our expert team can handle everything from sky replacements and object removal to HDR blending and virtual staging—freeing up your time so you can focus on growing your business.
Why Choose PhotoUp?
Here are some reasons why you should consider outsourcing your editing to PhotoUp:
| Affordable Pricing – Starting at just $1.50 per image for on-demand editing, PhotoUp provides budget-friendly editing solutions for real estate professionals. |
| Fast Turnaround Times – Get professionally edited images back in less than 24 hours, ensuring quick and efficient marketing. |
| Advanced Editing Techniques – From virtual staging and sky replacements to twilight conversions and HDR blending, PhotoUp offers a wide range of editing services tailored to real estate photography. |
| Dedicated Support – PhotoUp’s team of expert editors and customer service professionals ensures high-quality results and personalized service. |
| Access to Dedicated Editing – With a Dedicated Editor, you get access to an editor or team of editors who are 100% dedicated to your business and learn your style. This ensures maximum image consistency, which can help you improve your brand. |
| Access to Dedicated Editing – With a Dedicated Editor, you get access to an editor or team of editors who are 100% dedicated to your business and learn your style. This ensures maximum image consistency which can help you improve your brand. |
Wait! There are more reasons to choose PhotoUp…
Real Estate Marketing Ecosystem
Furthermore, PhotoUp has built an entire ecosystem around real estate photography. We also offer other powerful marketing services like:
We have everything you need to enhance and market real estate photography in one user-friendly software!
Browse Top Dedicated
Real Estate Photo Editors
Ready-to-hire editors for real estate photo editing, and more.
How to Get Started
If you’re wondering how to get started with PhotoUp, it’s super easy!
Here’s all you need to do:
Step 1. Sign up for a free PhotoUp account.
Step 2. Upload your photos to our easy-to-use software.
Step 3. Choose the level of editing that you need and provide instructions (optional).
Step 4. Wait for PhotoUp professional editors to edit and return the photos in less than 24 hours (48 hours for virtual staging).
Step 5. Download and start using your beautifully edited photos.
PhotoUp Real Estate Photo Editing Uploader
To see how easy it is to get started with PhotoUp, check out our real estate photo editing uploader tutorial:
It’s really as simple as 1-2-3!
Ready to elevate your real estate marketing without the editing hassle?
Sign up for a free PhotoUp account today and watch your listings stand out from the competition.
For a limited time, you’ll receive a bonus of 10 free credits you can use on any of our services when signing up for an account.
We hope this blog post helped you learn 10 real estate photo editing hacks to help perfect your listings. Before you go, you may also want to check out the following resources:

