


Table of Contents
- What Micro-Contrast Really Means in Photo Editing
- Why Micro-Contrast Makes Homes Feel More Luxurious
- Micro-Contrast vs Sharpening: Understanding the Difference
- A Practical Workflow to Achieve High-End Property Photos
- Elevating Your Listings With Professional Editing Support
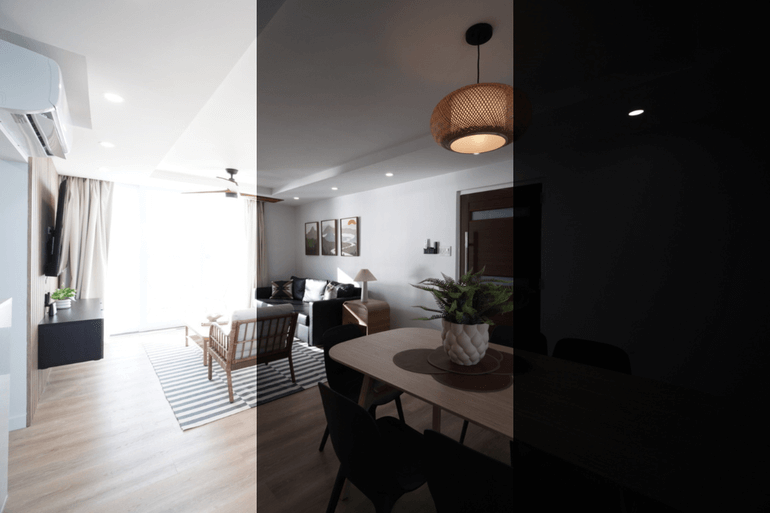
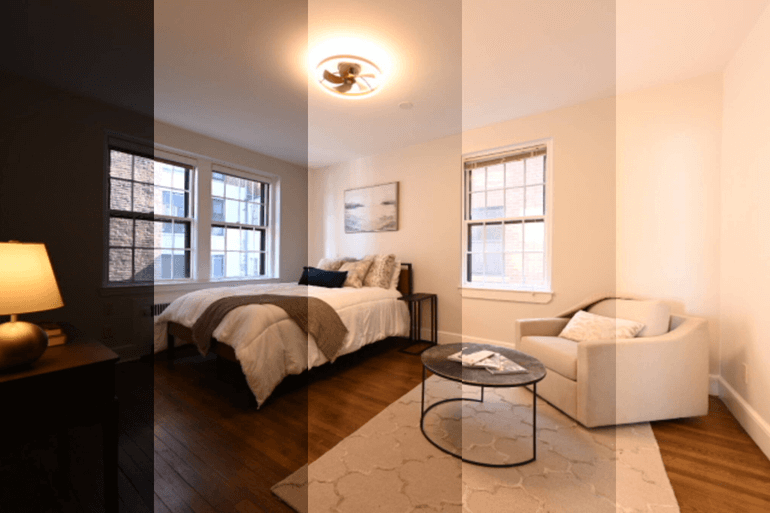
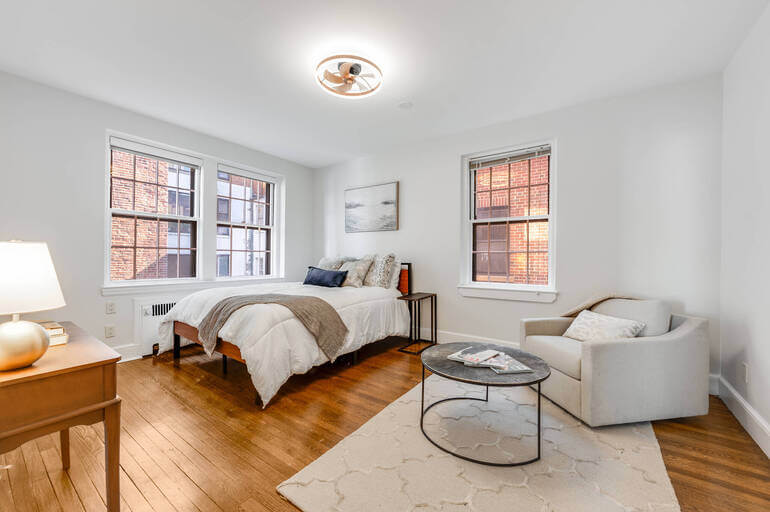
In real estate marketing, luxury is rarely the result of one dramatic effect. It’s built through subtle refinements—small enhancements that make a space feel polished, intentional, and expensive.
One of the most powerful yet understated tools for achieving that elevated look is micro-contrast.
Unlike bold sky replacements or cinematic color grading, micro-contrast works quietly in the background. It enhances the fine details that signal craftsmanship and quality.
When applied thoughtfully, it makes homes feel sharper, cleaner, and more dimensional—without looking over-edited. To understand why this matters, we first need to clarify what micro-contrast actually is.
What Micro-Contrast Really Means in Photo Editing📸
Traditional contrast affects the overall difference between light and dark areas across an image.
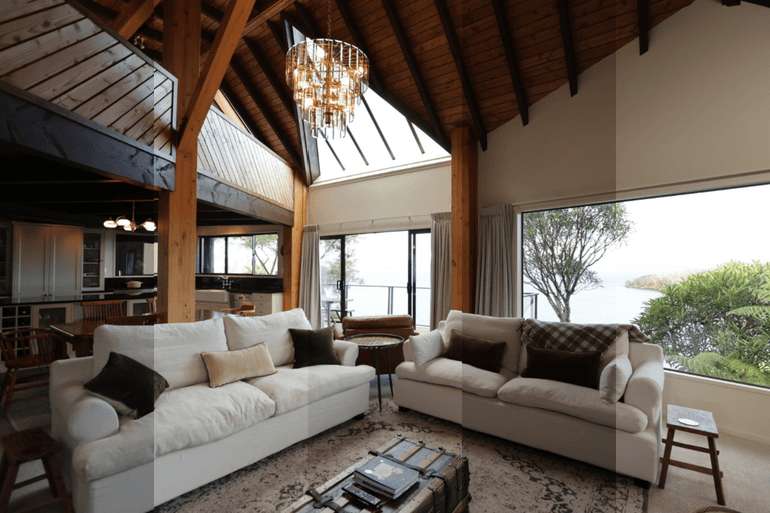
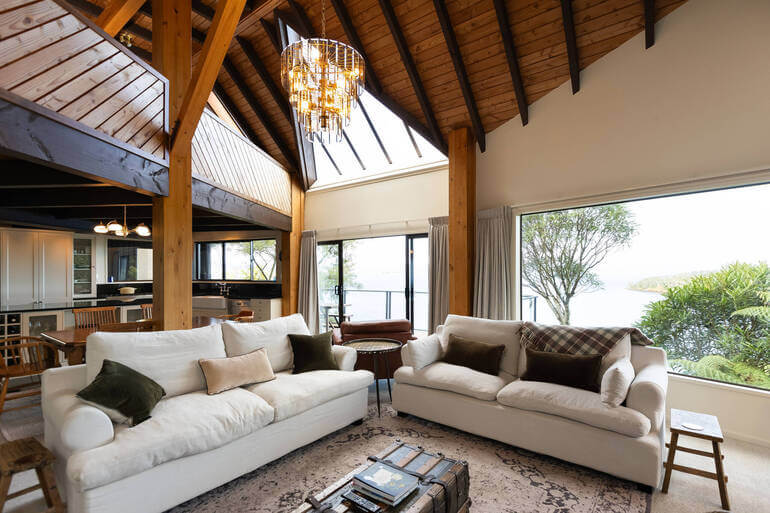
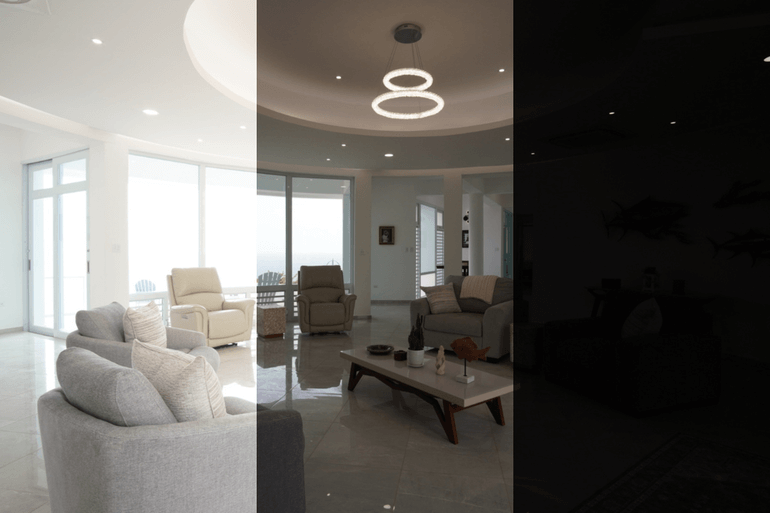
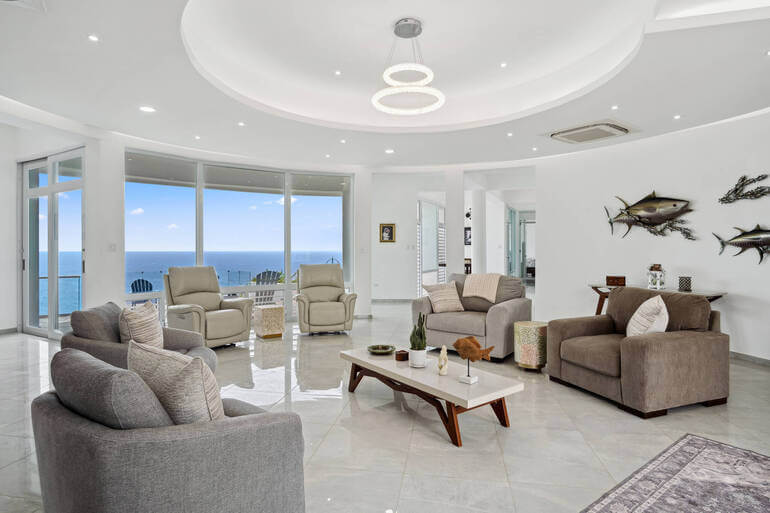
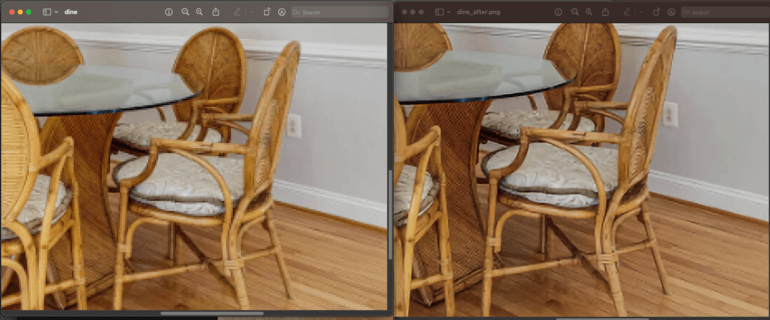
Micro-contrast, on the other hand, operates on a much smaller scale. It enhances subtle tonal differences between fine details—edges, textures, and small surface variations.
In practical terms, micro-contrast enhances the:
- Grain of natural wood
- Veining in marble or quartz
- Texture of linen or woven fabrics
- Crisp edges of cabinetry
- Pattern in tile backsplashes
- And dimension in brick or stone
Instead of dramatically shifting exposure, it increases separation between small tonal values, making surfaces appear more defined and tactile.
Now that we understand what micro-contrast does technically, let’s explore why it has such a strong emotional impact on buyers.
Why Micro-Contrast Makes Homes Feel More Luxurious🏘️
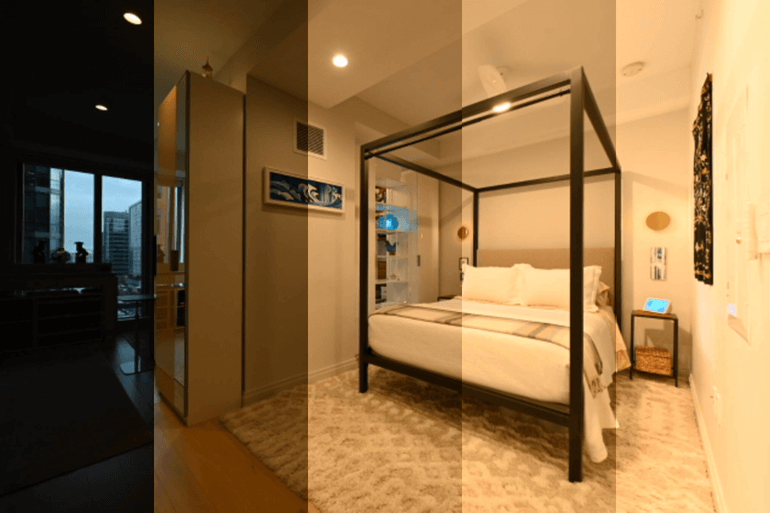
Luxury is communicated through materials and craftsmanship. However, cameras—especially when using HDR blending—can flatten textures and soften details.
Even beautifully finished homes can look slightly muted straight out of the camera. Micro-contrast restores that sense of dimensionality.
For example, it helps:
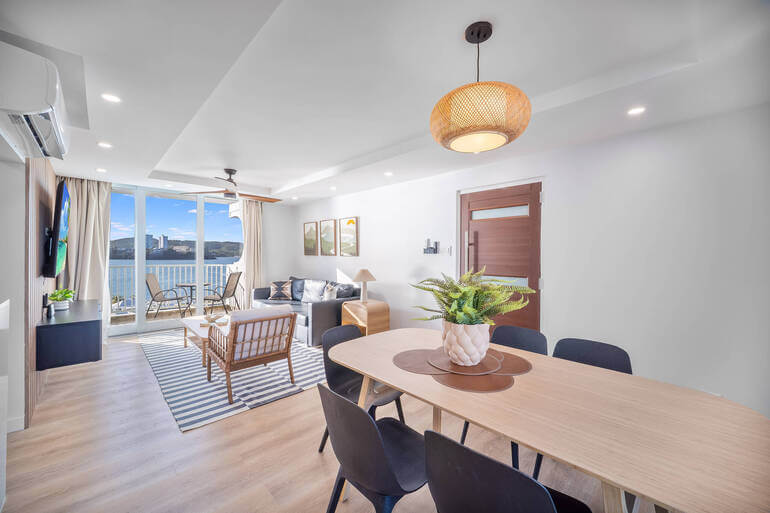
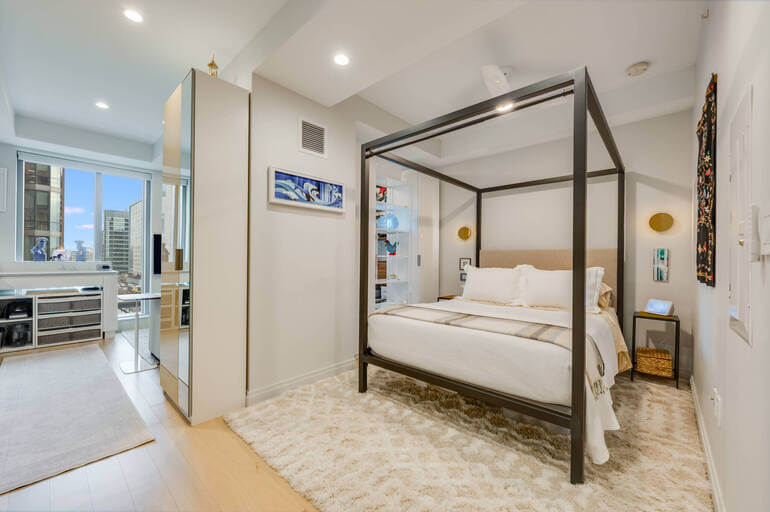
- Highlight Material Quality: Buyers can better see stone veining, wood grain, and fabric textures
- Create Depth: Rooms feel less flat and more three-dimensional
- Signal Professionalism: Crisp details subconsciously suggest high-end photography and, by extension, a high-end property
Buyers may not consciously identify micro-contrast, but they feel the difference. The space appears more refined and thoughtfully presented.
With that psychological foundation in mind, the next logical question is: where does micro-contrast have the greatest visual impact?
Where Micro-Contrast Has the Biggest Impact🛋️
Not every area of a property photo benefits equally from micro-contrast. Strategic application is key.
Certain spaces and materials respond especially well to this enhancement:
| Kitchens: Kitchens are detail-driven and finish-focused. Micro-contrast enhances countertops, cabinetry edges, hardware, and backsplashes—helping premium finishes stand out without exaggeration. |
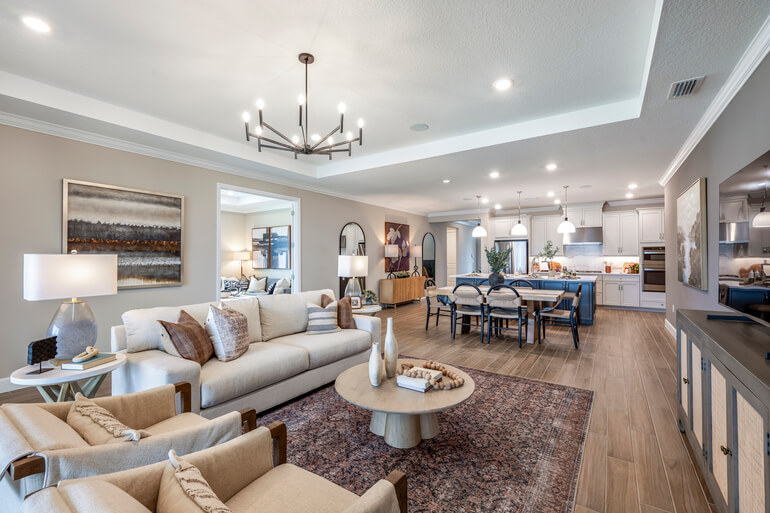
| Bathrooms: Bathrooms rely heavily on reflective surfaces, tile patterns, and metal fixtures. Controlled micro-contrast defines edges and textures, contributing to a spa-like, high-end feel. |
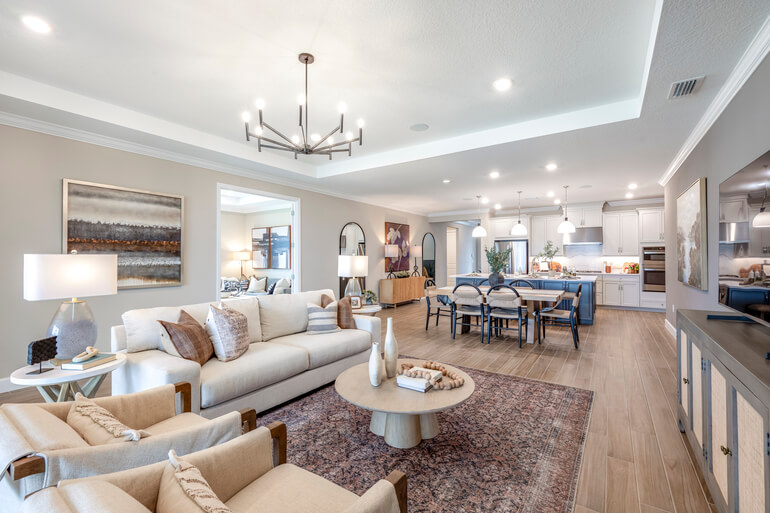
| Living Rooms With Texture: Spaces with woven rugs, upholstered furniture, wood beams, or statement materials benefit greatly. The added dimensionality makes the room feel layered and designed rather than flat. |
| Exterior Surfaces: Stone facades, brickwork, and wood siding often lose texture in cloudy lighting or heavy exposure correction. Micro-contrast restores natural depth without darkening the image. |
While these areas benefit most, it’s equally important to understand what micro-contrast is not—and how it differs from similar editing tools.
Let’s move on to look at the difference between micro-contrast and sharpening.
Have You Ever Thought To
Outsource Photo Editing?
Try it today with 5 free edits from three professional photo editors.

Micro-Contrast vs Sharpening: Understanding the Difference🤔
It’s easy to confuse micro-contrast with sharpening, but they serve different purposes. Here are their main differences:
- Sharpening emphasizes edges and can create harsh lines or halos if overused
- Micro-contrast enhances tonal separation within textures, resulting in a more organic clarity
Sharpening alone can make a photo look aggressive or artificial. Micro-contrast, when used carefully, delivers refinement without harshness.
Often, editors apply micro-contrast first and use minimal sharpening afterward.
Understanding this distinction helps prevent one of the most common issues in real estate editing: over-processing. And that brings us to the mistakes to avoid.
Common Micro-Contrast Mistakes and How to Easily Avoid Them🚫
Like any powerful tool, micro-contrast can undermine quality if misused. Here are the most frequent pitfalls and how to avoid them:
1. Crunchy Walls and Noisy Shadows
Applying micro-contrast globally can exaggerate drywall texture and noise in darker areas. Luxury images should feel smooth and clean.
Solution: Mask adjustments to focus on finishes rather than flat surfaces.
2. Harsh Edges and Halos
Too much combined clarity and sharpening can create visible halos along cabinets and windows.
Solution: Lower intensity and refine masking around strong contrast edges.
3. Highlighting Imperfections
Micro-contrast reveals details—both good and bad. Worn finishes or scuffs may become more noticeable.
Solution: Complete cleanup edits before applying texture enhancement.
Recognizing these mistakes naturally leads us to a more structured approach for getting micro-contrast right.
To learn how to use masking, you can check out our video tutorial on how to remove background in Photoshop using a layer mask:
With the pitfalls in mind, let’s show you a practical workflow for high-end results.
A Practical Workflow to Achieve High-End Property Photos💪

Consistency separates average editing from premium presentation. A controlled workflow ensures micro-contrast enhances rather than overwhelms real estate photos.
Consider following these 5 real estate photo editing steps:
| Step 1: Balance Exposure and Color: Start with proper brightness, neutral whites, and accurate color correction. Micro-contrast should refine—not fix—an image. |
| Step 2: Clean the Frame: Remove distractions, correct vertical lines, reduce glare, and ensure window pulls are natural. A polished foundation is essential. |
| Step 3: Apply Selective Micro-Contrast: Target textured materials such as stone, wood, tile, and textiles. Avoid ceilings, flat walls, and deep shadow areas. |
| Step 4: Evaluate at Multiple Zoom Levels: Check the image both zoomed out (for overall feel) and zoomed in (for artifacts or noise). |
| Step 5: Finish With Light Sharpening: If sharpening is necessary, apply it sparingly to maintain a refined look. |
Following this workflow ensures micro-contrast enhances the perception of quality rather than distracting from it.
And when executed correctly, the impact extends beyond aesthetics—it influences buyer perception.
The Psychological Effect on Buyers🤩
Buyers make emotional judgments within seconds of viewing a listing. Subtle cues shape those judgments. When images feel crisp and dimensional:
- Materials appear higher quality
- Craftsmanship feels more intentional
- The property appears well-maintained
- And the listing looks professionally marketed
These impressions increase perceived value and build trust. Micro-contrast plays a quiet but critical role in creating that response.
Of course, achieving that level of consistency across multiple listings can be time-consuming—which is why many photographers turn to professional editing support.
Have You Ever Thought To
Outsource Photo Editing?
Try it today with 5 free edits from three professional photo editors.
Elevating Your Listings With Professional Editing Support🖼️
Maintaining a high-end aesthetic across dozens of photos requires both skill and time. Micro-contrast, in particular, demands restraint and precision.
Professional real estate photo editing services like PhotoUp help photographers consistently achieve that elevated, luxury-ready look.
Our expert editors can help you with:
- Perspective correction
- Exposure balancing
- HDR blending
- Window masking
- Sky replacement
- Day-to-dusk conversion
- Distraction removal
- Consistent color grading
- And much more!
By outsourcing detail refinement and controlled texture enhancement, photographers can focus on shooting, client relationships, and scaling their business—while ensuring every listing feels polished and premium.
Browse Top Dedicated
Real Estate Photo Editors
Ready-to-hire editors for real estate photo editing, and more.
Your Real Estate Marketing Partner
In addition to photo editing, PhotoUp is a complete one-stop shop for real estate marketing and also offers services such as:
Whether you’re a real estate photographer striving to elevate your craft or simply someone eager to capture the beauty of everyday moments, we’ve got you covered with everything you need.
How to Get Started
Are you wondering how to get started using PhotoUp’s editing service? It’s super easy!
This is all you need to do:
Step 1. Sign up for a free PhotoUp account.
Step 2. Upload your photos to our easy-to-use software.
Step 3. Choose the level of editing that you need and provide instructions (optional).
Step 4. Wait for PhotoUp professional editors to edit and return the photos in less than 24 hours.
Step 5. Download and start using your beautifully edited photos.
PhotoUp Real Estate Photo Editing Uploader
To see how easy it is to get started with PhotoUp, check out our real estate photo editing uploader tutorial:
As simple as that!
In today’s competitive real estate market, subtle refinements often create the biggest impact. And when micro-contrast is used with intention and control, it becomes one of the most powerful tools for making homes feel undeniably high-end.
Sign up for a free PhotoUp account today, and let our expert editors help you refine your real estate photography with micro-contrast and other pro edits!
For a limited time, we even offer you 10 free credits you can use on any of our services when signing up for an account.
We hope this blog post has helped you understand the role of micro-contrast in making homes feel luxurious and high-end in real estate photo editing. Check out some related resources before you go:

