


Table of Contents
- Why Bold Wall Colors Can Turn Buyers Away
- The Role of Real Estate Photo Editing in Wall Color Updates
- 6 Steps to Neutralize Bold Wall Colors With Photo Editing
- Neutralizing Wall Colors in Real Estate Photos FAQ
- Why Partner With PhotoUp for Real Estate Photo Editing
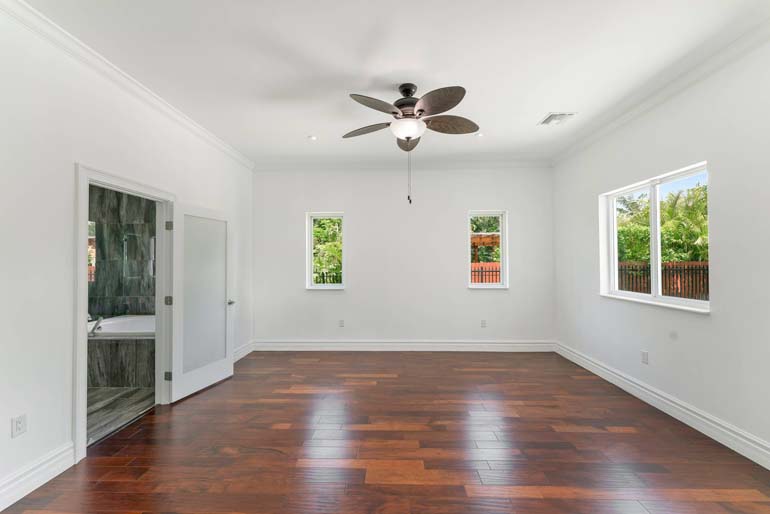
When selling a home, first impressions matter. From curb appeal to interior spaces, buyers want to picture themselves living in the property. However, bold or unusual wall colors can make this harder by distracting viewers or clashing with their personal tastes.
Fortunately, real estate photo editing provides a solution. By digitally neutralizing bold wall colors, you can present a clean, versatile look that appeals to a wider audience without requiring a fresh coat of paint.
In this guide, we’ll cover why neutralizing bold wall colors matters, key real estate photo editing techniques for achieving natural results, and how professional editors can help you sell listings faster.
Let’s dive in!
Why Bold Wall Colors Can Turn Buyers Away🎨
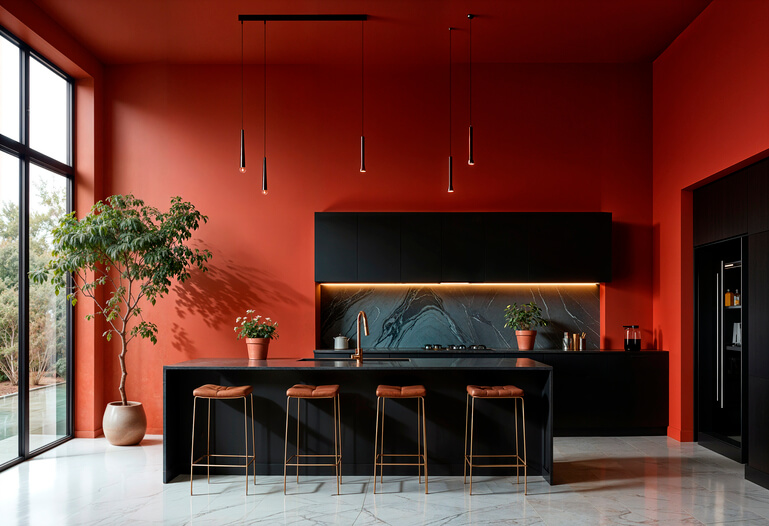
A vibrant red dining room or neon-green bedroom might reflect a homeowner’s personality, but for potential buyers, these colors can create a barrier if they don’t share the same taste.
Here’s why bold wall colors can hurt your listing:
- Distracts From the Home’s Features: Instead of noticing the beautiful hardwood floors or spacious layout, viewers fixate on the loud paint color
- Makes Spaces Look Smaller: Dark or saturated colors can shrink a room visually
- Limits Buyer Imagination: Buyers want to envision their furniture and décor, which is easier with neutral backdrops
- Triggers Subconscious Bias: Certain colors may evoke negative emotions or personal dislikes
In contrast to bold colors, neutral colors like beige, gray, or soft white have the broadest buyer appeal because they create a blank canvas according to the National Association of Realtors (NAR).
Let’s take a look at the role of real estate photo editing in transforming bold wall colors into appealing, natural tones.
The Role of Real Estate Photo Editing in Wall Color Updates⚡
Painting over bold colors before listing a home for sale can be costly and time-consuming. That’s where real estate photo editing comes in!
For example, a bright orange kitchen overwhelms the cabinets and countertops. Changing to soft gray or white walls highlights the sleek finishes and makes the space feel modern.
Skilled editors can digitally transform wall colors in listing photos to showcase a home in its best light—literally and figuratively.
Key Benefits of Neutralizing Colors
Here are some advantages of neutralizing colors through real estate photo editing instead of repainting each room:
- Cost-Effective Solution: Sellers can save hundreds of dollars on paint and labor
- Faster Turnaround: Agents can get listing-ready images in 24–48 hours
- Versatility: It allows you to experiment with multiple color palettes before deciding on a final look
- Staging Flexibility: You can also combine color changes with virtual staging for maximum appeal
By leveraging real estate photo editing, you can quickly and affordably present a clean, modern look that attracts more buyers and helps your listing stand out in a competitive market.
With these benefits in mind, let’s examine some effective real estate photo editing techniques to help you neutralize bold wall colors.
Have You Ever Thought To
Outsource Photo Editing?
Try it today with 5 free edits from three professional photo editors.

6 Steps to Neutralize Bold Wall Colors With Photo Editing🏡
Achieving a realistic and seamless result requires professional techniques. Here’s a step-by-step overview of the real estate photo editing process:
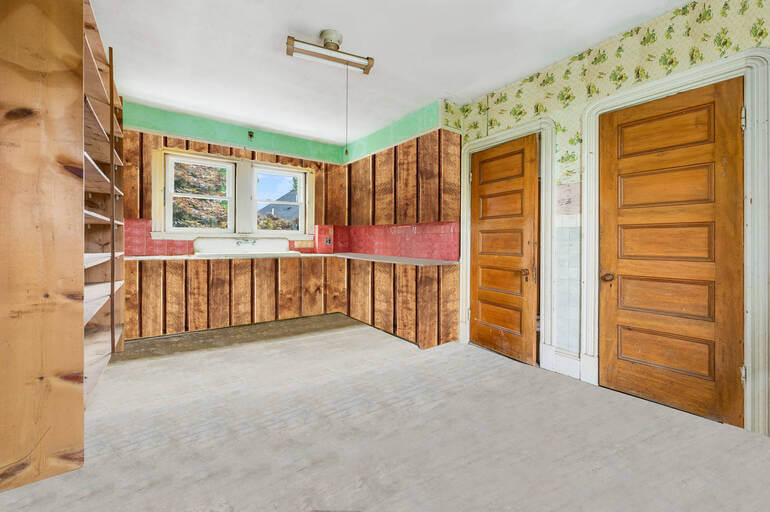
1. Identify Problem Areas
To get started, you need to identify the problem areas. Bold accent walls, heavily patterned wallpapers, or outdated color schemes should be the main focus.
2. Use Precision Masking Tools
Next, use masking and layer techniques to isolate walls without affecting trim, windows, or furniture.
For more details, you can check out our guide on how to use a layer mask in Photoshop.
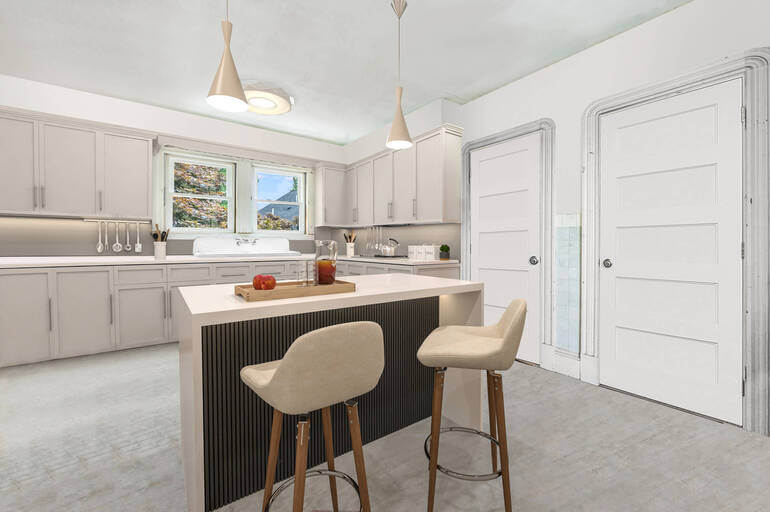
3. Apply Neutral Tones
Now, it’s time to apply neutral tones in your images. Popular neutral shades include:
- Warm beige
- Light gray
- Soft white
- Greige (gray-beige blend)
These colors create a fresh, inviting atmosphere while keeping the focus on the property’s architecture.
For example, a deep purple bedroom feels dark and cramped. Editing it using warm beige walls reflects more light, making the room appear spacious and serene.
4. Adjust Lighting and White Balance
Lighting plays a huge role in color perception. Fine-tuning exposure and white balance will ensure the new wall color looks natural.
If you want to brush up on your exposure and white balance editing skills, these tutorials will help you:
5. Leverage Virtual Staging to Make Updates to Walls
You can also use virtual staging to change the wall colors, as well as digitally furnish empty spaces or decorate new construction.


PhotoUp’s AI virtual staging service is quick and affordable, starting at $5.00 per image with a turnaround time of 48 hours or less.
This will help potential buyers see the home’s full potential and imagine themselves living there, ultimately accelerating sales.
6. Review for Realism
Before delivering the final image, remember to perform quality checks to avoid telltale signs of editing like hard edges or inconsistent shadows.
And there you have it! Follow these editing steps, and you’ll be able to neutralize bold wall colors for broader buyer appeal in a heartbeat.
Neutralizing Wall Colors in Real Estate Photos FAQ
Is digitally changing wall colors misleading to buyers?
No. The goal is to help buyers visualize the space’s potential. Listing descriptions can clarify that photos represent possible décor updates.
Can all wall colors be neutralized digitally?
Yes, but complex patterns or textures like brick may require more advanced editing techniques to maintain realism.
How much does wall color real estate photo editing cost?
Pricing varies depending on the number of images and complexity. Most services range from $1.50 to $3.00 per photo, making it far more affordable than repainting.
Will the new colors look natural?
When done by skilled real estate photo editors, the results are virtually indistinguishable from an actual repaint. Correct lighting adjustments are key to achieving realism.
How quickly can I get edited photos back?
Professional editing services like PhotoUp typically deliver edited images within 24 hours, ensuring your listing stays on schedule.
Have You Ever Thought To
Outsource Photo Editing?
Try it today with 5 free edits from three professional photo editors.
Why Partner With PhotoUp for Real Estate Photo Editing💎

Neutralizing bold wall colors is just one way PhotoUp helps real estate photographers, agents, and sellers create stunning, market-ready images.
Since its humble beginnings in 2011 with a team of just four, PhotoUp has grown into a global powerhouse with hundreds of highly skilled real estate photo editors.
Over a decade later, their diverse and experienced team has the technical know-how to handle any editing project—whether it’s a small touch-up or a complex, large-scale job.
Our team of expert editors specializes in:
- Accurate color correction and wall color neutralization
- Lighting and exposure adjustments
- Object removal and decluttering
- Perspective correction
- virtual staging for added buyer appeal
- And much more!
With PhotoUp, you’ll save time, money, and effort while ensuring your property photos are polished and professional.
And there’s more…
Browse Top Dedicated
Real Estate Photo Editors
Ready-to-hire editors for real estate photo editing, and more.
A Complete Real Estate Marketing Partner
Except for basic and advanced editing services, PhotoUp also offers a comprehensive range of real estate marketing services, including:
We have everything you need to enhance and market real estate photography in one user-friendly software.
Adding these services to your product offerings can also help you become more valuable to your clients and grow your business.
It’s a win-win!
How to Get Started
Getting started using PhotoUp’s photo editing service is super easy.
Here’s a step-by-step guide to using PhotoUp:
Step 1. Sign up for a free PhotoUp account.
Step 2. Upload your photos to our easy-to-use software.
Step 3. Choose the level of editing that you need and provide instructions (optional).
Step 4. Wait for PhotoUp professional editors to edit and return the photos in less than 24 hours (48 hours for virtual staging).
Step 5. Download and start using your beautifully edited photos.
PhotoUp Real Estate Photo Editing Uploader Tutorial
To see how easy it is to get started with PhotoUp, check out our real estate photo editing uploader tutorial:
As simple as that!
Ready to attract more buyers and close deals faster?
Sign up for a free PhotoUp account today to transform your real estate photos and showcase your listings at their very best.
For a limited time, you even get 10 free credits you can use on any of our services when you sign up for an account.
We hope this blog post helped you learn how to neutralize bold wall colors in real estate photo editing for broader buyer appeal. Before you go, check out the following resources for more interesting content:

