


Table of Contents
- Why Masking Windows Matters in Real Estate Photos
- How to Mask Windows in Photoshop (Video Tutorial)
- Window Masking FAQ
- Let PhotoUp’s Expert Editors Mask Your Windows!
In real estate photography, windows are one of the most powerful storytelling elements in an image. They don’t just let in light—they frame views, create atmosphere, and shape how buyers emotionally connect with a space.
However, windows are also one of the biggest technical challenges when editing interior photos. Without proper window masking, images can suffer from blown-out highlights, haze, or dull, washed-out scenery outside the glass.
This is where masking windows in Photoshop becomes essential.
In this step-by-step guide, we’ll show you how to mask windows in Photoshop. We’ll also cover why window masking matters and what you need to get started.
Why Masking Windows Matters in Real Estate Photos🏡
Here are 4 powerful reasons why you should consider masking windows in your real estate photos:
1. Creates Clear, Crisp Exterior Views
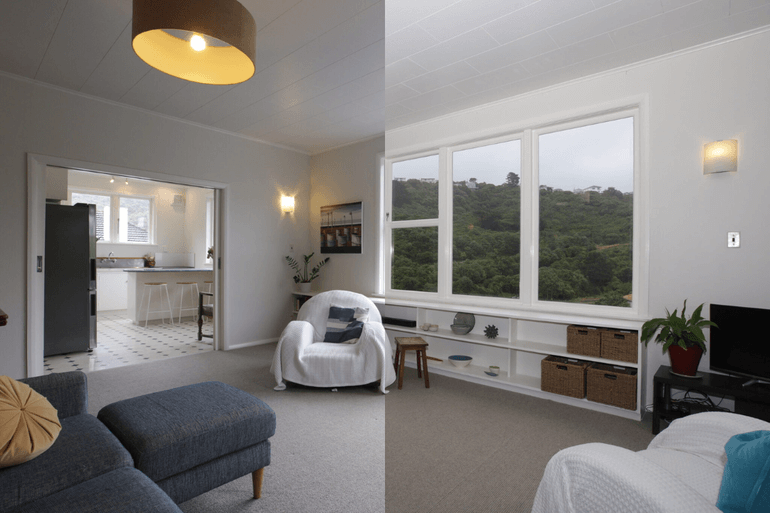
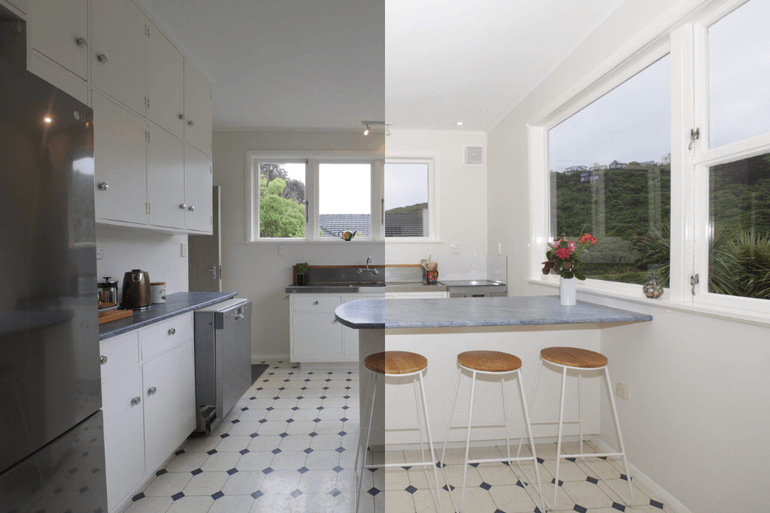
One of the most common issues in real estate interiors is blown-out windows.
The inside of the room is exposed correctly, but the outside becomes a bright white wash.
Window masking allows you to blend properly exposed exterior shots into your interior photo, revealing beautiful skies, greenery, water views, or cityscapes.
2. Elevates Perceived Property Value
Homes with visible, appealing window scenery appear more luxurious and desirable.
Whether it’s a city skyline, ocean view, wooded backyard, or manicured neighborhood, buyers want to see lifestyle—not just walls and furniture.
Clean window views help buyers feel the environment, and that emotional connection directly impacts willingness to pay.
3. Improves Professionalism & Consistency
Listings with professionally edited photos stand out instantly.
Realtors know that first impressions online matter, and images with perfectly masked windows look polished, intentional, and high-quality.
This boosts credibility, attracts more showings, and positions the listing as premium.
4. Helps Homes Sell Faster & for More
Multiple industry studies show that listings with professional photography receive more clicks, more interest, and often sell faster.
In fact, according to World Metrics, listings with high-quality photos receive 118% more online views compared to those with lower-quality images. In addition to increased visibility, they also receive up to 47% higher price per square foot.
Window masking contributes to that by making every image clearer, brighter, and visually compelling.
When buyers can see the full space—and the view that comes with it—they’re far more likely to take action.
In short, masked windows help listings pop, buyers engage longer, and homes ultimately sell stronger.
What You Need Before You Start📸
To mask windows effectively in Photoshop, it’s best to shoot bracketed exposures, particularly:
- One exposure for the interior
- One correctly exposed for the window view
Shooting in RAW format is highly recommended for maximum dynamic range. For more details, you can visit our blog post on the best practises for shooting bracketed images for HDR.
Additionally, a tripod helps maintain perfect alignment between frames, though Photoshop can auto-align if needed.
Have You Ever Thought To
Outsource Photo Editing?
Try it today with 5 free edits from three professional photo editors.

How to Mask Windows in Photoshop (Video Tutorial)🛠️
Let’s walk through a reliable, clean workflow on how to mask windows in Photoshop. You can either watch the video tutorial or read the text with screenshots below:
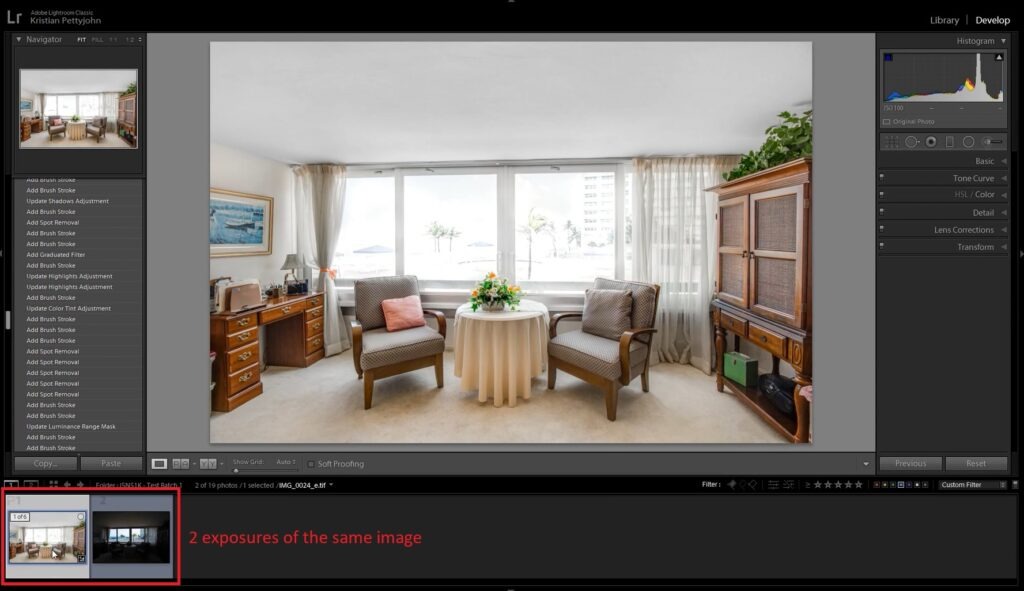
Step 1. To get started, you’ll need (at least) two exposures of the same image. One, the base file, is for the normal exposure of the interior of the room.
The second exposure is for the window view. The window view is set at the correct exposure, while the room view is underexposed.
To enhance the window view in the window view exposure, let’s make a few adjustments using the Image Adjustment Panel in Lightroom.
Keep in mind that the settings you need to change will vary from one photo to another, depending on the level of brightness and vibrance you desire for the window view.
Step 2. Next, select both photos.
Step 3. Right-click and choose Edit In. Then, scroll down and click Open as Layers in Photoshop.
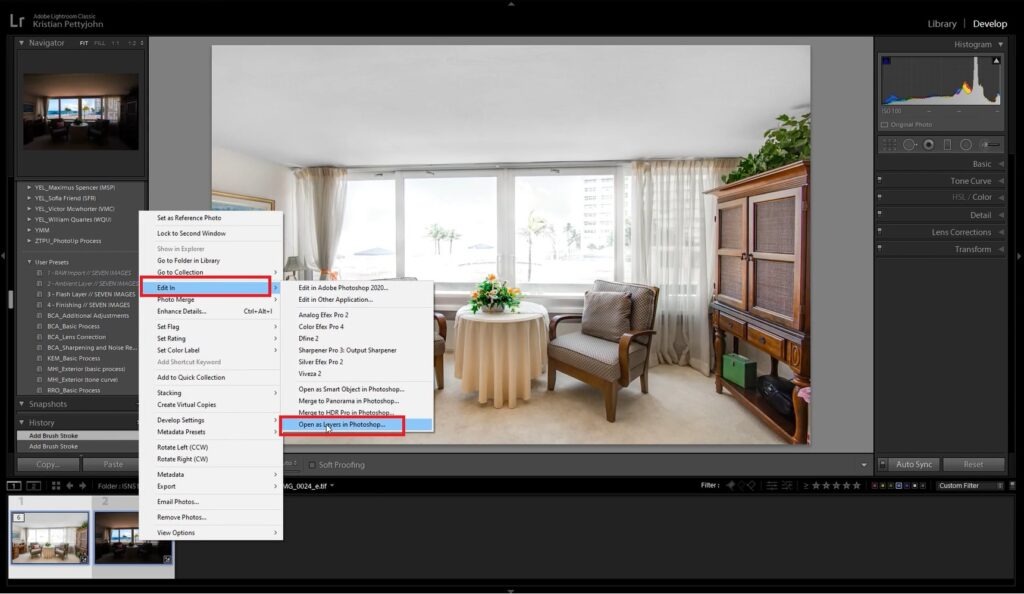
In Photoshop, drag and place the room-view image under the edited window-view image.
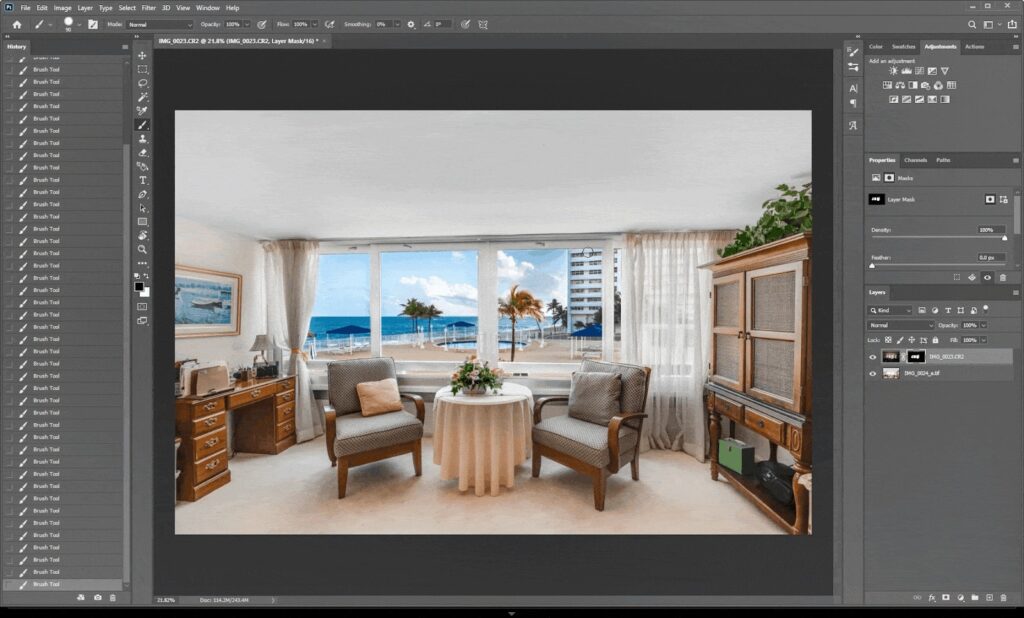
Step 4. Now, select the window view layer and click the Add Layer Mask icon at the bottom.
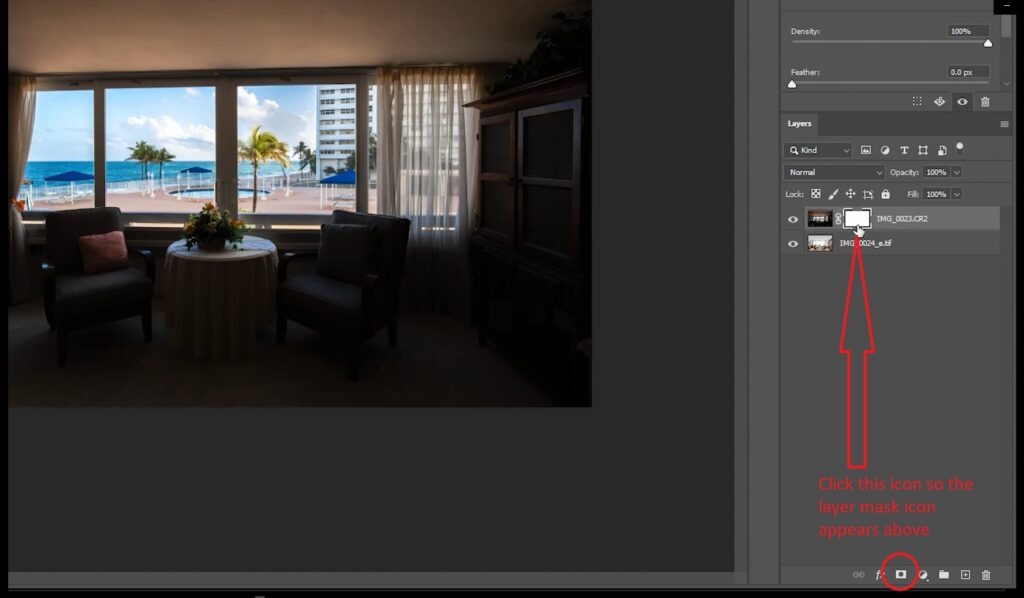
Step 5. To hide the layer without removing it, we need to invert the layer mask. Click Ctrl + I, or Command + I on your keyboard. Then select the Layer Mask.
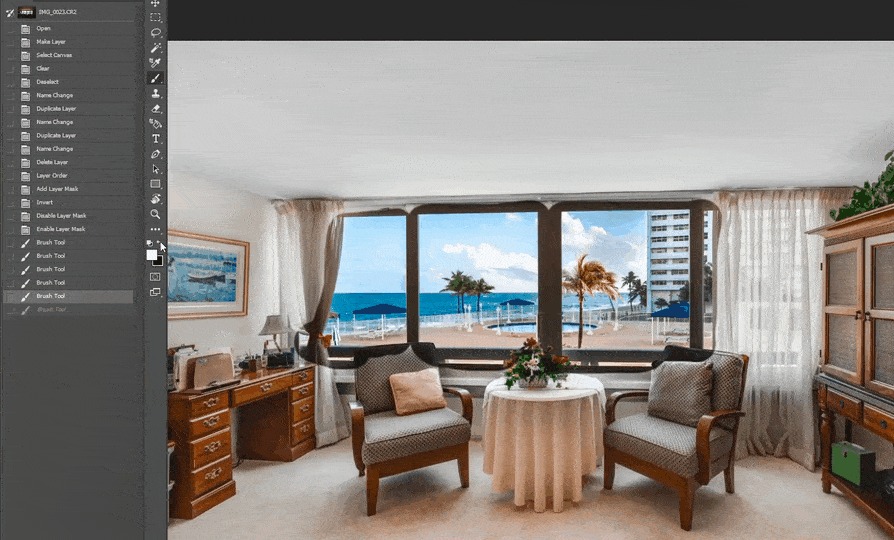
Start Masking the Window View
Step 6. Start masking the window view by using the Brush Tool. Adjust the Hardness setting to around 85%, and make sure the layer color in the menu bar is set to white. Then, brush over the image of the window view to the room view.
Step 7. To get rid of overlapped frames, let’s change the layer color to black. Simply brush over the areas that are overlapping to restore the original look.
You can also do steps 7 and 8 using the Pen Tool and make a selection of the windows, whatever you find easiest to do.
Step 8. Lastly, if you want to brighten up the window a bit, you can simply adjust the Opacity. This helps with the transition between the inside and outside and makes the view appear more natural.
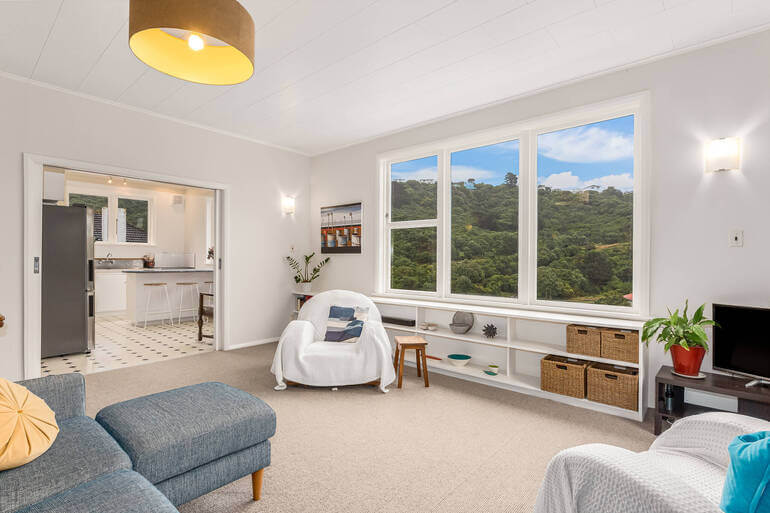
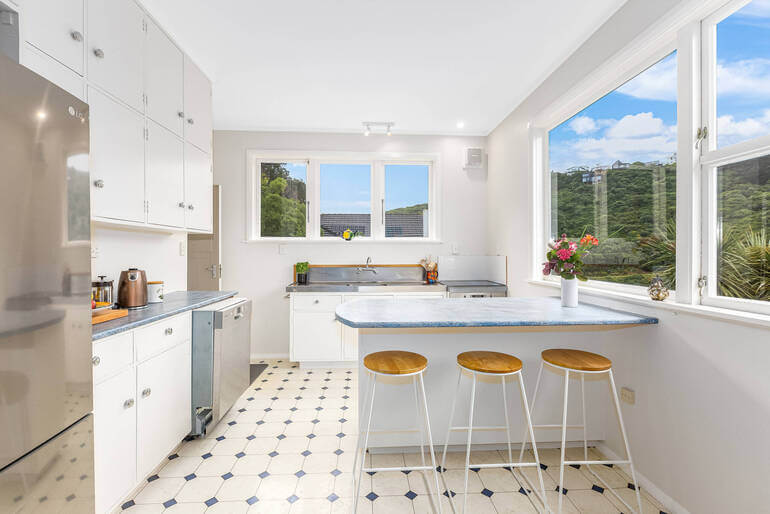
And voila! You have now learned how to mask windows for real estate photography in Photoshop.
Let’s move on to some professional window masking tips for even better results.
Extra Professional Window Masking Tips
Here are some extra window masking tips to consider when creating breathtaking views:
✔ Use a tripod when shooting
✔ Avoid extreme HDR “fake” looks
✔ Keep the window brightness slightly lower than the room
✔ Don’t oversaturate skies or greenery
✔ Maintain straight lines and perspective
Your goal is a believable, inviting result—not an obvious composite.
Window Masking FAQ❓
Do I always need to mask windows?
Not always. If the window exposure is naturally balanced or the view outside isn’t important, simple Lightroom adjustments may be enough. But for interiors with strong contrast or valuable exterior scenery, masking is the best choice.
Can I do this in Lightroom instead of Photoshop?
Lightroom offers masking tools, but Photoshop gives far greater precision and control. For professional real estate editing, Photoshop remains the gold standard.
What if my exterior view is extremely bright?
You may need more than one darker exposure. Shooting bracketed images is key. In worst-case scenarios, sky replacements or virtual exterior enhancement may help.
How long does it take to mask windows?
For an expert editor, typically 2–5 minutes per image. For beginners, expect 8–15 minutes until you get comfortable.
Is masking windows worth the effort?
Absolutely. Masked windows significantly enhance visual quality, elevate perceived property value, and improve listing performance online.
Clear Window Views = Stronger Photos
Window masking is one of the most impactful edits you can make to elevate interior real estate photography.
It helps present properties in the best possible light, showcases lifestyle and surroundings, and delivers images that feel bright, professional, and emotionally engaging—exactly what today’s buyers respond to.
But doing it yourself takes time, precision, and expertise. Thankfully, you can outsource tedious editing tasks to the professionals at PhotoUp.
Have You Ever Thought To
Outsource Photo Editing?
Try it today with 5 free edits from three professional photo editors.
Let PhotoUp’s Expert Editors Mask Your Windows!🪟

If you’d rather skip the tedious editing work and still get flawless results, PhotoUp is here to help.
Our expert real estate photo editors specialize in advanced window masking, exposure blending, HDR corrections, object removal, and more.
You’ll get beautifully polished photos with clear, natural-looking window views—without the stress, time drain, or high cost. Also, we offer a fast 12-24 hour turnaround, professional quality, and budget-friendly pricing.
Browse Top Dedicated
Real Estate Photo Editors
Ready-to-hire editors for real estate photo editing, and more.
A Complete Real Estate Marketing Partner
Apart from real estate photo editing, PhotoUp is a complete real estate marketing partner and also offers additional services such as:
We have everything you need to enhance and market real estate photography under one roof!
Easy Upload & Order Process
Getting started with PhotoUp is super easy – this is what to do:
Step 1. Sign up for a free PhotoUp account.
Step 2. Upload your photos to our easy-to-use software.
Step 3. Choose the level of editing that you need and provide instructions (optional).
Step 4. Wait for PhotoUp professional editors to edit and return the photos in less than 24 hours.
Step 5. Download and start using your beautifully edited photos.
It’s really as quick and easy as 1-2-3!
Let PhotoUp handle your window masking so you can focus on shooting more, earning more, and delivering images your clients love.
Get started with PhotoUp today, and get 10 free credits you can use on any of our services when signing up for an account – it’s totally free!
We hope this blog post provided you with a step-by-step guide on how to mask windows for real estate photography in Photoshop. If you found this post useful, you may also want to check out the following resources:

