


Table of Contents
- What Is HDR Photography?
- Equipment You’ll Need
- How to Shoot Bracketed Images for HDR
- Blending Bracketed Images
- Why HDR Matters in Real Estate Photography
- Pros and Cons of HDR Real Estate Photography
- Advanced Tips and Creative Options for HDR Blending
- How to Edit HDR Real Estate Photos in Lightroom
- Outsource HDR Blending to the Experts at PhotoUp
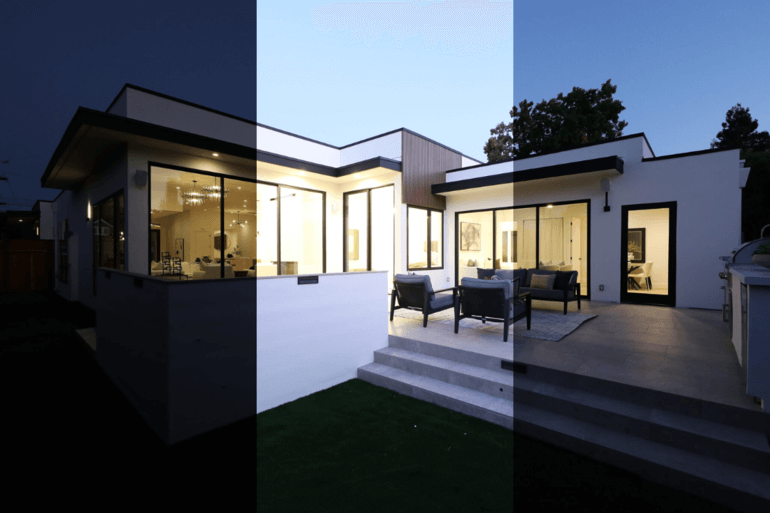
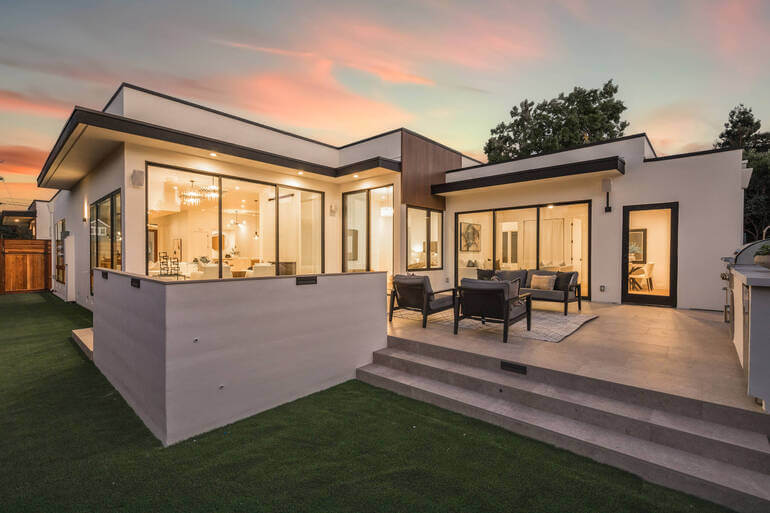
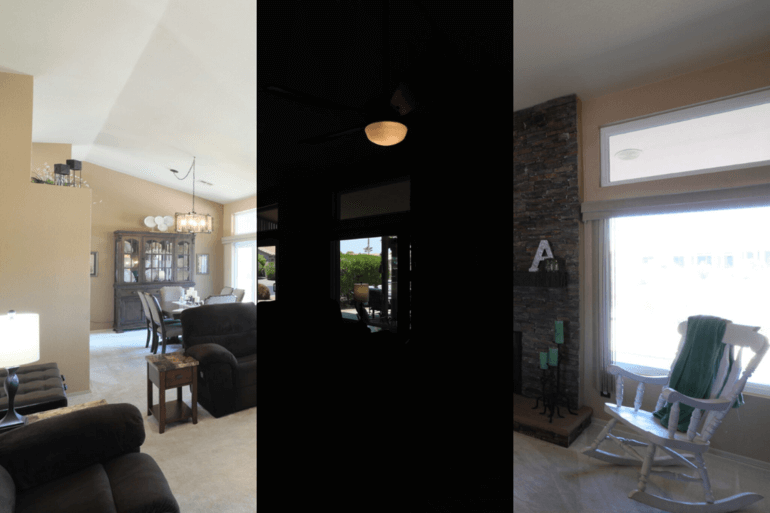
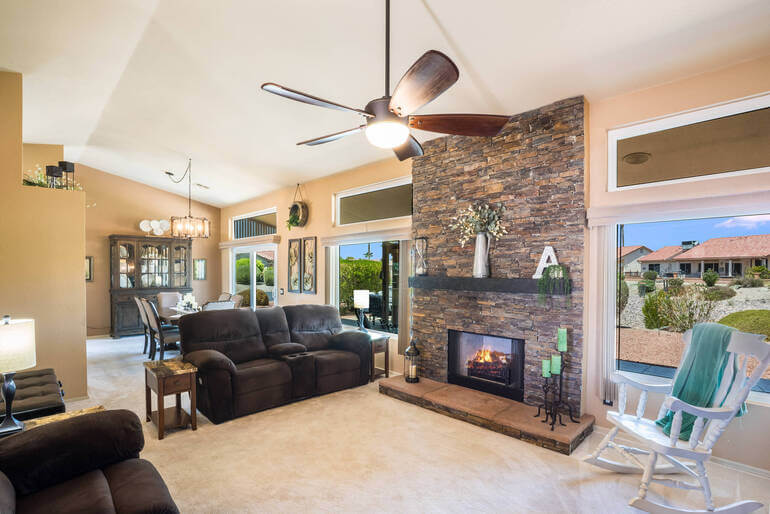
High Dynamic Range (HDR) photography has become a staple in real estate photography. It’s one of the most effective techniques for producing bright, evenly lit images that highlight both the details of interior spaces and the views outside windows.
When done correctly, HDR photos make properties look inviting, spacious, and true-to-life—qualities that are crucial when marketing homes online.
In this guide, we’ll cover what HDR photography is, why it’s so widely used in real estate, and how to capture bracketed images for stunning results. We’ll also review the essential equipment, software, and best practices to help you create professional HDR photos.
Let’s get started!
What Is HDR Photography?🌄
HDR stands for High Dynamic Range. The “dynamic range” of a photo refers to the range of brightness levels, from the darkest shadows to the brightest highlights.
A single exposure often struggles to capture all of this detail, especially in scenes with strong contrast, like a room with dark furniture and bright sunlight pouring through the windows.
That’s where HDR comes in.
By blending multiple exposures of the same scene, HDR photography creates a balanced image that maintains detail in both shadows and highlights—without blowing out whites or crushing blacks.
Before we get to the nitty-gritty, let’s explain the histogram in an HDR image.
Understanding the Histogram📊
If you’ve ever edited a photo in Lightroom (LR), Photoshop (PS), or similar software, you’ve probably noticed the histogram in the corner of your workspace.
This graph shows how the pixels of your photo are distributed across the brightness scale:
- Left side: pure black
- Right side: pure white
- Middle: midtones (the grays and natural tones of most photos)
An ideal HDR photo will have a histogram stretching from edge to edge, with most pixels concentrated in the middle, forming a bell-curve shape.
This indicates a full tonal range with good balance—details in both highlights and shadows, while keeping the bulk of the image natural and mid-toned.
But what equipment do I need to shoot HDR? Let’s take a look at that next.
High-Quality & Consistent
Real Estate Photo Editing
Hire a dedicated editor with performance metrics from $7/hour.

Equipment You’ll Need💡

To get the best HDR results, you’ll need more than just a good eye. Here’s the essential gear:
| Sturdy Tripod: Keeps frames perfectly aligned. Look for one with a solid build and adjustable legs. |
| Camera Body: A full-frame DSLR or mirrorless camera that performs well in low light. Examples: Nikon D810, Canon 5D Mark IV. |
| Wide-Angle Lens: A 15–18mm lens allows you to capture entire rooms, making them look more spacious. |
| Remote Trigger or Timer: Reduces camera shake between shots. |
Optional but useful: a flash unit (for color correction or hybrid HDR/flash methods) and a bubble level for perfectly straight lines.
That said, let’s move on to how to shoot bracketed images for HDR.
How to Shoot Bracketed Images for HDR📷
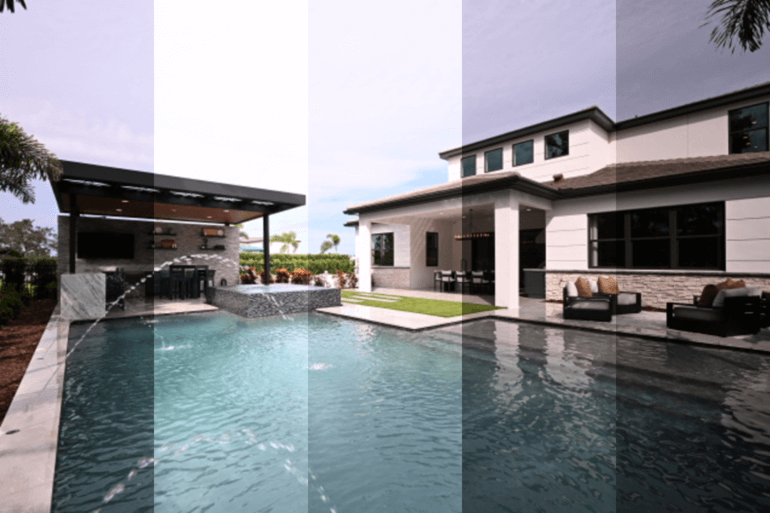
The key to HDR is bracketing—capturing multiple versions of the same photo at different exposures. Instead of relying on one shot, you take several: some darker, some brighter, and one “neutral” exposure.
These images are then blended into a single composite that pulls the best details from each exposure.
Common Bracketing Patterns
Most real estate photographers use:
- Five-shot bracket: -2, -1, 0, +1, +2
- Or, three-shot bracket: -2, 0, +2
Here, 0 represents the “best” or neutral exposure (what the camera meter recommends), while negative numbers are darker exposures and positive numbers are brighter.
Modern DSLR and mirrorless cameras make this easy with auto-exposure bracketing (AEB).
Just set your range (e.g., -2 to +2), mount your camera on a tripod, and the camera will automatically capture the sequence with minimal movement between shots.
Pro tip: Always use a tripod and, if possible, a remote shutter release or 2-second timer. Even tiny movements between shots can cause misalignment when blending.
Camera Settings
Furthermore, there are a few camera settings to keep in mind when it comes to capturing great HDR photos:
- Setting ISO (Film Speed) to 100: First of all, make sure to set your ISO (film speed) to 100 for the sharpest and clearest images. It’s also important to use a medium or large JPEG setting if you plan on sending your photos through our system
- Use a Cropped Sensor: When it comes to shooting with a DSLR and a wide-angle lens, we recommend not going too wide and instead sticking with a cropped sensor of 12mm or a full frame of 17mm for the best results
- Set Aperture Priority to F7.1-11: If you want to make your real estate photos really stand out, set your aperture priority to F7.1-11. This will give you the sharpest images possible. Of course, if you’re not comfortable with changing your camera settings, you can always use the “Auto/Program” setting instead
Remember to shoot in RAW format, which will give you more control over the final image.
Have you finished shooting? Then, it’s time to blend your images to create clear and detailed real estate photos.
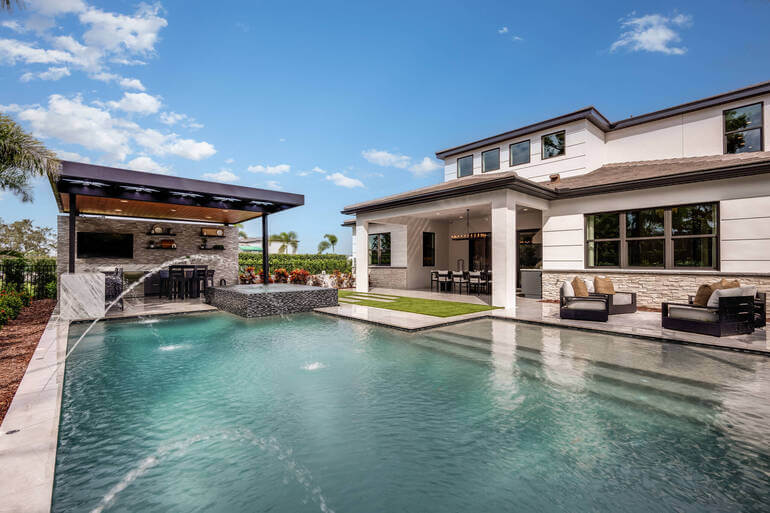
Blending Bracketed Images🖥️
Once you’ve captured your bracketed set, the next step is blending them. This is where software comes in.
Some popular HDR programs include:
- Photomatix – Dedicated HDR software with robust blending options
- LR/Enfuse – A Lightroom plugin that creates natural-looking blends
- Photoshop – Built-in HDR merge tools, though often less specialized
These programs analyze your bracketed exposures and combine them into a single HDR image.
The goal is a well-balanced, natural photo—bright enough to showcase the room, but not so processed that it looks fake or cartoonish (a common HDR beginner mistake).
If you’re still on the fence, let’s take a look at why HDR matters in real estate photography.
Why HDR Matters in Real Estate Photography🏡
Recent studies show that property listings featuring high dynamic range (HDR) photos sell 50% faster and increase online views by 118%.
HDR editing enhances the visual appeal of a property through richness and depth, providing potential buyers with a clearer picture of a home’s features.
Additionally, real estate photographers often rely on HDR because it:
- Captures Detail Without Extra Lighting: Eliminates the need for setting up multiple flashes
- Balances Window Views: Keeps the outdoor scene visible while properly exposing the interior
- Saves Editing Time: Automated blending tools streamline the workflow
- Improves Marketability: Bright, detailed photos stand out on listing sites and attract more buyers. In fact, homes with professional photography have an 84% higher chance of being sold within the listing period compared to homes with amateur photography
Here’s a cool HDR real estate photography statistics infographic to check out:

While some pros prefer to combine HDR with flash photography (known as “flambient”), HDR alone remains one of the most accessible and effective methods for beginners and professionals alike.
To figure out which technique is best for you, you can check out our blog post on flambient photography vs HDR: Which is best?
Pros and Cons of HDR Real Estate Photography✅❌
To give you a better overview, here are some pros and cons of HDR photography to consider.
Pros✅
| Natural-Looking Results: HDR creates a well-balanced image that showcases both interior and exterior details. |
| Speed: HDR shoots don’t require complicated lighting setups, making it faster to capture multiple properties. |
| Cost-Effective: Since it primarily uses natural lighting and bracketing techniques, HDR doesn’t require advanced equipment or many accessories. |
| Great for Well-Lit Spaces: HDR shines in areas with large windows and natural light. |
Cons❌
| Inconsistent Results in Low Light: HDR struggles in poorly lit spaces, which can result in noise or unappealing color shifts. |
| Less Control Over Lighting: HDR relies on existing lighting, which can sometimes lead to less dramatic or flattering images. |
| Post-Processing Time: Merging multiple images and adjusting the tone mapping can add time to the editing process. |
By weighing these pros and cons, you can determine whether HDR is the right approach for your real estate photography projects or if alternative techniques may better suit your needs.
Before we leave the topic of HDR, let’s share some tips and creative options when editing your real estate photos.
Advanced Tips and Creative Options for HDR Blending✨

Once you’re comfortable with the fundamentals of HDR photography, it’s time to take your skills to the next level.
Mastering advanced techniques not only gives you more creative control but also helps you overcome tricky lighting situations that can make or break a real estate photo.
From refining window views to achieving more natural colors, these advanced options allow you to deliver polished, professional images that stand out.
Here are some creative possibilities:
- Manual Blending: If the software’s result looks unnatural, try layering exposures in Photoshop and manually masking details
- Window Pulls: For clear, crisp window views, shoot an extra exposure, exposed specifically for the view. Blend it into your HDR image with masking
- Flash Blending: Use a flash to neutralize indoor color casts and then blend the flash shot on “Color” mode for cleaner tones
- Outsourcing Editing: If HDR blending isn’t your strength, services like PhotoUp can handle it for you, saving time while ensuring professional results
These advanced HDR strategies can transform your workflow, giving you the flexibility to produce images that feel natural, balanced, and visually appealing.
Whether you choose to experiment with manual blending, enhance window views, or outsource editing to professionals, the key is to use the right method for each space.
By expanding your toolkit beyond basic HDR, you’ll be able to consistently deliver photos that impress clients and help properties shine online.
How to Edit HDR Real Estate Photos in Lightroom
If you want to get into action, let’s take a closer look at how to easily edit HDR real estate photos in Lightroom.
You can either watch the video tutorial or continue reading the text below:
Import and Infuse Photos
Step 1. To get started, Import your photos into Lightroom. Then, Sort your Photos by File Name to keep the photos in order during the HDR process.
Step 2. To produce an HDR photo, we need to infuse them. So, Select your images, right-click, and select Stacking and Group into Stack. Or you can select them all and Auto Stack by Capture Time, and Lightroom will automatically stack them.
Step 3. For the infuse process, you can also infuse multiple stacks of photos. Just select them all, and then go to File >> Plug-in Extras, and then click on Blend exposures using LR/Enfuse. This will open a dialog box.
Step 4. In the Auto Align tab, you need to make sure the option Automatically align images before blending them is checked so that Lightroom will automatically align the photos before blending them.
Step 5. Since we stack our photos, in the Output tab, the Batch Mode should be checked. Next, in Output files (on the same tab), you need to also check the Create blended images in the same folder as the images in the stack option.
Saving Your Infused Files
Step 6. To save the infused files in the same folder as the original (still on the same tab under after blending), check the Reimport image into Lightroom option so the infused product will automatically appear in Lightroom after reviews.
Besides that, you have the option to Stack with originals. Stacking with originals will automatically group with the images you’ve stacked beforehand. It’ll be the first image on the stack.
On the other hand, if you opt not to stack with originals, the infused image will appear beside the stacked images. Either way is fine.
Step 7. Next, click Infuse Images. The progress can be viewed in the upper left corner of the screen. However, since we infused multiple stacks of photos, this will take time.
Step 8. When the infuse is done and you don’t see the infused photos, go to the Library and select the Folder, where you put the images. This will sort of refresh the folder.
If you are still confused, the infused image will always be a tiff file. When the infuse is done you can now start editing the photos with basic editing.
And that’s it!
Wrapping Up
HDR photography is one of the most powerful tools in a real estate photographer’s toolkit.
By shooting bracketed exposures and blending them into a high dynamic range composite, you can produce images that showcase every detail of a home—inside and out.
With the right equipment, software, and technique, you’ll be able to deliver bright, professional-quality photos that help listings stand out online.
High-Quality & Consistent
Real Estate Photo Editing
Hire a dedicated editor with performance metrics from $7/hour.
Outsource HDR Blending to the Experts at PhotoUp🤝
Want to take your real estate photography to the next level? PhotoUp is here to help!
Our expert editing team specializes in creating stunning, market-ready images through HDR processing and a wide range of professional real estate photo editing services, such as:
- Professional HDR editing for detail-rich images
- Correcting brightness and exposure for balanced lighting
- Enhancing colors and tones for natural, vibrant results
- Window masking and glare reduction for clear views
- Removing clutter or unwanted objects seamlessly
- Straightening lines and fixing perspective issues
- Softening harsh shadows and brightening dark areas
- Replacing skies and enhancing landscapes with greener grass
- Transforming daytime shots into eye-catching twilight or dusk images
- Editing aerial and drone photography for dramatic perspectives
- …and much more!
With PhotoUp, your photos get the polish they need to capture buyers’ attention and showcase properties at their very best at the low cost of $1.50 per image for on-demand editing.
Additionally, Dedicated Editing can go as low as $0.50 per image, depending on your editing style and batch.
Your Real Estate Marketing Service

On top of that, PhotoUp is a complete one-stop shop for real estate marketing and also offers a complete ecosystem of powerful marketing tools, such as:
We have everything you need to market real estate in one platform!
Plus, adding these product offerings to your toolkit will make you more valuable to your clients and ultimately help grow your business.
How to Get Started
Getting started using PhotoUp’s real estate photo editing service is super easy!
This is all you need to do:
Step 1. Sign up for a free PhotoUp account.
Step 2. Upload your photos to our easy-to-use software.
Step 3. Choose the level of editing that you need and provide instructions (optional).
Step 4. Wait for PhotoUp professional editors to edit and return the photos in less than 24 hours (48 hours for virtual staging).
Step 5. Download and start using your beautifully edited photos.
As simple as that! So why wait?
Sign up for a free PhotoUp account and elevate your HDR real estate photography and marketing today!
Did we mention that you get 10 free credits when you sign up for an account that you can use for any of our services?!
We hope this blog post helped you learn best practices for shooting bracketed images for HDR. If you found this guide useful, make sure to also check out the following resources:

