


Table of Contents
- Do You Have to Stage a Home Before Selling It?
- Which Rooms Are the Most Important to Stage?
- A Faster & More Affordable Option to Traditional Staging
- 4 Best Practices to Virtually Stage a Kitchen
- How to Virtually Stage a Home
- Why Use PhotoUp’s Virtual Staging Service?
Do you want to learn how to virtually stage a home—a kitchen or any other empty or outdated room?
When it comes to selling a home, every space matters and each room should leave a lasting impression. And that includes the kitchen as well! According to NAR research, 35% of buyers think staging the kitchen is important, so it should definitely be a part of your selling proposal.
In this article, we’ll explore the virtual staging process of a kitchen – a quicker and more affordable solution than traditional staging.
Before we get into the nitty-gritty details, let’s first discuss whether you have to stage a home before selling it and what rooms are the most important to stage.
Do You Have to Stage a Home Before Selling It?


Buying a home is more than just about the price. It’s about the feeling you get when you step inside.
You know those times when you walk into a fancy place and it leaves you feeling nothing, and other times when you fall in love with a place that’s not perfect?
Well, that’s because there’s an emotional component to finding your new home. And that’s where staging comes in.
Here’s an amazing fact: a quarter of buyers’ agents say staging a home can increase its value by 1%-5% compared to other homes on the market that are not staged.
And guess what? 17% of agents go even further, saying that staging can bump up the value by 6%-10%!
You see, home staging is crucial because it helps buyers see the potential of the home and picture themselves living there.
And the statistics don’t lie – when an emotional connection is established, buyers may even be willing to pay a higher price for the home. It’s all about making that special connection!
Which Rooms Are the Most Important to Stage?
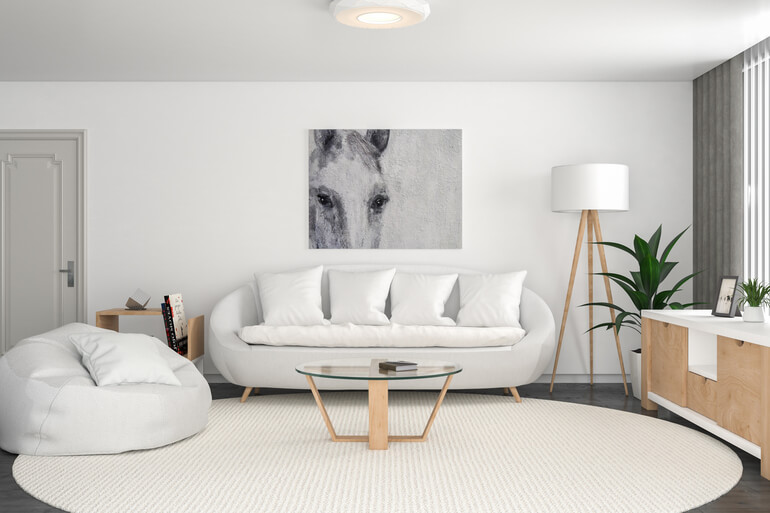
When it comes to staging rooms, the living room, master bedroom, and kitchen take center stage.
Research conducted by the National Association of Realtors (NAR) reveals the significance of these rooms. According to the study, 83% of buyers’ agents emphasize staging the living room, 76% prioritize staging the master bedroom, and 35% say the kitchen is the most important room to stage.
These spaces serve as the heart of any home, where buyers envision themselves unwinding, cooking, and sleeping.
By incorporating furniture, decor, and accessories, an emotional connection can be established with potential buyers, bringing out the full potential of the space.
So, if your goal is to sell your home swiftly and at an optimal price, make sure to give these key rooms top priority.
A Faster & More Affordable Option to Traditional Staging
Traditional home staging can be quite expensive, and time-consuming, and requires physical resources like furniture, decor, and manpower.
But here’s where virtual staging comes to the rescue!
Not only is it 97% cheaper than traditional staging, but it also has a lightning-fast turnaround time of just 24 to 48 hours.
And the best part is that you don’t need any physical resources at all since everything is done digitally.
AI Virtual staging is the perfect solution for real estate professionals who want to save time and money while still making their listings shine.

With virtual staging, you can showcase a beautifully decorated home without the hassle and expense of traditional staging. It’s a total game-changer for the industry!
4 Best Practices to Virtually Stage a Kitchen
Here are 4 best practices to consider when preparing to virtually stage a kitchen.
1. Presentation Is Crucial
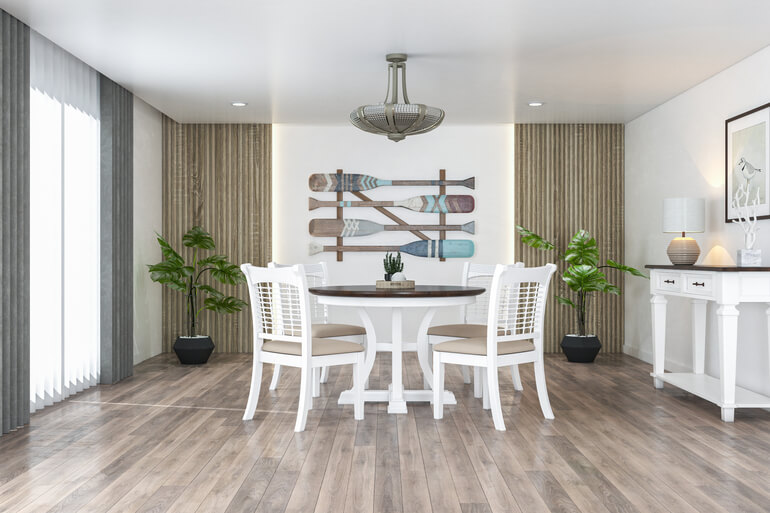
When it comes to selling a home, presentation is absolutely crucial. A well-staged, organized, and sparkling-clean kitchen can truly make a huge difference in attracting potential buyers and sealing the deal.
Now, let’s address a common concern: what if your kitchen isn’t picture-perfect? Well, that’s where AI virtual staging swoops in to save the day. It allows you to skip the stress of deep-cleaning every nook and cranny or hiring a professional cleaner.
All you need to do is upload your kitchen photos, (which we’ll guide you through below), and our talented team will work their magic.
They’ll carefully edit out any imperfections and skillfully add stylish furniture and decor to make your space shine its brightest.
However, to ensure your photos turn out crisp and clear, it’s always a good idea to start with a clean, decluttered, and high-quality image of your kitchen. This helps us avoid any blurry or unsharp shots.
2. Declutter & Depersonalize the Space


Creating a space that potential buyers can truly envision as their own is absolutely crucial. One vital step towards achieving this is by removing all personal items from the kitchen.
Yes, that means bidding farewell to those name-labeled items, fridge magnets, family portraits, photos, and even vacation souvenirs.
The key here is to eliminate anything that might divert a buyer’s attention away from the remarkable features and overall ambiance of the kitchen.
Now, here’s the scoop… Personal items tend to evoke an emotional attachment for the seller, but that doesn’t mean potential buyers will feel the same connection.
After all, everyone has distinctive tastes and preferences. When potential buyers come across someone else’s decor or personal belongings, it can become quite challenging for them to envision the space as their own.
So, if you genuinely want to make a lasting impression on potential buyers, clear out all of those items and create a clean slate for individuals to freely explore the look and feel of the room.
You’ll be pleased to know that this can even be accomplished by virtually removing any personal items in the photos or videos.
3. The Kitchen Should Be a Hub for Entertainment


When it comes to the kitchen, it’s not just about cooking. Buyers envision it as a hub for entertaining, where loved ones gather to chat, enjoy meals, and socialize.
To create an inviting ambiance, consider these tips:
- Add stools for seating at kitchen counter overhangs and islands
- Set up placemats and table settings in dining areas
- Display fresh fruit in a decorative bowl
- Cheer up the space with flowers
- Showcase a bottle of wine with some wine glasses on the counter.
Not to forget, an absolutely clean and organized kitchen is essential when it comes to showcasing a home for sale. No one likes to see a dirty and messy kitchen.
Potential buyers should be able to imagine themselves sharing a meal with their loved ones in a clean and inviting kitchen.
By taking the time to make the kitchen feel like a welcoming haven, you’ll create a space where people can truly relax and unwind.
4. Use Neutral Tones
As a real estate photographer, it’s crucial to grasp the impact of color in setting the mood for your photos.
The perfect color palette can add elegance and sophistication, while the wrong colors can be distracting and detract from the room’s essence.
When selecting colors for your photoshoot, it’s always wise to opt for neutral tones like white, cream, light gray, brown, and beige.
These colors not only look pleasing but also create a calming effect that’s perfect for capturing beautiful photos.
They allow potential buyers to focus on the room’s features instead of being overwhelmed by strong or overly flashy colors.

For instance, if you’re going for a Scandinavian design theme, incorporating soft pastels can enhance the light in the space.
On the other hand, if you’re aiming for a Coastal or Hamptons style theme, pale blues, and whites can really evoke that seaside living vibe.
With that said, let’s take a look at how to quickly and easily virtually stage a home with PhotoUp next.
Quick & Easy
AI Virtual Staging
Interiors. Landscapes. Commercial. Virtually transform any space.

How to Virtually Stage a Home
PhotoUp’s top-notch AI virtual staging service is hassle-free and incredibly easy to use.
With the help of PhotoUp’s AI virtual staging, you can get your images digitally staged and returned to you in less than 10 minutes for the low cost of $3 per image.
This is all you need to do!
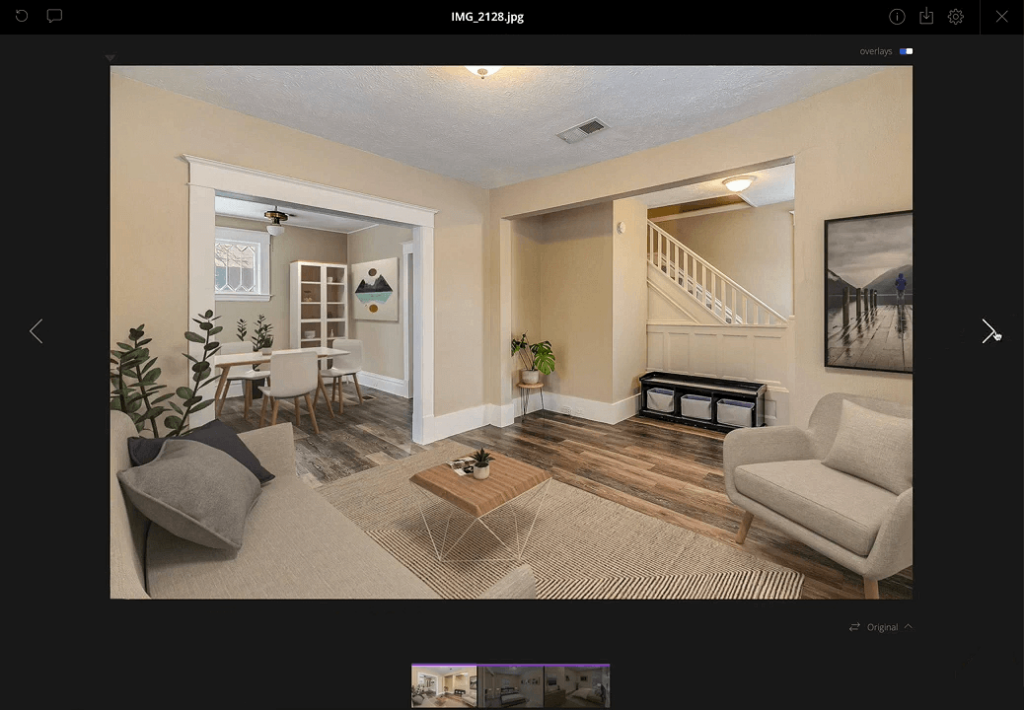
Step 1. Take Photos of the Space
To start, all you need to do is take high-quality photos of your bedroom or the space you want virtually staged from various angles and perspectives with a real estate photographer.
Once you have these snaps, you can upload them quickly onto PhotoUp’s website, and voila!
Let’s break the image uploading and virtual staging process down to show you how easy it is to get your images virtually staged.
PhotoUp AI Virtual Staging Demo
You can either watch the video or continue reading the text below:
Step 2. Sign Up for a Free PhotoUp Account
Next, sign up for a free PhotoUp account on PhotoUp’s website by entering your email address and creating a password.

Step 3. Choose Virtual Staging
Once you’ve signed up for an account, it’ll take you to the PhotoUp Dashboard, where you can choose Virtual Staging » New Order.

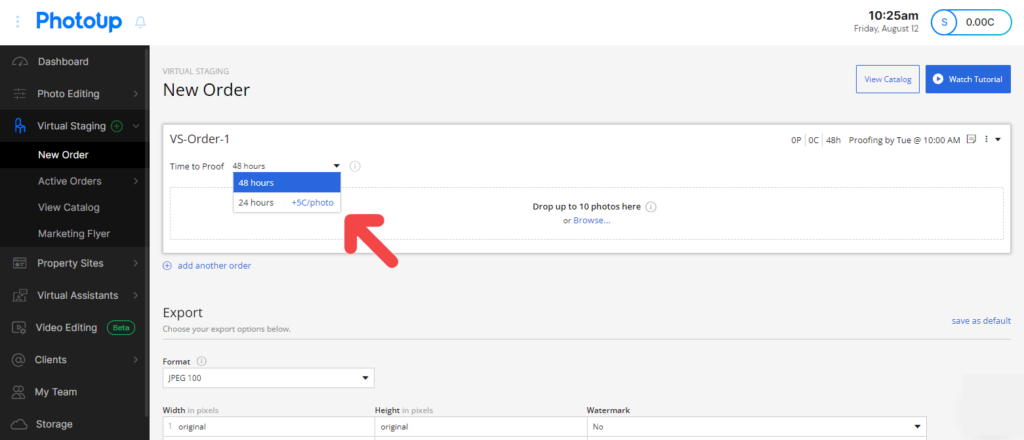
Step 4. Choose Turnaround Time
In the next step, you can choose your preferred turnaround time. PhotoUp offers either a 24 or 48 hours turnaround.
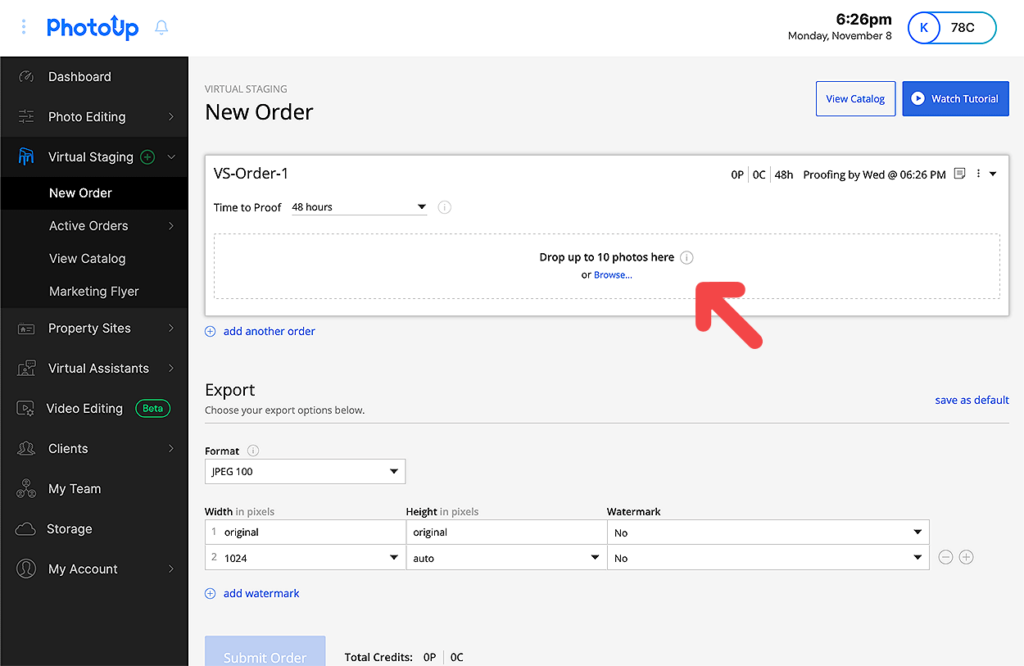
Step 5. Upload Your Photos
Now it’s time to upload your real estate photos of the vacant space that you want to be staged.
Although virtually staging empty spaces is the most common option, you can also choose to declutter and redecorate your photos, or even make virtual renovations.
To begin uploading your images, click on the Browse button in the New Order window and select your photos. Or, you can simply drag and drop up to 10 images at the same time.
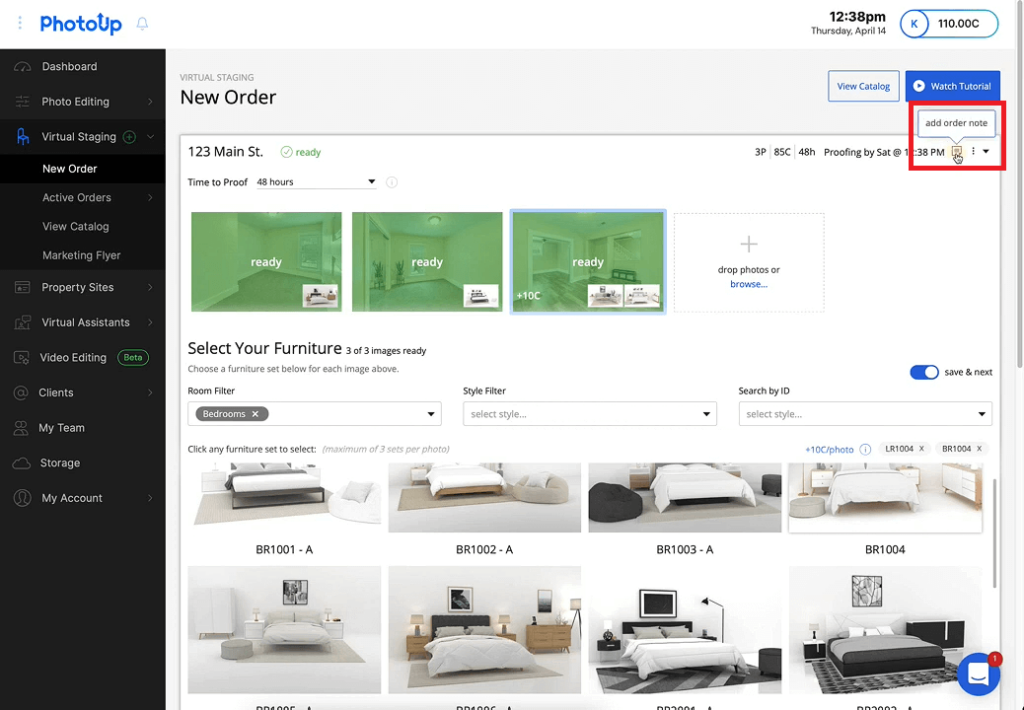
Step 6. Choose Digital Furniture
After you’ve uploaded your photos, you need to choose digital furniture. Start by marking the photo you want to add furniture to, and then click on the furniture set you want to add to your image.
You can choose up to 3 sets per photo. And you can either use the Style Filter or Room Filter option or Search by ID for furniture sets.
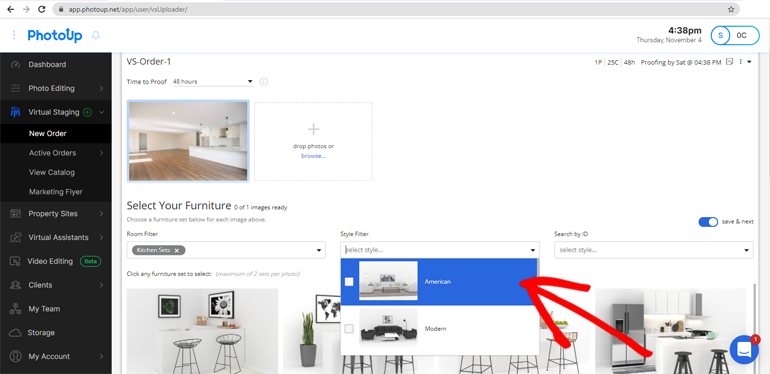

Once you’ve clicked on the set you wish to add to your photo, you’ll see thumbnails of them at the bottom right corner of the uploaded image.

You also have the option to add your comments and instructions in Add order note in the menu in the top right corner of the dashboard. Or, you can leave your comments on each individual photo.
Step 7. Choose Export Settings
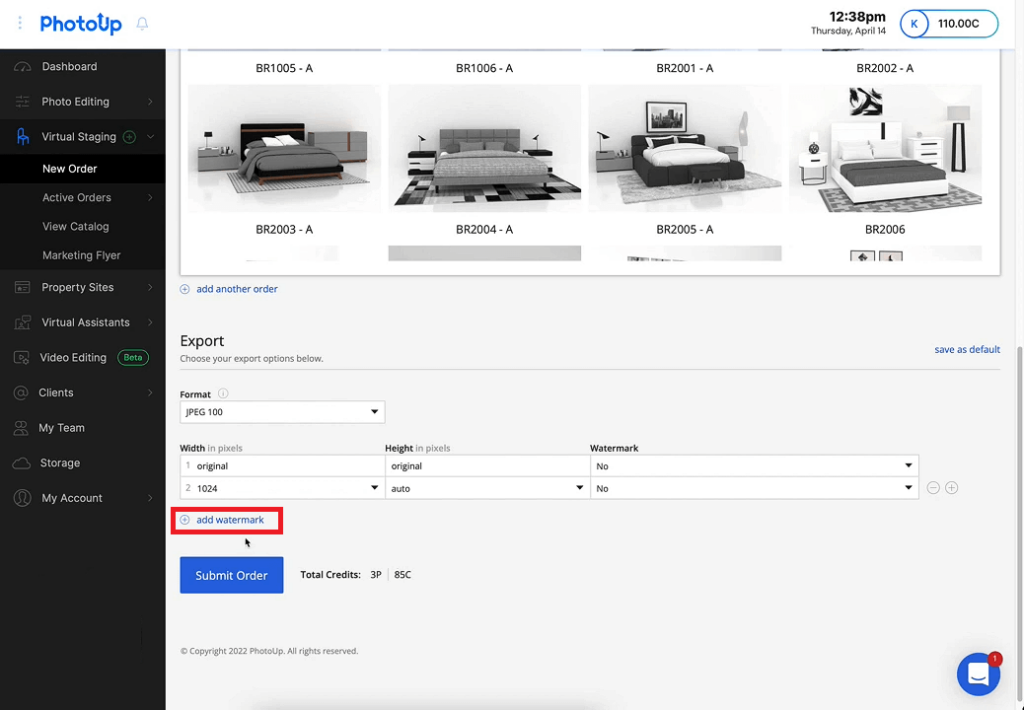
Once you’ve selected the furniture you want to stage your photos with, you need to scroll down and choose your preferred Export Settings.

This will be the type of image format you want your photos to be delivered in.
Additionally, you can also choose to have your images watermarked. Simply click on the + add watermark button below the export settings and upload your logo or icon.
Then, click on the Submit Order button, and you’ll get a confirmation of your order. You’ll also receive a separate email that your upload was successful.
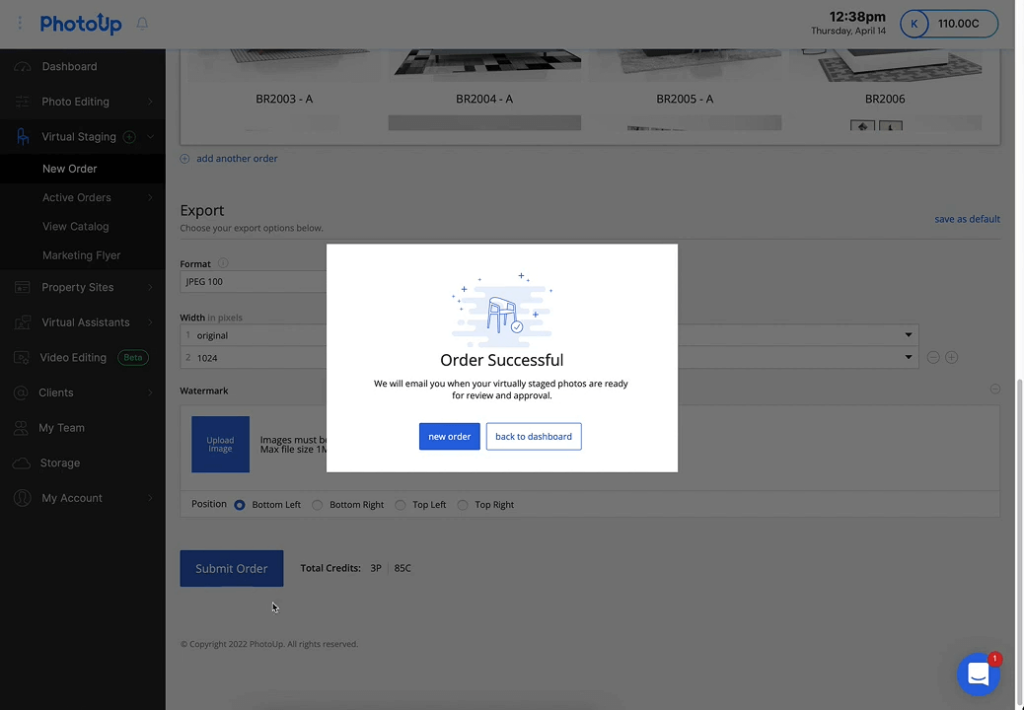
Now, you’re almost finished!
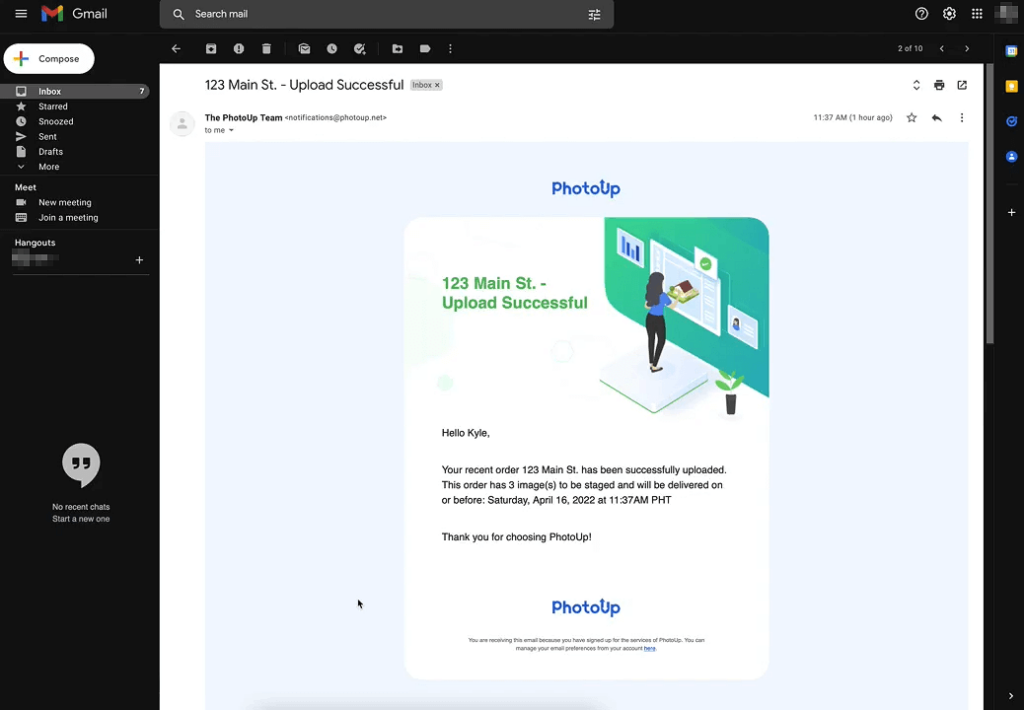
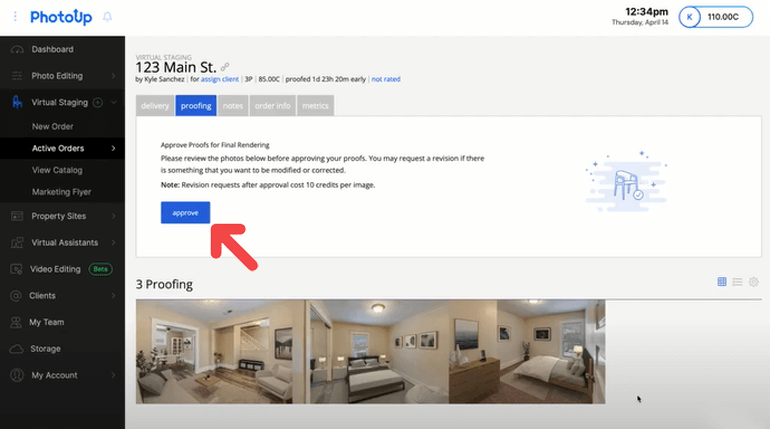
Step 8. Proofing Your Virtually Staged Photos
The final step is to review your virtually staged photos. When your photos are ready for proofing, you’ll receive an email containing a link.
This link will take you to an order page where you have the ability to view your photos and request revisions if needed or approve your order. Just click on the proofing button and review your images.

Additionally, PhotoUp offers 2 free revisions and then each additional revision costs 10 credits.
Furthermore, each image contains a before and after slider of the image. Simply, drag the slider back and forth to see the original photo and the final image.
9. Approve & Download
If everything looks okay, you can go ahead and Approve the order.
When the images are fully rendered you’ll receive a notification email. And when you click on the link in the email, it’ll take you back to the order page where you can download your high-resolution photos.
And there you have it!
It’s a quick and easy order process, and you’ll be equipped with captivating photos to start marketing your listing in a matter of hours.
Quick & Easy
AI Virtual Staging
Interiors. Landscapes. Commercial. Virtually transform any space.
Why Use PhotoUp’s Virtual Staging Service?


Did you know that PhotoUp is considered one of the most exciting and cutting-edge virtual staging providers in the industry?
With over a decade of experience in the industry and hundreds of professional editors around the world, we can handle any job – big, complex, or small.
Our virtual staging service is super easy to use and budget-friendly, starting at the low cost of $3 per image. It includes awesome features such as:
- Photo-realistic staging of any room or space
- Remodeling and repairs
- Decluttering and depersonalizing of rooms
- Sky replacements and twilight effects
- Virtual landscaping
- And more!
We also offer an extensive furniture library with 5 design styles, including:
- Mid-Century Modern
- Coastal
- Modern
- Industrial
- And Rustic
On top of that, PhotoUp also provides an ecosystem of real estate marketing services like:
With PhotoUp, you’ll find everything you need to grow your business as a real estate photographer or agent.
Get started today by signing up for a free PhotoUp account. Let us assist you in creating captivating virtually staged images that will undoubtedly enhance your real estate sales!
We hope this blog post helped you learn how to virtually stage a home to enhance your real estate photography and accelerate sales. If you enjoyed this post, make sure to check out the following resources as well:

