


Table of Contents
- Is Staging a Home Necessary?
- Which Rooms Are the Most Important to Stage?
- A Faster & More Affordable Option to Traditional Staging
- 4 Best Practices to Virtually Stage a Bedroom
- How to Quickly & Easily Virtually Stage a Home
- Why PhotoUp Should Be First on Your Call List of Providers
Do you want to learn how to virtually stage a home—a bedroom or any other empty or outdated space?
When selling a home, every space counts and every room should make a lasting impression. That includes the bedroom too – it should be part of your selling proposal. In fact, 42% of buyers said the bedroom was one of the most important rooms when looking to buy a home.
In this article, we’ll explore the virtual staging process of a bedroom. It’s quicker and easier than you’d think!
Before we get into the nitty-gritty details, let’s first discuss whether staging a home before selling it is necessary and what rooms to stage.
Is Staging a Home Necessary?


Buying a home is not just about the price. It’s about how you feel when you walk in. You know those times when you walk into a fancy place and you feel nothing, and other times when you love a place that’s not perfect?
Well, that’s because there’s an emotional component to finding your new home. And that’s where staging comes into the picture (*pun intended).
Did you know that one-quarter of buyers’ agents say staging a home raises its value by 1%-5% compared to other homes on the market not staged? Amazingly, 17% of agents also said that staging increased value by 6%-10%.
Staging is crucial to help buyers see the home’s potential and visualize themselves living there.
And as the statistics indicate, buyers may even be willing to pay a higher price for the home when an emotional connection is established.
Which Rooms Are the Most Important to Stage?

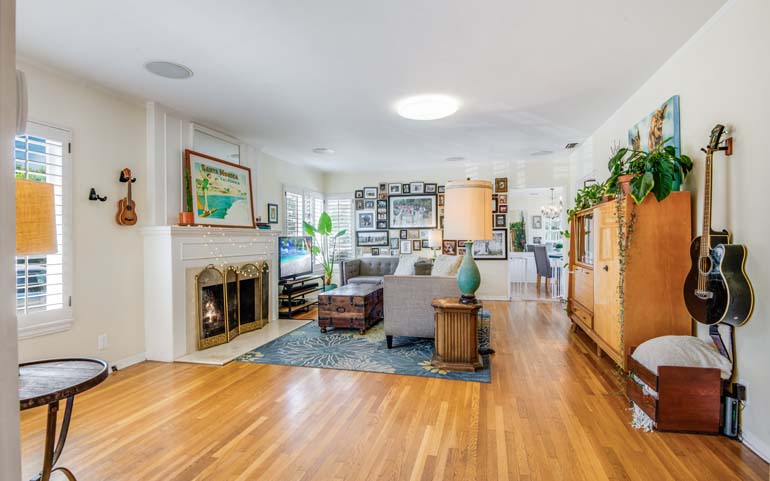
When it comes to which rooms to stage, the most important ones are the living room, master bedroom, and kitchen.
This statement is backed by a study by the National Association of Realtors (NAR) which revealed that 83% of buyers’ agents said staging the living room was important, 76% said staging the master bedroom was important, and 69% said staging the kitchen was important.
Overall, these rooms are the heart of the home, and buyers want to be able to envision themselves relaxing, cooking, and sleeping in these spaces.
By adding furniture, decor, and accessories, you can create an emotional connection with potential buyers and help them see the potential of the space.
So, if you’re looking to sell your home quickly and for top dollar, be sure to prioritize staging these key rooms.
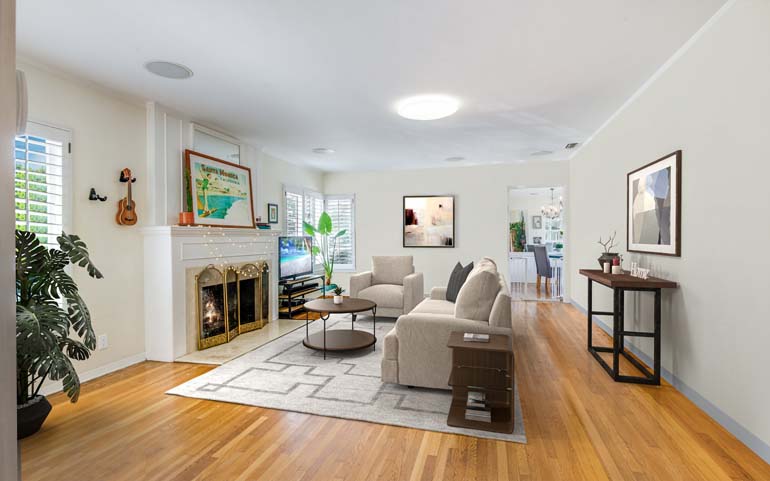
A Faster & More Affordable Option to Traditional Staging
Traditional home staging can be expensive, time-consuming, and often requires physical resources such as furniture, decor, and manpower.


That’s where AI virtual staging comes in as a lifesaver.
Not only is it 97% cheaper than traditional home staging, but virtual staging also has a fast turnaround time of just 24 to 48 hours.
And the best part? It doesn’t require any physical resources.
Virtual staging is the perfect solution for real estate professionals looking to save time and money while still making their listings look their best.
With virtual staging, you can showcase a beautifully decorated home without the hassle and expense of traditional staging. It’s a game-changer for the industry, and we highly recommend giving it a shot!
4 Best Practices to Virtually Stage a Bedroom
Here are 4 best practices to consider when preparing to virtually stage a bedroom.
1. Presentation Is Key


When it comes to selling a home, presentation is key. A well-staged and clean bedroom can make a huge difference in attracting potential buyers and sealing the deal.
But what if your bedroom isn’t picture-perfect? That’s where virtual staging comes in.
With AI virtual staging, you don’t need to worry about deep-cleaning every surface or hiring a professional cleaner.
You can simply upload photos of your bedroom (which we’ll show you below) and our team will carefully edit out any imperfections and add stylish furniture and decor to make your space look its best.
However, starting off with clean, decluttered, and high-quality images of the bedroom is helpful to avoid blurry and unsharp photos.
2. Depersonalize the Space
It’s essential to create a space that potential buyers can envision as their own. One essential step in achieving that is to remove all personal items from the bedroom.
That includes items with the seller’s name on them, family portraits and photos, and vacation memorabilia.
Essentially, anything that could distract a buyer from focusing on the features and atmosphere of the bedroom should be put away.
Here’s the thing…
Personal items can create an emotional connection to the space for the seller, but that doesn’t mean potential buyers will feel the same attachment.
People have different tastes and preferences, and seeing someone else’s decor and personal items can make it challenging to visualize the space as their own.
So, if you want to make a lasting impression on potential buyers, remove all of those items and create a clean slate so buyers can explore the look and feel of the room.
This can even be done virtually by removing any personal items in photos or videos.
3. Bedrooms Should Have a Relaxing Atmosphere
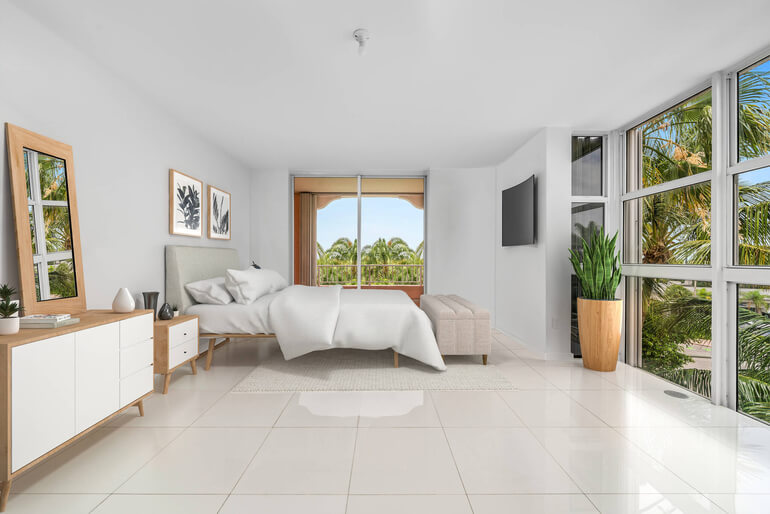
The bedroom is more than just a place to sleep. It’s a sanctuary of sorts, a retreat from the hustle and bustle of the world outside.
For many people, it’s a space to relax and unwind, to read a book or watch TV in peace before drifting off into a peaceful slumber.
As a real estate photographer or agent, it’s important to keep this in mind when staging a home for sale.
You want your potential buyers to feel welcome and at ease when they enter the bedroom, so consider incorporating soft, oversized furniture that’s arranged in a way that promotes conversation and relaxation.
Think about items that add to the room’s overall ambiance, such as soft lighting, plush throw pillows, and cozy blankets.
Remember that bedrooms appeal to the senses, so choose decor and accessories that are easy on the eyes and soothing to the touch.
Consider also adding fresh flowers or some lightly scented candles to enhance the relaxing atmosphere. With the right staging, you can help potential buyers see themselves enjoying the calming oasis that could be their new bedroom.
4. Rely on “Calming” Neutrals
As a real estate photographer, it’s important to understand the power of color in creating a mood for photos.
The right color palette can make a space feel more elegant and sophisticated, while the wrong colors can be distracting and take away from the essence of the room.
When choosing colors for your photoshoot, it’s always best to go for neutral tones like white, cream, light gray, brown, and beige.
These colors not only look appealing but also create a calming effect that’s perfect for photos. They allow potential buyers to focus on the room’s features, rather than being distracted by an overpowering or garish color scheme.

For example, if you’re working with a Scandinavian design theme, you can incorporate pale pastels that bring a light-enhancing quality to the space.
Alternatively, for a Coastal or Hamptons style theme, pale blues, and whites work really well and evoke the essence of seaside living.

With the right color palette, you can create a mood that will appeal to potential buyers and help to sell your listing quickly.
With that said, let’s take a look at how to quickly and easily virtually stage a home with PhotoUp next.
Quick & Easy
AI Virtual Staging
Interiors. Landscapes. Commercial. Virtually transform any space.

How to Quickly & Easily Virtually Stage a Home
PhotoUp’s top-notch AI virtual staging service is hassle-free and incredibly easy to use.
With the help of PhotoUp’s AI virtual staging, you can get your images digitally staged and returned to you in less than 10 minutes for the low cost of $3 per image.
This is all you need to do!
Step 1. Take High-Quality Photos of the Space
To start, all you need to do is take high-quality photos of your bedroom or the space you want virtually staged from various angles and perspectives with a real estate photographer.
Once you have these snaps, you can upload them quickly onto PhotoUp’s website, and voila!
Let’s break the image uploading and virtual staging process down to show you how easy it is to get your images virtually staged. You can either watch the video or continue reading the text below:
Step 2. Sign Up for a PhotoUp Account
Next, sign up for a free PhotoUp account on PhotoUp’s website by entering your email address and creating a password.

Step 3. Choose Virtual Staging
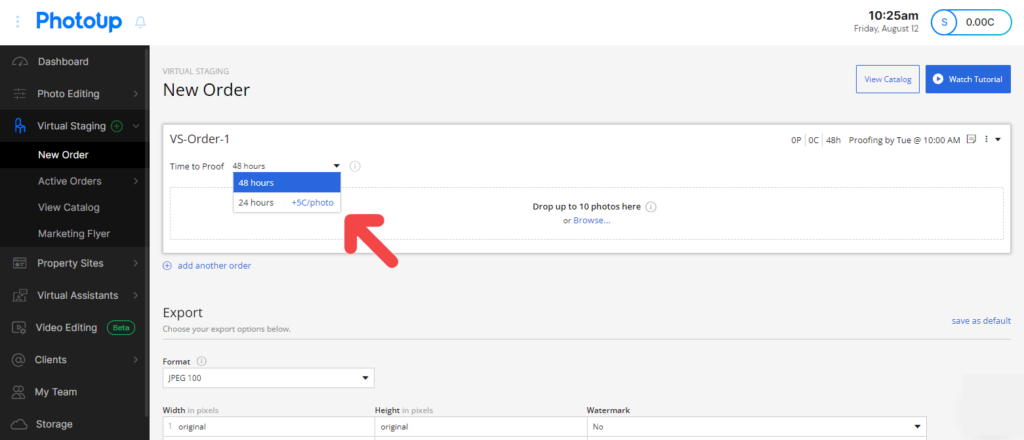
Once you’ve signed up for an account, it’ll take you to the PhotoUp Dashboard, where you can choose Virtual Staging » New Order.

Step 4. Choose Turnaround Time
In the next step, you can choose your preferred turnaround time. PhotoUp offers either a 24 or 48 hours turnaround.
Step 5. Upload Your Photos
Now it’s time to upload your real estate photos of the vacant space that you want to be staged.
Although virtually staging empty spaces is the most common option, you can also choose to declutter and redecorate your photos, or even make virtual renovations.
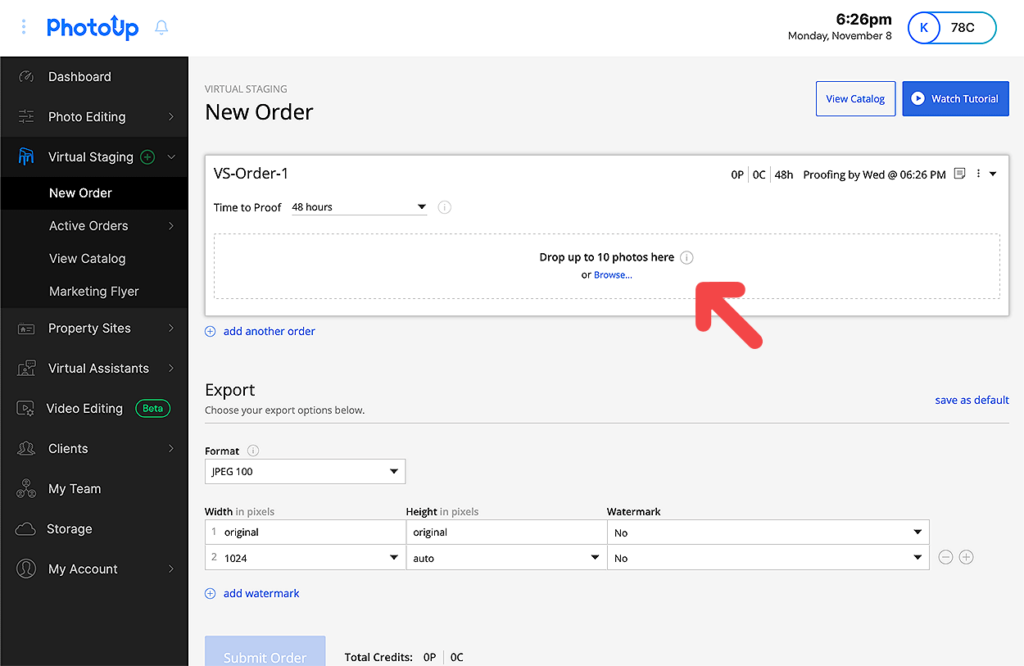
To begin uploading your images, click on the Browse button in the New Order window and select your photos. Or, you can simply drag and drop up to 10 images at the same time.
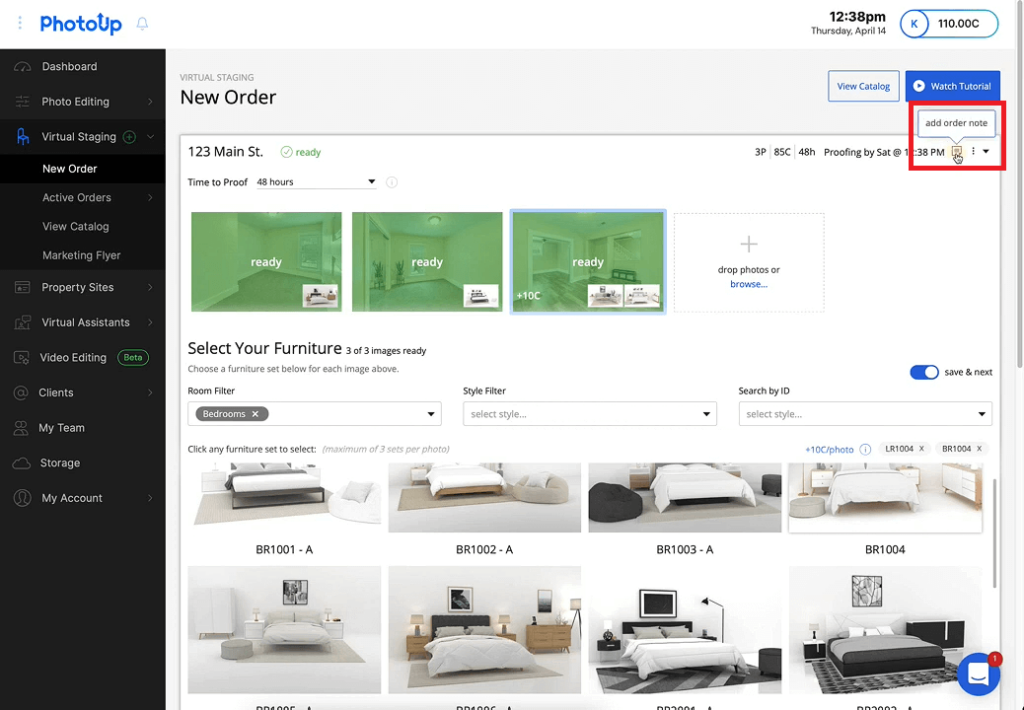
Step 6. Choose Digital Furniture
After you’ve uploaded your photos, you need to choose digital furniture. Start by marking the photo you want to add furniture to, and then click on the furniture set you want to add to your image.
You can choose up to 3 sets per photo. And you can either use the Style Filter or Room Filter option or Search by ID for furniture sets.
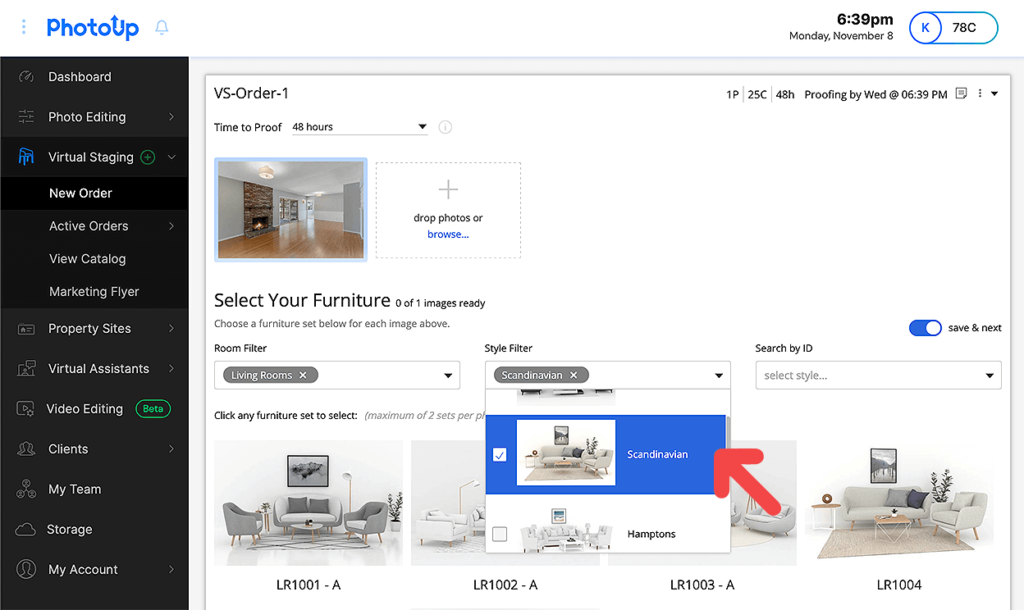

Once you’ve clicked on the set you wish to add to your photo, you’ll see thumbnails of them at the bottom right corner of the uploaded image.

You also have the option to add your comments and instructions in Add order note in the menu in the top right corner of the dashboard. Or, you can leave your comments on each individual photo.
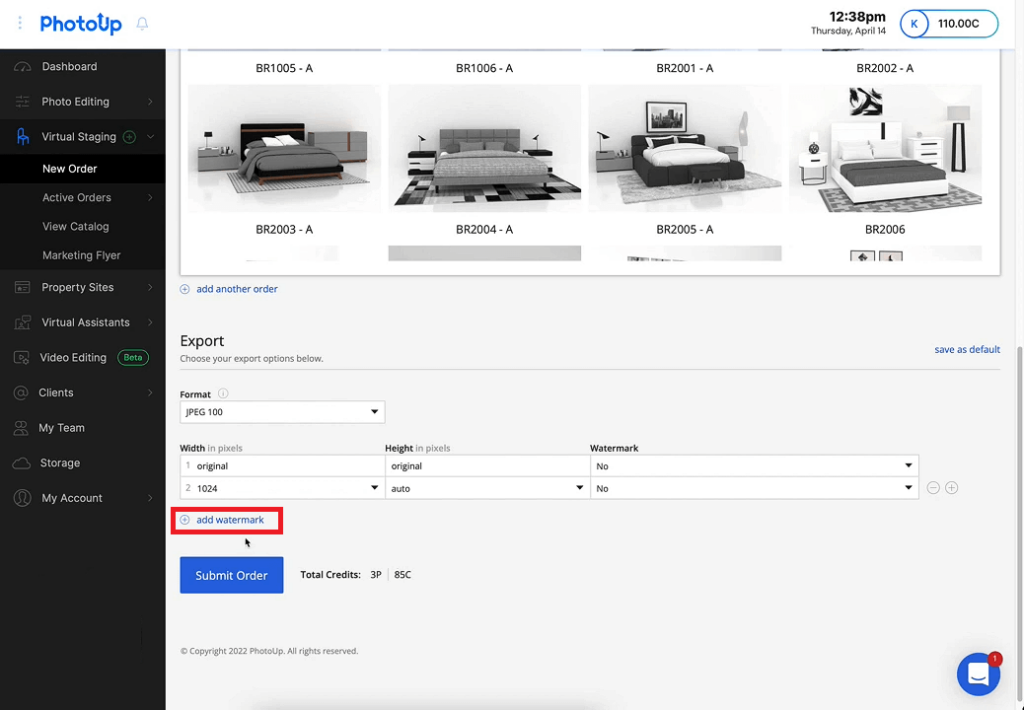
Step 7. Choose Export Settings
Once you’ve selected the furniture you want to stage your photos with, you need to scroll down and choose your preferred Export Settings.

This will be the type of image format you want your photos to be delivered in.
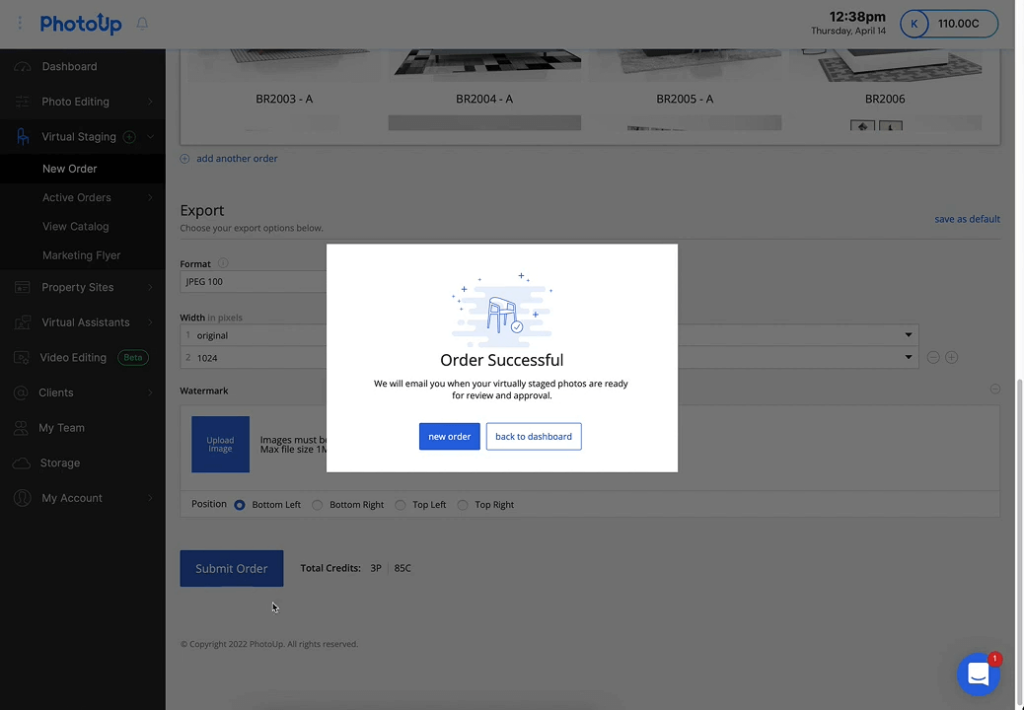
Additionally, you can also choose to have your images watermarked. Simply click on the + add watermark button below the export settings and upload your logo or icon.
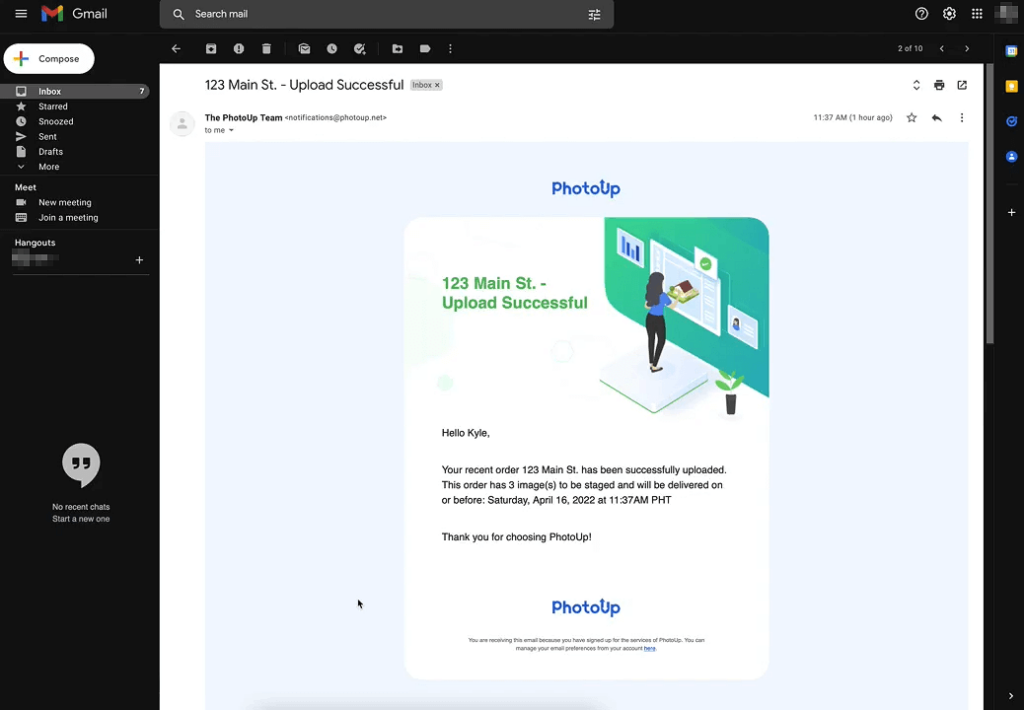
Then, click on the Submit Order button, and you’ll get a confirmation of your order. You’ll also receive a separate email that your upload was successful.
Now, you’re almost finished!
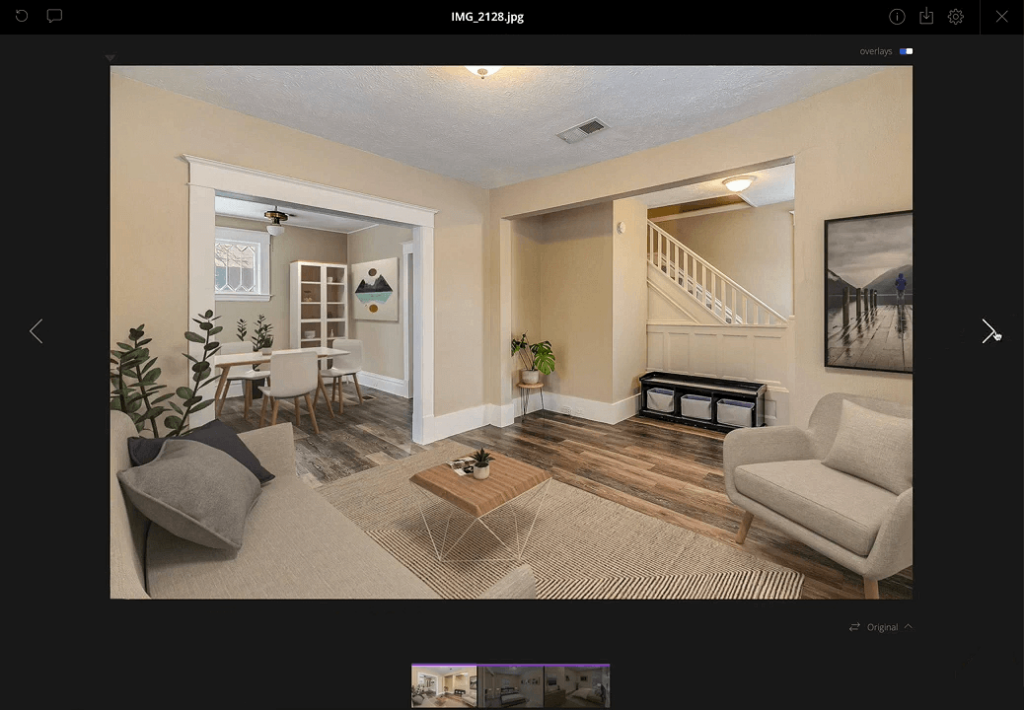
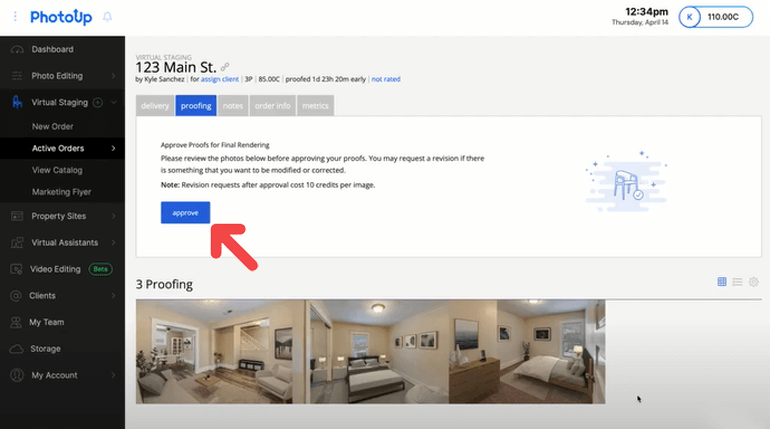
Step 8. Proofing Your Virtually Staged Photos
The final step is to review your virtually staged photos. When your photos are ready for proofing, you’ll receive an email containing a link.
This link will take you to an order page where you have the ability to view your photos and request revisions if needed or approve your order. Just click on the proofing button and review your images.

Additionally, PhotoUp offers 2 free revisions and then each additional revision costs 10 credits.
Furthermore, each image contains a before and after slider of the image. Simply, drag the slider back and forth to see the original photo and the final image.
9. Approve & Download
If everything looks okay, you can go ahead and Approve the order.
When the images are fully rendered you’ll receive a notification email. And when you click on the link in the email, it’ll take you back to the order page where you can download your high-resolution photos.
And there you have it!
It’s a quick and easy order process, and you’ll be equipped with captivating photos to start marketing your listing in a matter of hours.
Quick & Easy
AI Virtual Staging
Interiors. Landscapes. Commercial. Virtually transform any space.
Why PhotoUp Should Be First on Your Call List of Providers


PhotoUp has emerged as one of the most exciting and cutting-edge virtual staging providers of the last few years.
Our virtual staging service is easy to use and affordable, and includes the following:
- Photo-realistic staging of any room or space
- Remodeling and repairs
- Decluttering and depersonalizing of rooms
- Sky replacements and twilight effects
- Virtual landscaping
- And more!
We also offer an extensive furniture library with 5 design styles, including:
- Mid-Century Modern
- Coastal
- Modern
- Industrial
- And Rustic
On top of that, PhotoUp is a full-service online real estate marketing business with additional services such as:
We have everything you need to market your listing and grow your real estate business under one roof!
Sign up for a free PhotoUp account today, and let us help you create inviting, luxurious virtually staged images to boost your real estate sales!
We hope this blog post helped you learn how to virtually stage a home to enhance your real estate photography and accelerate sales.
If you enjoyed this post, make sure to check out the following resources as well:

