


How to stage a home office has become a common question in real estate virtual staging communities.
In the post-COVID age of remote work, a home office has become more than just a luxury; it’s a necessity for many.
Therefore, the challenge for virtual designers is how to stage a home office space that will captivate prospective buyers while boosting the value of the home.
In this article, we’ll share 11 tips and tricks on how to stage a home office virtually.
How to Stage a Home Office – 11 Tips & Tricks
Did you know that nearly 25% of full-time employees work remotely from a home office?
In today’s digital age, with remote work becoming more prevalent, a home office has become a significant selling point for potential homebuyers.
The following 11 essential tips on how to virtually stage a home office will ensure a visually appealing workspace, making it a standout feature in the sale of the home.
1. How to Stage a Home Office – Try to Find a Dedicated Space
To begin, it’s vital to have a dedicated space for the home office. A desk in a corner of a room or near the kitchen simply won’t do.


Potential buyers want to know that they will be able to set up a fully functional home office free from distractions and interference.
If the property constraints are such, try to at least take a small nook or space and do your best to present it as a clearly defined home office area.
Tips & Tricks:
- Survey the entire home to identify the best spaces for a dedicated home office
- Favor quiet areas away from high-traffic sections of the house
- Strategically use room dividers, shelves, or distinct furniture arrangements to separate the office space if it’s part of a larger area
To learn more about virtual staging, read our article, what is virtual staging for real estate – an in-depth guide.
2. Feature Only Trendy, High-Quality Office Chairs and Desks

An office chair and desk are the core pieces of any home office. Make sure you select a desk and chair that is both ergonomic and stylish. For example, a contemporary swivel chair combined with a large wooden desk can leave a lasting impression.
Tips & Tricks:
- If you need design ideas, research online to get a sense of the range of office chairs and desks
- The chair must look comfortable and ergonomically designed
- Moreover, pair the chair with an appropriate desk in terms of style and function
3. Make the Most of Vertical and Floor Space


When considering how to stage a home office, think beyond the desk.
Employ bookshelves, stackable file organizers, or wall shelves. For example, you can use a tall bookshelf with matching storage bins to maximize home office floor space.
Tips & Tricks:
- Survey all the vertical space available
- Virtually add wall-mounted shelves to utilize vertical space efficiently
- Maintain uncluttered floor space by placing any items on the shelves instead of the floor
Learn more virtual design principles in how to redecorate your home with virtual staging.
4. Less Is More – Keep It Simple
While it can be tempting to add many office features, don’t. A simply designed home office promotes focus while reducing fatigue.


Further, a home office should be free of distractions and offer plenty of tabletop and desk space to spread out work and papers.
Above all, the home office needs to appear tidy and well-organized.
Tips & Tricks:
- Frequently used items should be out and easy to grab, while less-used items can be stored in drawers or cabinets
- Again, don’t be tempted to over-add decor pieces
- A minimal home office should convey a sense of peace and tranquility
5. How to Stage a Home Office – Avoid Placing Personal Items

Since you want the home office to be inviting, avoid placing personal-looking items when virtually staging.
Instead, of adding framed desk photos, consider using an elegant clock or a piece of art. By keeping the design stylish, but impersonal, more buyers will be able to envision the space being their own.
Tips & Tricks:
- Don’t add personal items, such as vacation items or family photos
- Limit decor items to generic choices
- Finally, place any decor items in ways that add character without making the home office look cluttered
Quick & Easy
AI Virtual Staging
Interiors. Landscapes. Commercial. Virtually transform any space.

6. Lights and Windows Are Important!


When virtually staging a space, it’s all too easy to forget about natural and artificial light sources.
Natural light is an extremely valuable feature of a home office. Therefore, stage the desk near a window if possible.
Then, make sure to include general and task lighting, such as a matching floor and desk lamp.
Tips & Tricks:
- Analyze the natural light flow in the image of the office space before staging it
- Place the desk facing a window for added depth and a source of natural light
- Add artificial lighting in ways that make sense according to use
Learn more about a quick and easy way to mask windows in Photoshop.
7. How to Stage a Home Office – Neutral Tones With Hints of Color

While there will always be those who like bold and bright colors in a home office, most people naturally gravitate toward neutral tones.
Soothing, natural color choices create a calm and professional look, making the space appear larger and more inviting.
However, at the same time, you don’t want the space to look drab and boring. So, make sure to add occasional bursts of color with accent items to maintain a sense of energy for the space.
Tips & Tricks:
- If necessary, virtually paint the walls with neutral tones like off-whites, greys, or tans
- Select office window treatments in brighter shades or patterns to add color
- Don’t overdo the colors – use one or two accent colors at most
8. Include a Few Natural Elements

Plants, stone carvings, a fish tank, and other such items can take a sterile, life-less work area and make it look amazing. Incorporating natural elements like plants warms up a space while keeping it looking calming.
Tips & Tricks:
- Add one or two plants at most – you want accent items, not a jungle
- If the space can fit it, a fish tank can add both color and interest while being soothing at the same time
9. How to Stage a Home Office – Don’t Forget Textural Variety

A blending of textures adds depth and sophistication to any home office. After all, you want your staging to offer various tactile experiences, from soft rug textures to sleek metal finishes.
Tips & Tricks:
- Include a mix of materials in the furnishings – such as wood, metal, glass, etc.
- Layer the textiles using rugs, curtains, or throw pillows on a chair
- Additionally, consider decorative items like woven baskets or metal sculptures for added textural contrast
- Select wooden desks and storage solutions to add warmth
10. Create an Inspiration Corner

If you have ample room, think about including a dedicated space within the office for brainstorming and creative breaks. This space should be both functional and minimal.
Experiment with items such as housing tools whiteboards or cork boards, and perhaps with a comfortable chair for reading or thinking.
Tips & Tricks:
- The space should be a dedicated small section of the office
- Fill the area with brainstorming tools like pen and paper, sketch boards, and colored sticky pads
- Additionally, consider items featuring a motivational quote that inspires creativity
Get further inspired by reading, what is digital furniture staging and how to do it.
11. Top It off With a Dual Monitor Setup

Fewer things represent creative professionalism than dual monitors on a modern-looking desk. Such an arrangement will be particularly appealing to professionals in fields like graphic design, writing, coding, or accounting work.
Tips & Tricks:
- Make sure to choose a desk big enough to accommodate two monitors
- Use matching monitors for a cohesive look
- Include monitor stands to optimize desk space
- Also, place the monitors at eye level
Hopefully, the above tips for how to stage a home office have inspired and informed you. However, if you want the absolute best home office staging, we have one last tip – use PhotoUp.
Quick & Easy
AI Virtual Staging
Interiors. Landscapes. Commercial. Virtually transform any space.
How to Virtually Stage Your Home Office With PhotoUp


PhotoUp’s AI virtual staging service is easy to use, affordable, and produces outstanding results. Their highly skilled virtual staging editors can handle any job, big or small – including staging a home office.
It’s so easy to virtually stage with PhotoUp. Here’s our fast and simple virtual staging process:
1. Sign up for a free PhotoUp account and easily upload your photos
2. Then, choose from hundreds of design items in our library of design styles and furnishings
3. Lastly, approve and download the proofs within 24 to 48 hours
Let’s take a look at PhotoUp’s virtual staging process in detail.
Step 1. Take Photos of the Space
To start, all you need to do is take high-quality photos of your bedroom or the space you want virtually staged from various angles and perspectives with a real estate photographer.
Once you have these snaps, you can upload them quickly onto PhotoUp’s website.
PhotoUp AI Virtual Staging Demo
This is how you can upload your images to get them virtually staged. You can either watch the video or continue reading the text below:
Step 2. Sign Up for a Free PhotoUp Account
Next, sign up for a free PhotoUp account on PhotoUp’s website by entering your email address and creating a password.

Step 3. Choose Virtual Staging
Once you’ve signed up for an account, it’ll take you to the PhotoUp Dashboard, where you can choose Virtual Staging » New Order.

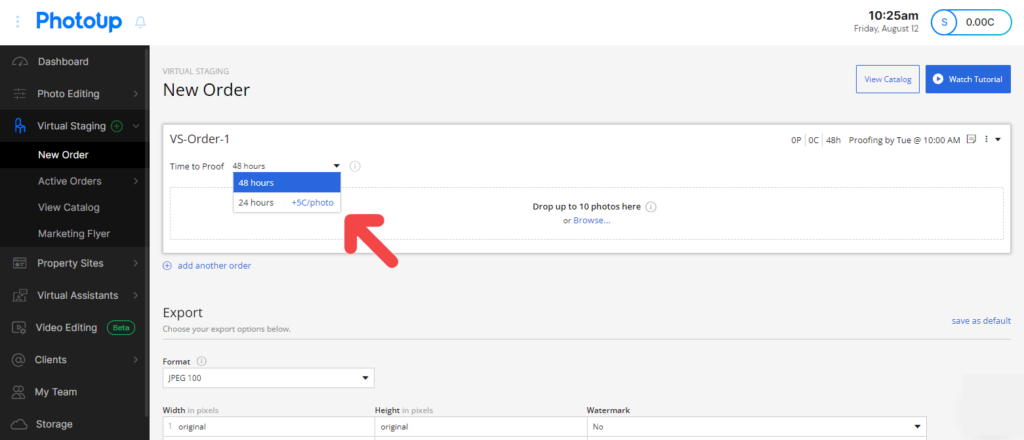
Step 4. Choose Turnaround Time
In the next step, you can choose your preferred turnaround time. PhotoUp offers either a 24 or 48 hours turnaround.
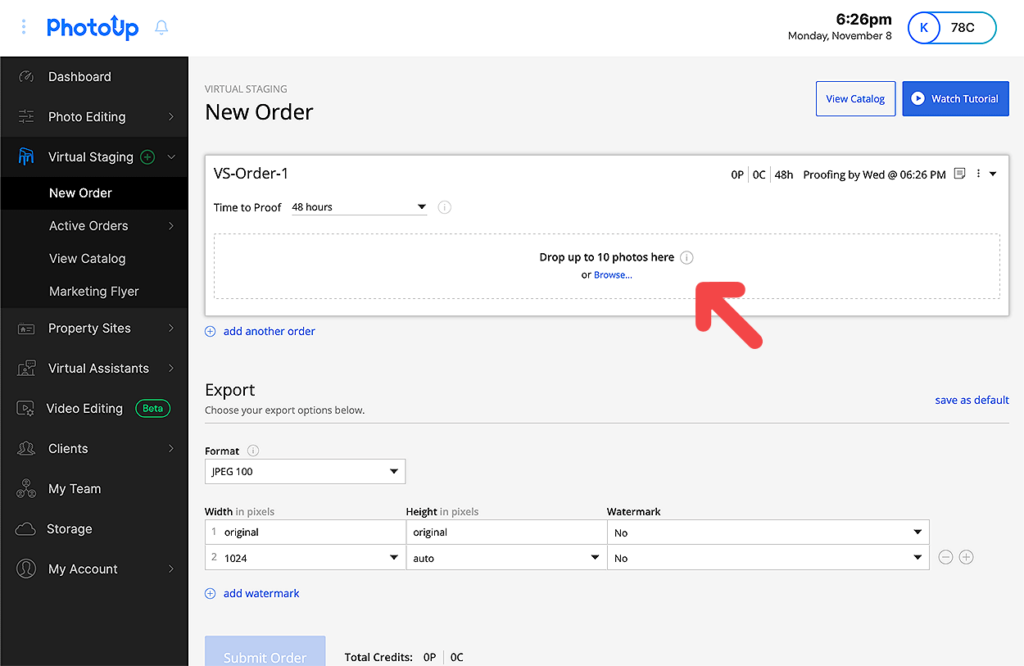
Step 5. Upload Your Photos
Now it’s time to upload your real estate photos of the vacant space that you want to be staged.
Although virtually staging empty spaces is the most common option, you can also choose to declutter and redecorate your photos, or even make virtual renovations.
To begin uploading your images, click on the Browse button in the New Order window and select your photos. Or, you can simply drag and drop up to 10 images at the same time.
Step 6. Choose Digital Furniture
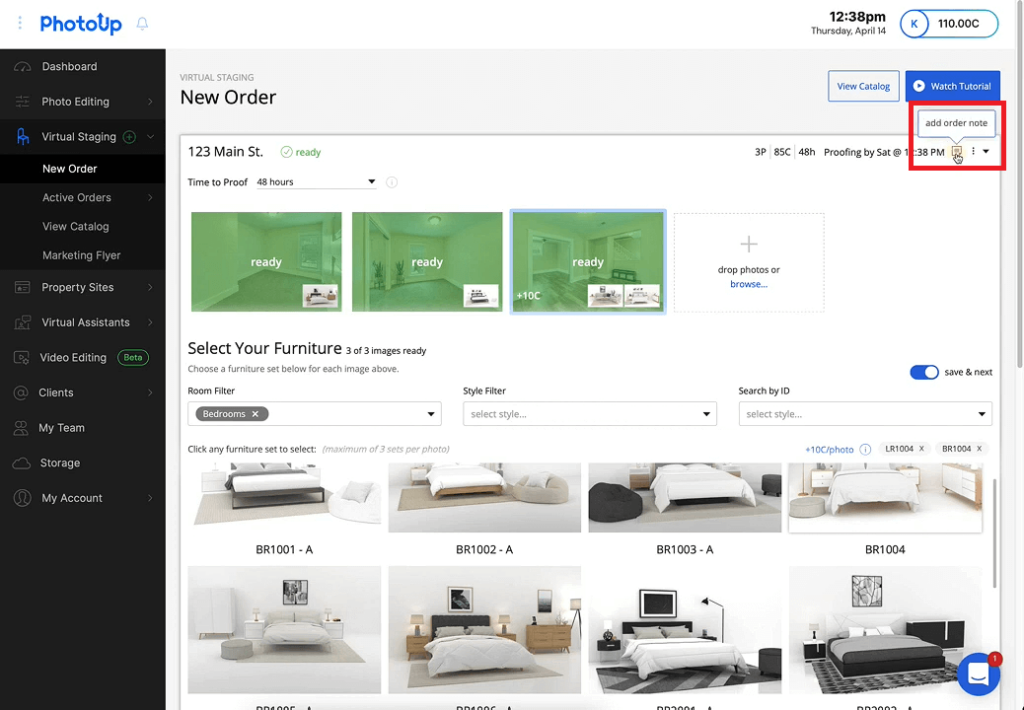
After you’ve uploaded your photos, you need to choose digital furniture. Start by marking the photo you want to add furniture to, and then click on the furniture set you want to add to your image.
You can choose up to 3 sets per photo. And you can either use the Style Filter or Room Filter option or Search by ID for furniture sets.
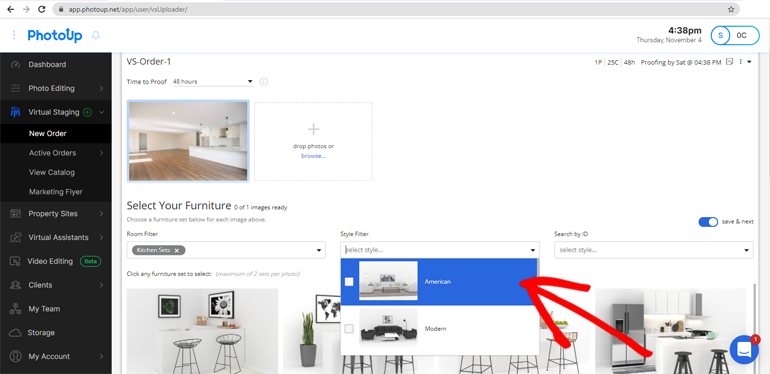

Once you’ve clicked on the set you wish to add to your photo, you’ll see thumbnails of them at the bottom right corner of the uploaded image.

You also have the option to add your comments and instructions in Add order note in the menu in the top right corner of the dashboard. Or, you can leave your comments on each individual photo.
Step 7. Choose Export Settings
Once you’ve selected the furniture you want to stage your photos with, you need to scroll down and choose your preferred Export Settings.

This will be the type of image format you want your photos to be delivered in.
Additionally, you can also choose to have your images watermarked. Simply click on the + add watermark button below the export settings and upload your logo or icon.
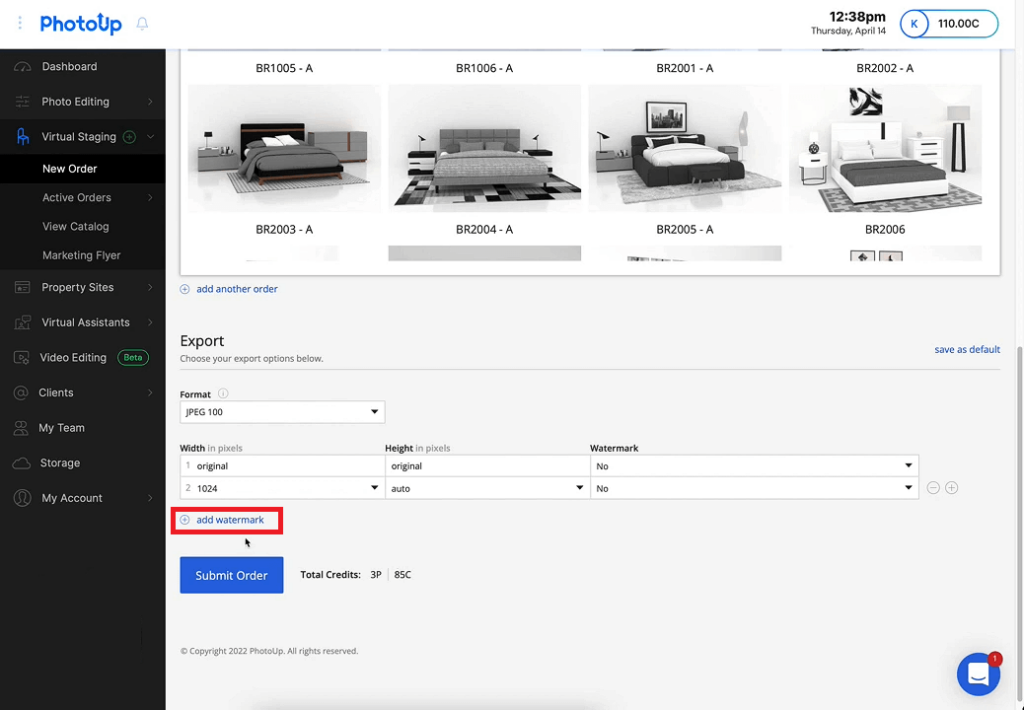
Then, click on the Submit Order button, and you’ll get a confirmation of your order. You’ll also receive a separate email that your upload was successful.
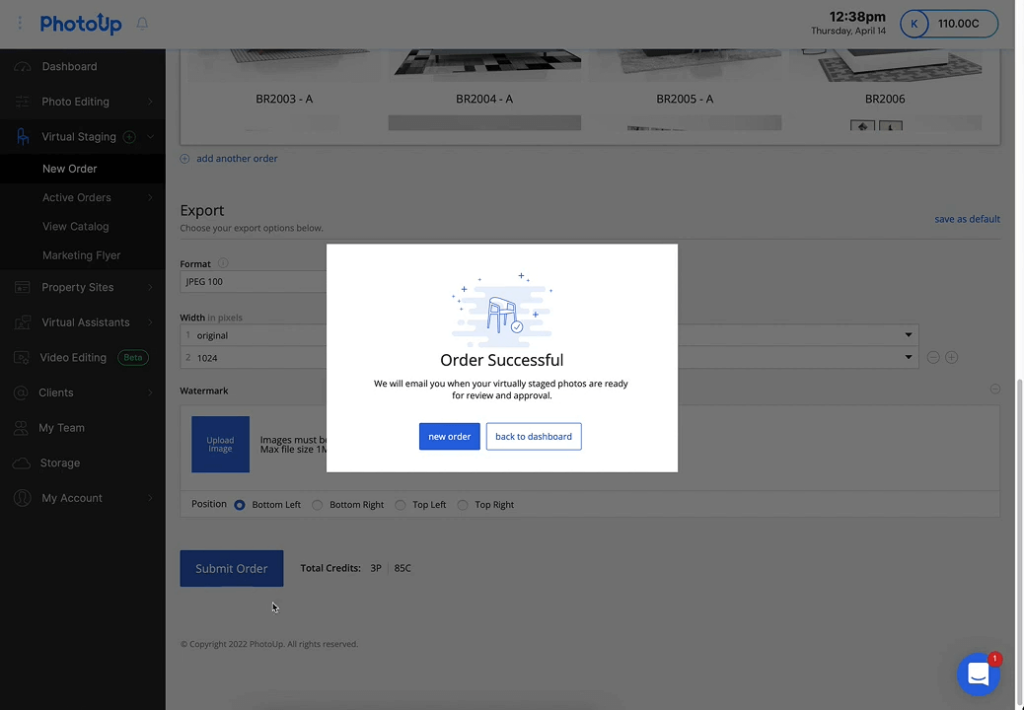
Now, you’re almost finished!
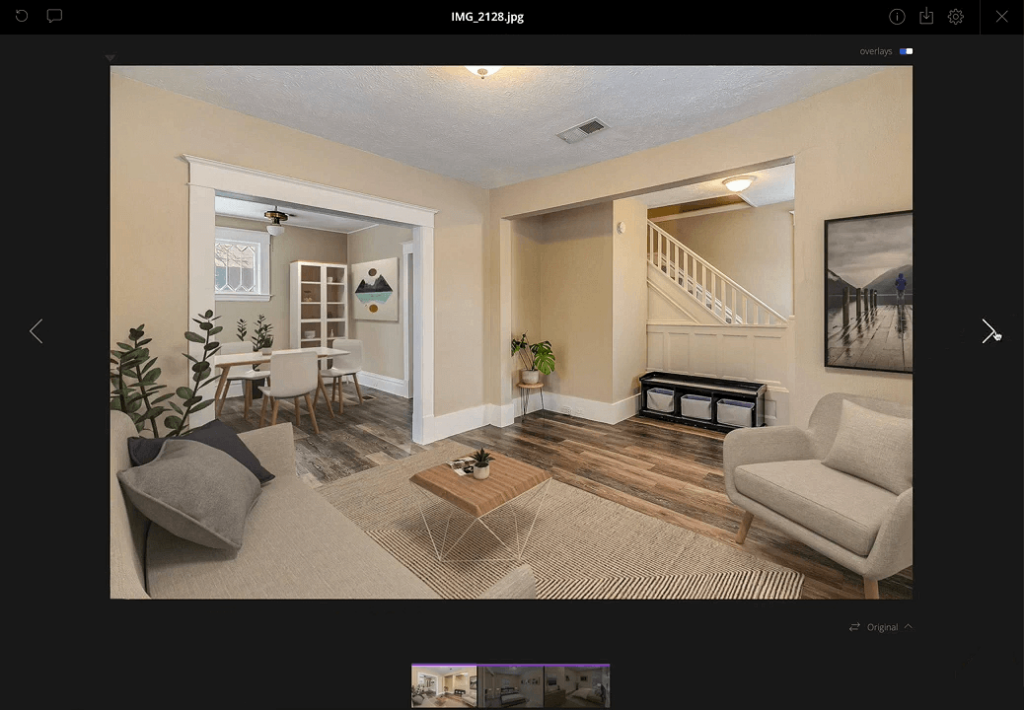
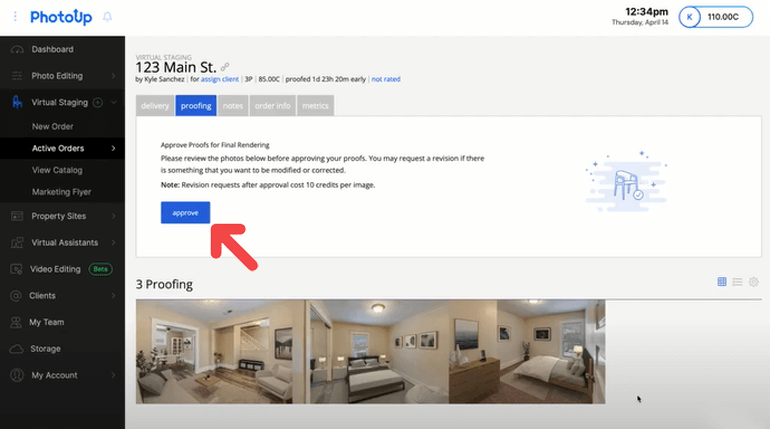
Step 8. Proofing Your Virtually Staged Photos
The final step is to review your virtually staged photos. When your photos are ready for proofing, you’ll receive an email containing a link.
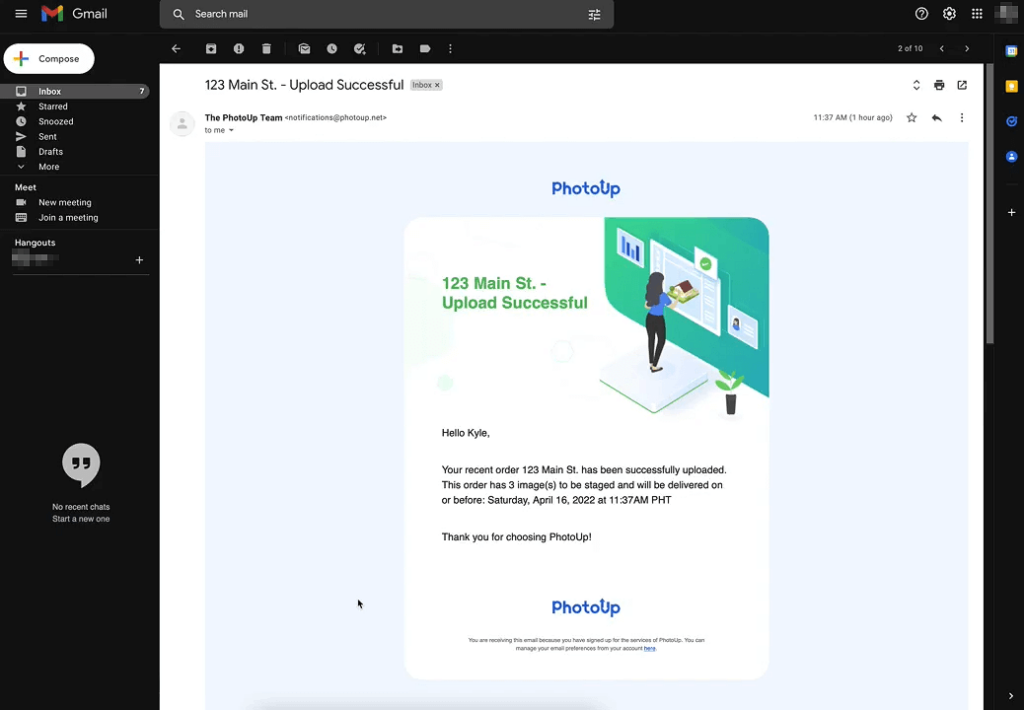
This link will take you to an order page where you have the ability to view your photos and request revisions if needed or approve your order. Just click on the proofing button and review your images.

Additionally, PhotoUp offers 2 free revisions and then each additional revision costs 10 credits.
Furthermore, each image contains a before and after slider of the image. Simply, drag the slider back and forth to see the original photo and the final image.
9. Approve & Download
If everything looks okay, you can go ahead and Approve the order.
When the images are fully rendered you’ll receive a notification email. And when you click on the link in the email, it’ll take you back to the order page where you can download your high-resolution photos.
And there you have it!
A Complete Real Estate Marketing Partner

And PhotoUp does much more than virtual staging. Our comprehensive real estate marketing services include a full variety of high-powered marketing tools and solutions such as:
So, what are you waiting for?
Sign up for a free PhotoUp account now, and let our expert virtual staging designers help you stage the perfect home office.
We hope you enjoyed this blog post on how to stage a home office virtually. Thanks for reading today. You may want to check out the following related resources:

