


Are you looking for a crash course in how to shoot 3D real estate photography to create online virtual tours?
Virtual tours are excellent marketing tools as they help showcase a property in its best light. They allow buyers to walk through the halls of a property to explore all its rooms and see the space from different angles.
In this post, we’ll share 9 actionable tips on how to shoot 3D real estate photography to create virtual tours and help you expand your skillset and client base.
What Are 3D Real Estate Tours?
3D real estate tours are online simulations of properties listed for sale. They are made with the help of still photos, videos, or 360-degree panoramas.
Thanks to this technology, potential buyers can walk through the property as if they were physically viewing it, making it possible to buy homes without even stepping foot in them.
It provides buyers with an experience about how they could use the property and how they would feel within that space, which is crucial for selling a home.
Especially, if they are moving cross-country.
In fact, recent studies found that real estate listings featuring virtual tours are clicked on 40% more often than those using still photos alone.
They are also a big factor in selling houses at prices 2% to 3% percent higher than similar homes without online tours.
Shooting 3D Real Estate Photography (9 Actionable Tips)
Now that you know what virtual tours are and why they are a great tool to market and sell a home, let’s take a closer look at how to prepare and shoot 3D real estate photography.
1. Prepare the Space Before Shooting

Preparing the space before shooting is the key to high-quality 3D real estate photography.
Make sure to remove all unwanted, personal items and declutter the space so that all rooms look neat and clean.
Personal items and clutter in the background easily distract buyers and make it difficult for them to see the home’s potential. They may skip your listing and move on to the next one that’s more to their liking.
For a successful photoshoot, contact the Realtor, agent, or seller beforehand and ask them if the cleaning and staging of the home are ready before you start shooting. This way, you can focus on your job – to frame and adjust camera settings and take amazing photos.
2. Use the Right Gear
If you want to take great real estate photography in 3D, we recommend using a 360-degree camera with high FPS (Frames-Per-Second).
For example, the Ricoh Theta Z1 is an excellent option for those who want to take panoramic shots and create online virtual tours.
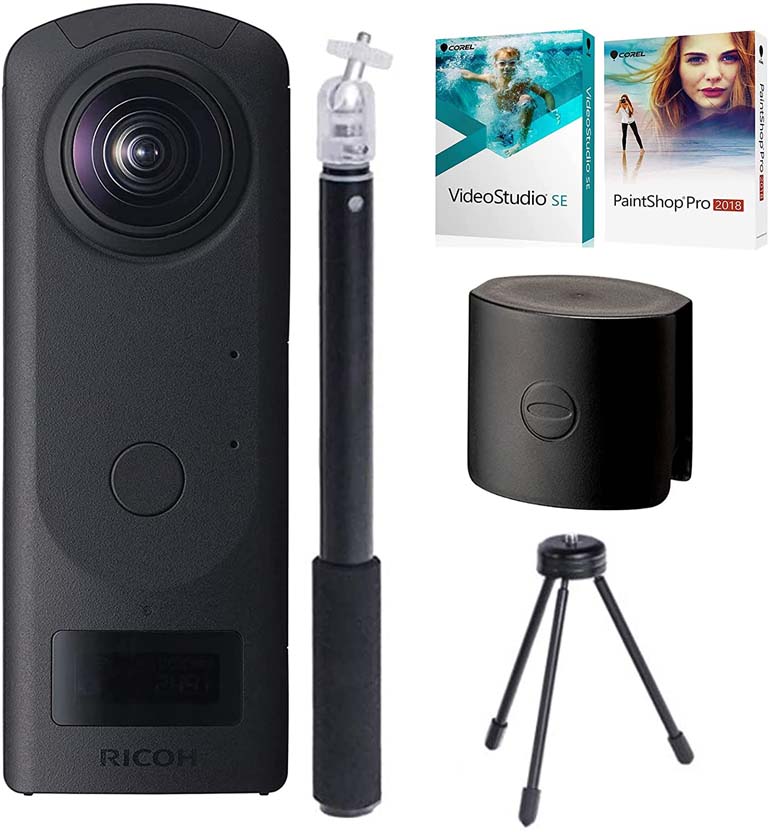
For one, the camera is equipped with 2 1-inch sensors. Other 360 cameras often come with poor-quality sensors.
To create a high-quality online virtual tour, pay attention to the frames per second and make sure to use a camera that supports at least 90 FPS.
Preventing lagging is crucial since the majority of people viewing the home tours won’t have the patience to wait for it to load, and will move on to the next listing.
For best results, you can purchase a the 3D Virtual Tour Bundle that includes all 3D real estate photography gear you’ll need to create high-quality virtual tours.

3. Avoid Blurry Images With a Tripod
To avoid blurry images from shaking and being able to create an engaging 3D tour, you should invest in a quality tripod with a panoramic head, for example, the SIRUI Traveler 7C Camera Tripod.

This will help you take sharp images that are perfectly aligned at the same level, which will also help with the image stitching later.
Additionally, the panoramic tripod head will help you easily rotate your camera so that you can capture all angles and details of the interior.
High-Quality & Consistent
Real Estate Photo Editing
Hire a dedicated editor with performance metrics from $7/hour.

4. Position the Camera at a Low Angle
Another essential aspect to consider for high-quality 3D real estate photography is the position of the camera.
You should position the camera at a low angle to improve the floor-to-ceiling ratio. This helps you create visually appealing photos and convey the sense of the space better.
If you position your camera too high, your photos won’t look well-balanced and you’ll end up capturing too much of the ceiling.
The only time it would be suitable to aim your camera a bit higher is when, for example, shooting the kitchen and you want to fit the cabinets, countertops, faucet, and sink in the frame.
Also, try keeping your camera on the same level when taking all photos to ensure consistency.
5. Take Photos of All Rooms
When shooting 3D real estate photography, you shouldn’t only include standard rooms like the living room, kitchen, and bedroom.
It’s important to also shoot the laundry room, bathroom, closets, garage, etc., since many potential buyers may be interested in viewing them and get an idea of the space.
Remember that the more rooms you include, the better your 3D tour will become.
So, before taking your photos, explore the property and decide where to best put your 360-degree camera.
You may have to be a bit creative with the placement in areas where it’s difficult to fit all the details in the frame.
6. Highlight the Home’s Special Features
To create engaging and interactive virtual tours, you need to fit the home’s key selling points in the frame.
For example, if you are going to take a 360-degree panorama shot of a master bedroom, you need to highlight its best features such as:
- The master bed
- Windows for natural light
- Master bathroom and spa area
- Walk-in closet
- And more.
A professional 3D tour will make it easier for potential buyers to notice the home’s special features, which may lead to a sale without even physically visiting the property.
7. Watch Out for Reflections in Mirrors and Windows

When taking your photos in rooms with mirrors, try to position the camera so that it doesn’t show in the mirror. Windows can cause reflections as well, so be aware of them, too.
Overall, you need to watch out for mirrors when taking photos of bathrooms, hallways, bedrooms, and living rooms with TV screens.
And don’t forget to also pay attention to your own shadow on the floor.
If you can’t avoid reflections or unwanted shadows, you can always edit this away in post-processing. Sometimes to get the best shot of bathrooms, Photoshopping the camera out of the image is actually the best way to go.
If you lack editing skills or don’t want to spend valuable time on editing, PhotoUp has a team of professional real estate photo editors that can edit your photos and return them in 12 to 24 hours or less.
Browse Top Dedicated
Real Estate Photo Editors
Ready-to-hire editors for real estate photo editing, and more.
Have You Ever Thought To
Outsource Photo Editing?
Try it today with 5 free edits from three professional photo editors.
8. Ensure Easy Navigation
To not lose out on potential buyers/viewers, you need to make it easy and intuitive to navigate your virtual tour.
That said, there are 2 main types of navigation you can use:
- Floorplan navigation
- Visual navigation
Floor plan navigation uses a floor plan of the home to allow your audience to click on points of interest placed directly on the floor plan.
Typically, this is the fastest way to access the visuals because they are accessible for an entire floor at the same time.
On the other hand, visual navigation requires viewers to click on the images to virtually move throughout the home.
For instance, you’ve seen this type of navigation on Googles Street View.
Even though it has the advantage of being more immersive, it’s slower than regular floor plan navigation since you can’t jump directly to the room you want to view. It also requires more clicks to get from one room to another.
9. Get Your Images Ready for 3D Virtual Tours

To create an online virtual tour that will capture buyers’ attention, your images need to be of top-notch quality. And this involves post-processing and editing.
You can either edit your images using Adobe Photoshop and Lightroom, or free 360 video editing software like HitFilm Express, VIRB Edit, or VideoPad.
Better yet, if you don’t have advanced editing skills, you can simply outsource this task to PhotoUp’s professional photo editors for only $1.50 per image.
Photoup Real Estate Photo Editing Uploader Tutorial
To see how easy it is to get started, have a look at our photo editing image uploader video tutorial:
As simple as that!
Sign up for a free PhotoUp account today, and let our expert real estate photo editors enhance your images at rocket speed.
We promise to return your edited images within 12 to 24 hours, with unlimited free revisions included.
It can’t get any better than that!
We hope this blog post helped you learn how to shoot 3D real estate photography.
If you enjoyed reading this post, you may also want to check out the following resources:

