


Table of Contents
- Why Is Lighting Important for Real Estate Photography?
- 5 Real Estate Photography Lighting Tips
- Boost Image Quality With a Professional Real Estate Photo Editor
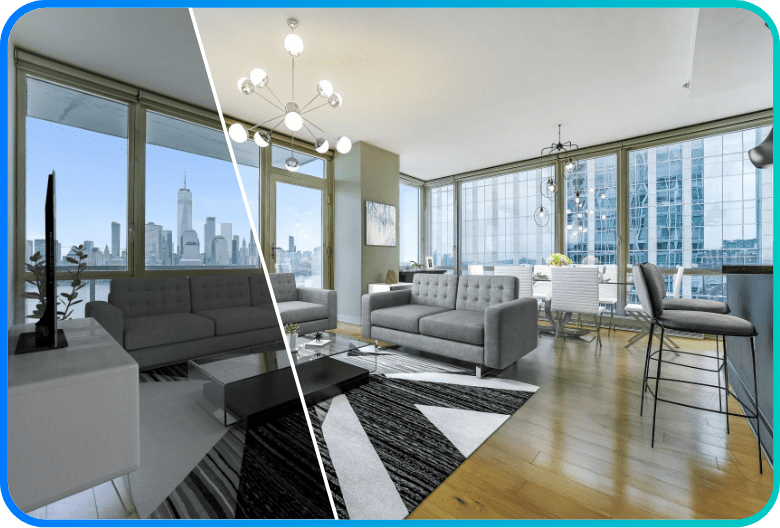
Learn 5 powerful real estate photography lighting tips for incredible images that will impress your clients.
In this post, we’ll teach you how to work effectively with lighting options to get stunning results that a real estate agent with a cell phone can’t come close to capturing.
Why Is Lighting Important for Real Estate Photography?
Understanding the use of lighting in real estate photography is essential for high-quality interior photos. And lighting is one of the biggest challenges many new professional photographers face.
Often, in real estate photography, the thought of adding a burst of light (the flash) to the frame seems a bit unnerving.
And there are other questions, too. For example, should I use natural light? Should I turn the homeowner’s lights on or not?
The experts at PhotoUp are here to help. So, let’s talk about interior lighting options!
5 Real Estate Photography Lighting Tips

Following these 5 real estate photography lighting tips, you’ll become a master in lighting for real estate photography in no time:
1. Use Natural Light for Magazine Quality Interior Photos
To begin, if you look through an interior design magazine, you notice most of the shots using natural light.
Therefore, for real estate photography, the best lighting source is natural light. So, just open the windows and curtains and let the sunshine in.
Here’s some advice for shooting with natural light:
- Choose the best time of the day. It’s usually around midday, but some properties get better light in the morning or afternoon. Make sure you have enough time to shoot with constant light.
- Let the sunlight fill the entire room. You can use sheer curtains to limit the contrast from the windows.
More Than Industry Leading
Real Estate Photo Editing
PhotoUp is the end-to-end business platform for real estate photographers.

2. Use a Single Flash to Mimic Natural Light

One of the downsides of natural light is that it can produce strong shadows that require extensive editing.
The easiest way to light a room or interior space that mimics natural light is to add a single flash to your kit. You can use a simple light stand or hand-hold it wirelessly.
When you use a flash, you want to avoid having the “flash look”. Here are three tips to consider:
- First, the flash should never be pointed forward, or it will produce hard shadows.
- Second, adjust the camera settings to get the correct exposure.
- Third, you need to adjust the flash power so that only the shadows are affected.
One more consideration: if you use flash on each exposure of your HDR, make sure you have enough time to recycle so that the flash is ready to “pop” again at the correct power.
Also, consider turning your camera’s drive speed (FPS, frames-per-second) down to “Continuous Low” speed, and/or using exposure delay mode if your camera is capable of both at once.
3. Use a Bounced Flash to Reveal Details in the Shadows
Now, let’s talk about why real estate photography professionals often rely on a bouncing flash.
A bouncing flash is excellent to fill a room with soft, even light. To best do this, try bouncing the flash off the ceiling.
However, you need to keep the ceiling itself outside the frame of your shot. Otherwise, you end up with a blown-out white spot on the ceiling or wall in your image.
Also, bounced flash works best if the ceiling is a relatively neutral color. Neutral grays and whites work best, so, look for white or near-white ceilings and/or walls.
Here’s what you need to do:
- To start, bounce your flash off the ceiling just above and off to one side of your camera position.
- Then, brighten or darken the flash to get the illumination perfect.
- Keep testing and moving the flash until you like how the light and shadows play on the subject area.
4. Use the Client’s Lights if They Add Value and Character

Sometimes the light fixtures are a selling feature of the property.
If this is the case, then you’ll want them lit.
There are two ways to get the right exposure, and which way to follow is a matter of personal style and taste:
- First option — use natural light and a bounced flash to fill the shadows in the room.
- Second option — try closing the curtains if the light from the window is too strong.
If you are in this situation, the challenge is to balance three sources of light: the light fixtures, the light coming from the windows, and the flash.
In addition, try adjusting the exposure by looking at the histogram on the camera.
Also, keep the highlights off to one side to avoid a complete blowout of the area around the lamps or lighting.
Another option is to shoot multiple exposures and merge them into a single HDR image. You can address the details in Lightroom or Photoshop.
5. Avoid Mixed Lighting to Eliminate Color Cast Variation
The perfect lighting for real estate photography is uniform and neutral in color.
However, different light sources have different temperatures.
Daylight coming in from a window is different depending on the hour and the direction of the building.
The light from fixtures can be cold or warm. And the light from the flash is usually daylight.
When these light sources don’t match, your photo might have a red and blue cast. This will require time and effort to fix in the editing phase.
Here are two ways you can avoid color cast:
- One way to avoid a color cast is to turn off every light. If the only lighting is natural or your own, you can be sure to have uniform light in your photos.
- Try using gel filters if your flash doesn’t match with the light fixtures or with the window light.
Have You Ever Thought To
Outsource Photo Editing?
Try it today with 5 free edits from three professional photo editors.
Boost Image Quality With a Professional Real Estate Photo Editor
You don’t have to master real estate photography alone!
Let our skilled photo editors save you time and effort while improving your results.
Browse Top Dedicated
Real Estate Photo Editors
Ready-to-hire editors for real estate photo editing, and more.
You’ll also impress your clients with incredible photos.
Whether you shoot in a single exposure, flambient or HDR, PhotoUp provides detailed photo editing customized exactly to your liking.
We’re a global leader in socially responsible image editing for real estate photography. And we offer a full range of affordable and fast photo editing services.
Get started with PhotoUp today, and let us help you take your new real estate photography to the next level!
We hope this post helped you learn new powerful real estate photography lighting tips for incredible results.
If you enjoyed reading this post, you may also want to check out the following resources:

