


Table of Contents
- What Is a Color Space in Photoshop?
- How to Change the Color Space in Photoshop
- FAQ
- Let the Experts at PhotoUp Edit Your Real Estate Photos!
Learning how to change the color space in Photoshop is essential to creating dynamic images.
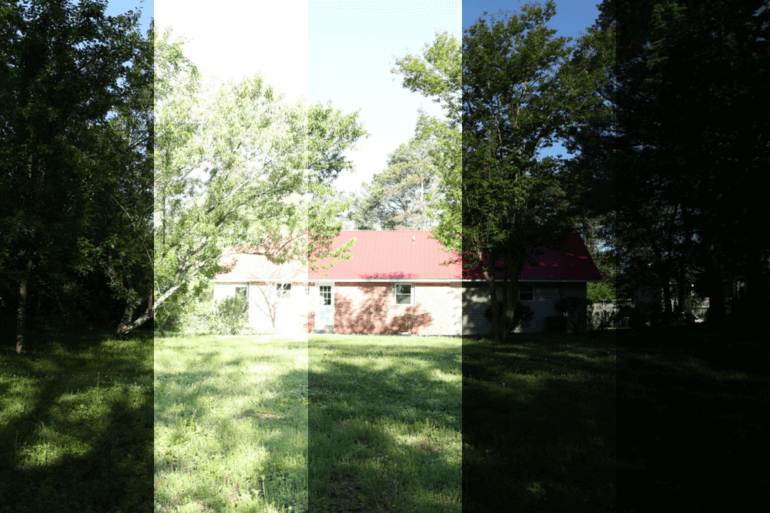
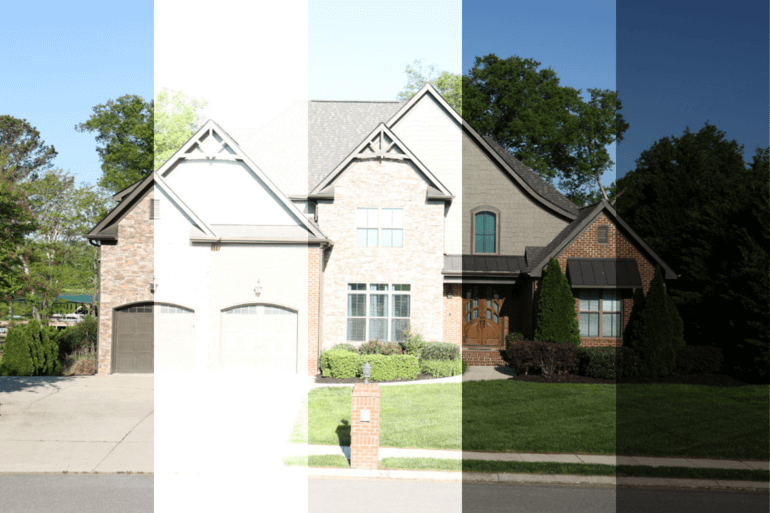
As real estate photographers, we know that color is an essential element in any photo that can evoke emotions, convey messages, and tell stories. However, not all devices, software, and platforms share the same color space, which can lead to color shifts, banding, and other unwanted effects.
That’s why understanding and changing the color space of your photos in Photoshop can make a huge difference in their quality and impact.
In this guide, we’ll show you how to change the color space in Photoshop step by step, so you can transform your dull images into dynamic ones.
Before we get into the nitty-gritty details, let’s first take a look at what color space in Photoshop is.
What Is a Color Space in Photoshop?
Photos edited in Photoshop can serve different purposes: printing, online use, or further editing in other applications. Understanding how to change the color space in Photoshop is crucial for adjusting the color range based on your intended use.
Additionally, a color space represents a full spectrum of colors, acting as a container for various hues. The range of colors within a color space is called a color gamut, and any colors outside this range won’t be visible on certain devices.
Exporting real estate photos in Photoshop can be perplexing due to the various color management options available.
Familiarizing yourself with how to change the color space in Photoshop allows you to output images in a color space that is supported by the specific printer, online platform, or devices you plan to use.
How to Change the Color Space in Photoshop
When working with images in Photoshop, it’s important to know the color space, which can be found at the bottom of the workspace. If the color space is not specified, it will display as untagged.
With that being said, let’s show you how to change the color space in Photoshop. You can either watch the video or continue reading the text with the screenshots below:
1. Open the Color Settings Dialogue Box
To change the color space, follow these steps:
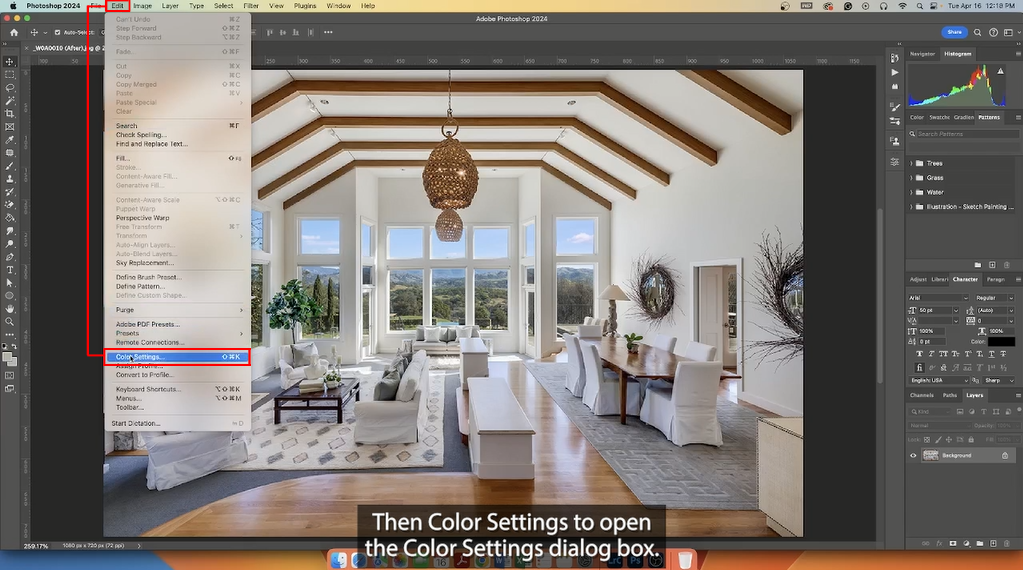
Step 1. Firstly, open your photo in Photoshop, and click on Edit in the top menu. Next, choose Color Settings near the bottom of the menu. Alternatively, you can use the keyboard shortcuts:
- On a Mac: Press Shift + Command + K
- On a Windows PC: Press Shift + Ctrl +
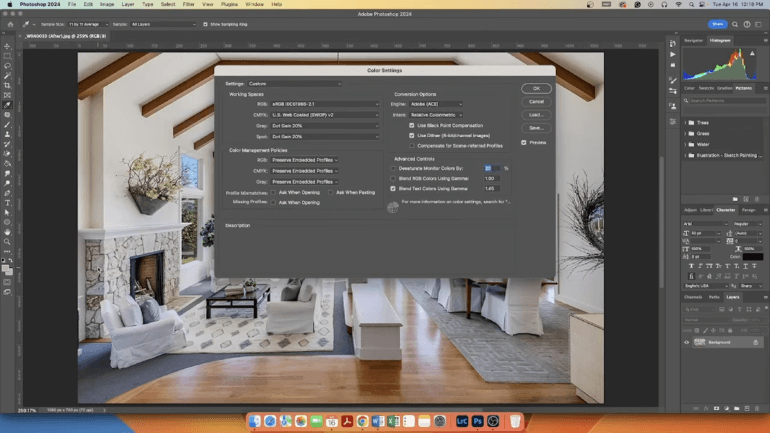
Step 2. Once you’ve opened the Color Settings, you’ll see the Settings, Working Spaces panel, and the Color Management Policies panel to the left of the dialog box.
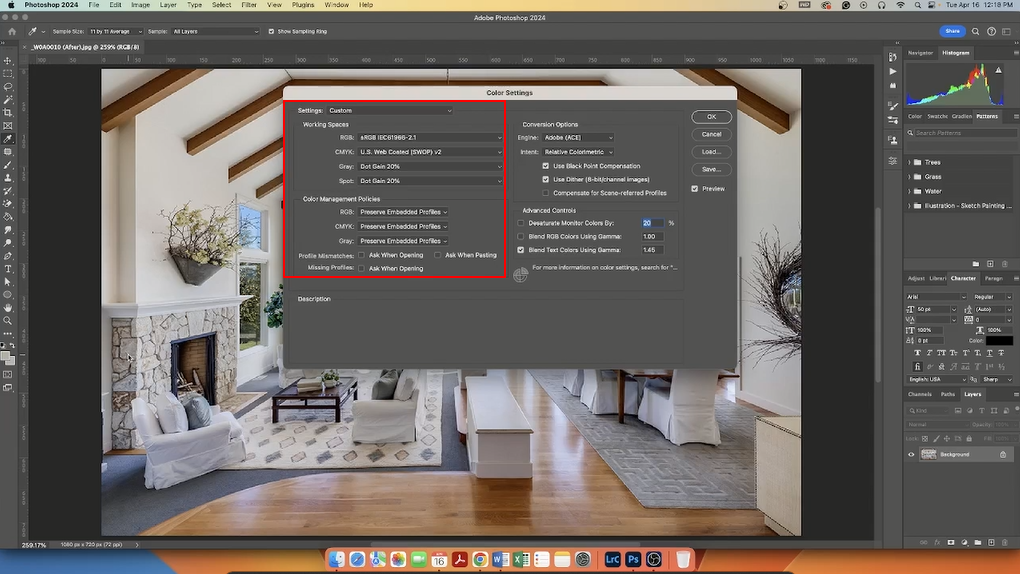
In practical operation, the Working Spaces and Color Management Policies are closely linked, despite the gray borders separating them visually.
1.2 Understanding the Working Spaces
Let’s first understand the “Working Spaces.” This primarily refers to the color spaces associated with different image modes, such as RGB.

RGB Image Mode
RGB stands for red, green, and blue. In this color model, colors are created by combining different intensities of red, green, and blue light.
By adjusting the intensity of each color, various colors can be produced. When all three colors are combined at their maximum intensities, they create white light.
By default, Photoshop associates the RGB image mode with the sRGB color space. This color space is based on the standard recommended by the International Electrotechnical Commission (IEC).
CMYK Image Mode
The CMYK color model is commonly known for its components: cyan, magenta, yellow, and black. Unlike the RGB color model, CMYK functions as a subtractive color model.
This means that colors are created by subtracting light from white. In practical applications, a separate black channel, represented by Key or K, is incorporated to enhance color depth and reduce ink consumption.
In Photoshop, the CMYK color model is automatically associated with the U.S Web Coated (SWOP) v2 color space. This color mode is suitable for prepress document editing, specifically when preparing for print output on a multiple drum offset press printer.
All in all, these printers employ cyan, magenta, yellow, and black inks on four rotating drums to produce images on paper sheets. Understanding the relation to the CMYK color space helps in effectively configuring the color settings for optimal print results.
Spot Mode
Also known as Spot Color Separation or Spot Channel, the Spot mode is used for printing special inks and colors that go beyond the typical CMYK colors.
In Spot Mode, you can add additional channels to the image, with each channel representing a separate ink or color.
Spot colors are often used in print jobs that require precise color matching, such as real estate company logos and colors.
By default, Photoshop color settings associate the grayscale and spot color mode to the Dot Gain 20% color space. So in most cases, you won’t need to change these default settings of these modes.
Grayscale Mode
When an image is in Grayscale Mode, it is represented using shades of gray, ranging from pure black to pure white.
Consequently, there is no color information in this mode, and each pixel is assigned a brightness value between 0 and 255, representing a grayscale intensity. Therefore, grayscale mode is commonly used for black-and-white photography.
Have You Ever Thought To
Outsource Photo Editing?
Try it today with 5 free edits from three professional photo editors.

2. Changing the Color Space
Photoshop has the default setting of sRGB color space for RGB image mode. However, there are multiple color spaces available to choose from.
This is how to change the color space in Photoshop:
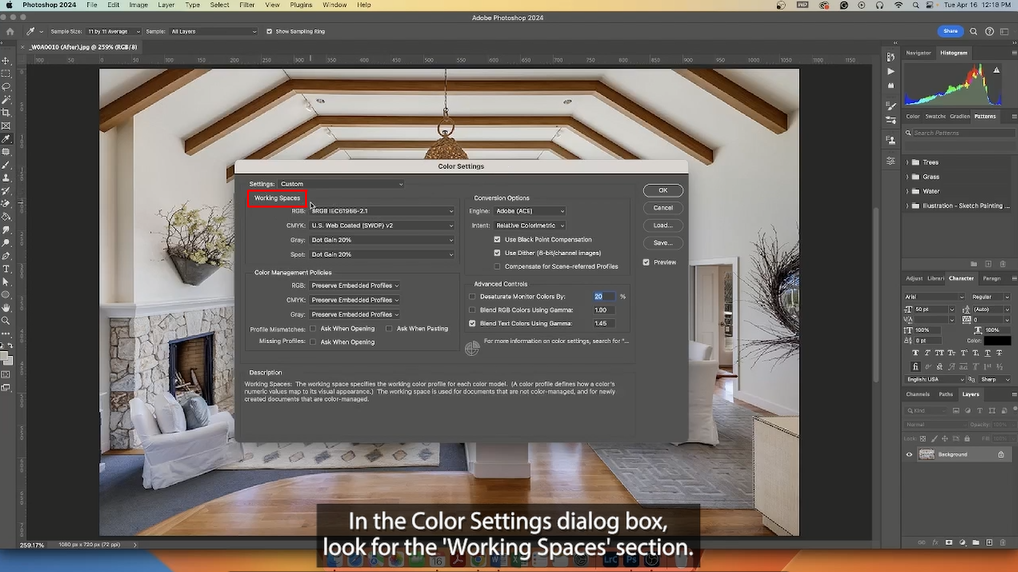
Step 1. In the Color Settings Dialog box, look for the Working Spaces section.
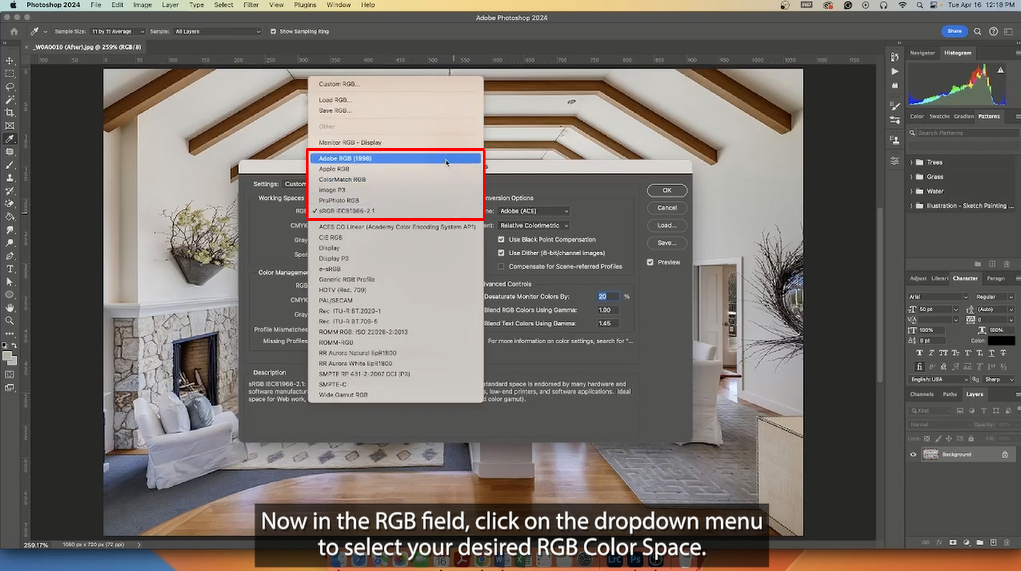
Step 2. Now in the RGB field, click on the dropdown menu to select your desired RGB Color Space and click OK.

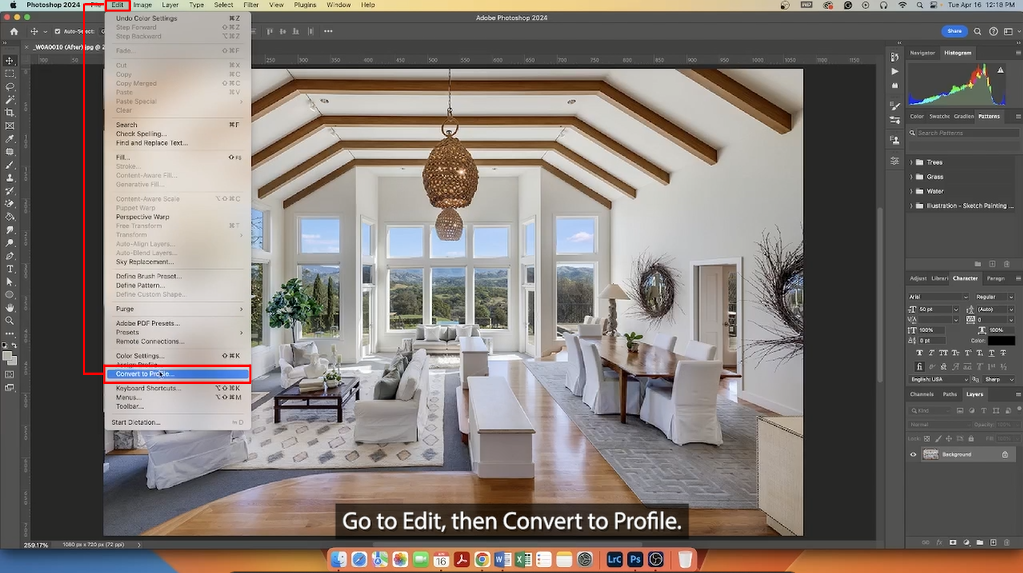
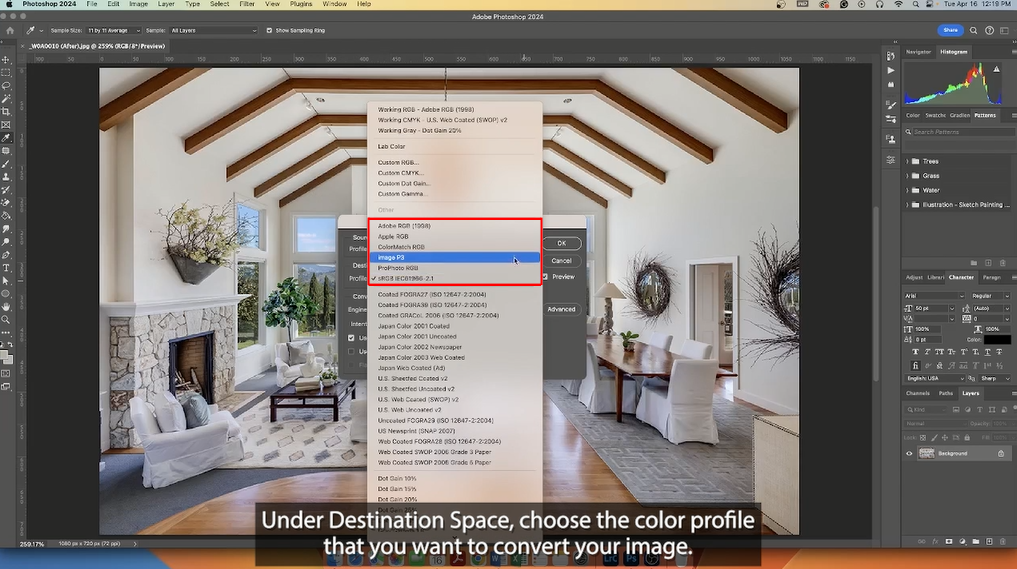
Step 3. In the next step, go back to Edit and then select Convert to Profile and the Convert to Profile dialog box will open.
Step 4. Under Destination Space, choose the color profile that you want to convert your image.
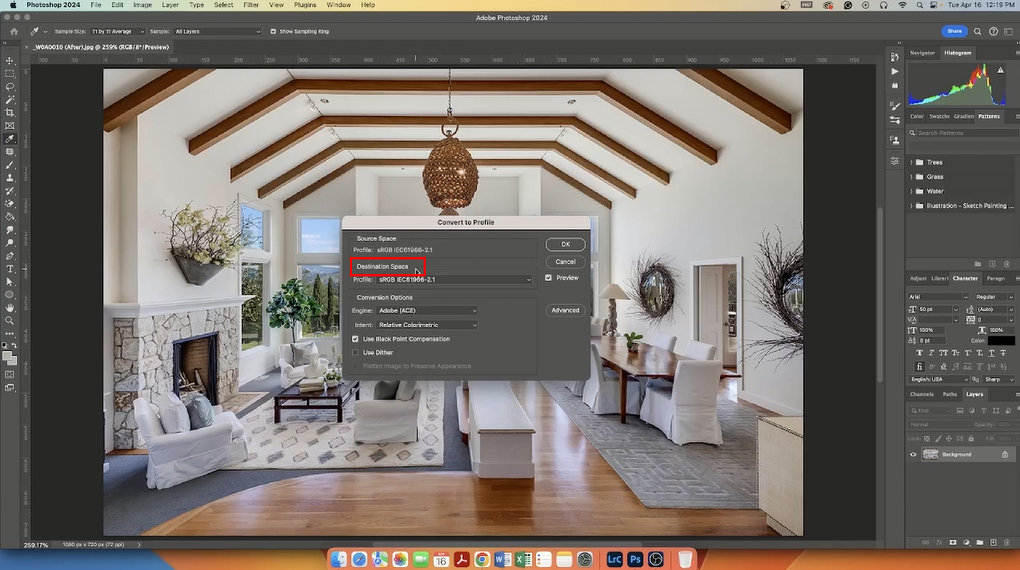
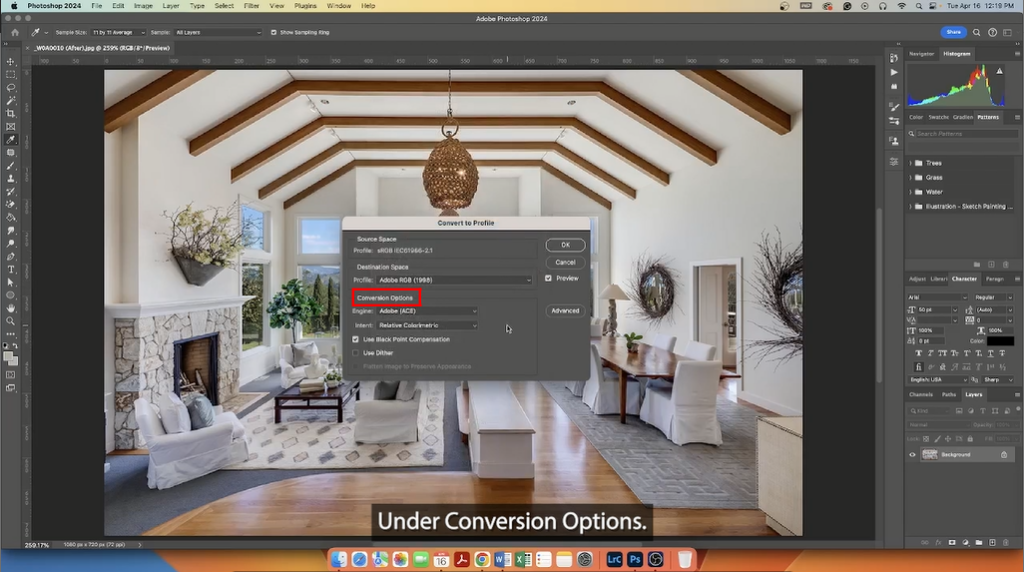
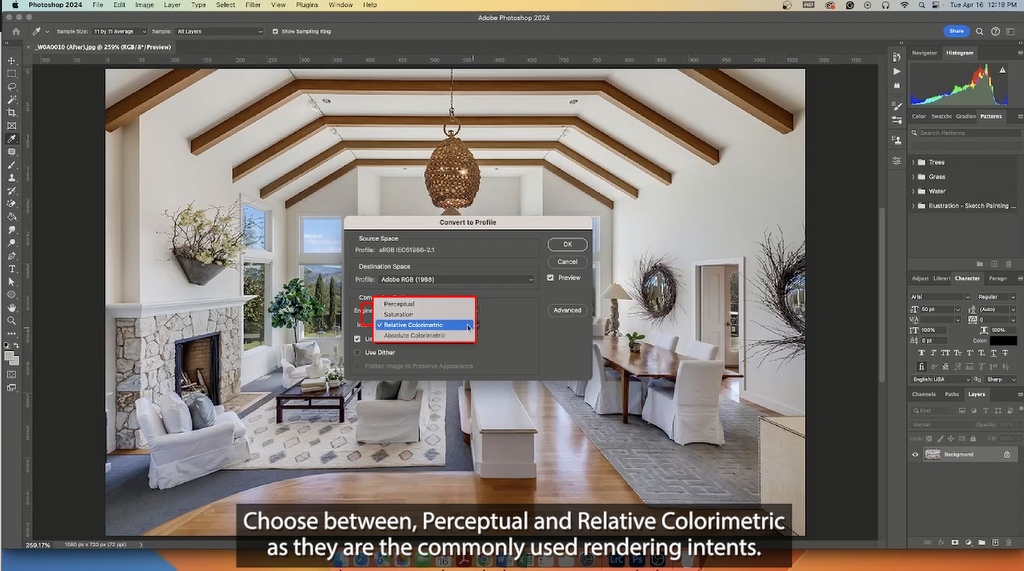
Step 5. Under Conversion Options, choose between Perceptual and Relative Colorimetric as they are the commonly used rendering intents.
Step 6. Once you’re satisfied with the settings, click OK to apply the changes. Your image is now in the new color space.
And that’s it!
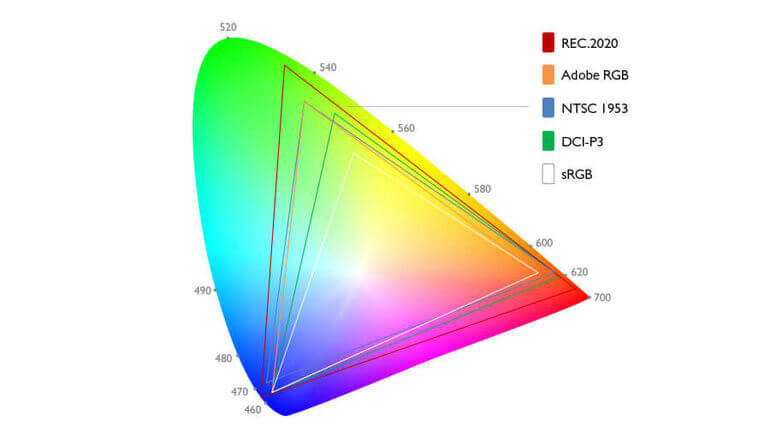
2.1 The Difference Between sRGB and RGB
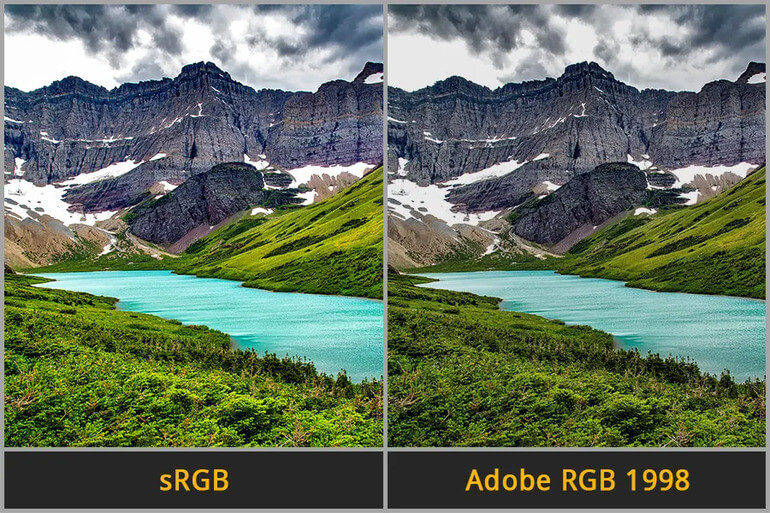
Now, if you want to learn more about the difference between RGB and sRGB, we’ve got you covered.
sRGB Color Space
The sRGB color space is the oldest color space in Photoshop and was initially associated with VGA monitors and photographic printers. It is the smallest color space in terms of the range of richer color shades it can display.
Because of its limited color information, sRGB is widely supported and can be faithfully displayed or printed on many devices.
Additionally, it is the color space supported by most web browsers. Therefore, if you are planning to upload photos online or display them on various devices like phones, it is recommended to use the sRGB color space.
Adobe RGB 1998
The Adobe RGB 1998 color space is considered newer than sRGB and offers a broader range of colors for display or printing.
It‘s worth noting that most modern printers support this color space, making it the ideal choice for saving your work intended for printing.
ProPhoto RGB Color Space
Lastly, the ProPhoto RGB is the largest color space available in Photoshop. It supports a wide range of tonality, allowing for a broad spectrum of colors.
While some believe that printers and display devices cannot accurately reproduce the ProPhoto RGB color space, it remains the preferred option when intending to export and edit images in other software like Lightroom.
Due to its extensive color information, this color space ensures optimal flexibility and fidelity in editing workflows.
And there you have it!
Now that you have a better understanding of color spaces in Photoshop, you can start making informed choices when working with your images.
FAQ
What is the default color space for images in Photoshop?
In Photoshop, the default color space is sRGB. It is the smallest color space in terms of the range of richer color shades it can display and is mostly suited for online use.
The three primary colors of light are red, green, and blue. RGB (red, green, blue) devices, such as computer monitors, smartphones, and TVs, utilize a combination of these colors to display all the colors we see on the screen.
Should color space be sRGB or Adobe RGB?
If you’re a photographer who frequently prints photos, the recommended color space for printing is Adobe RGB.
However, if you’re capturing photos for online upload, selecting the sRGB color space is more suitable. It’s worth noting that if you upload Adobe RGB photos to the internet, you may notice a loss in saturation.
Will changing the color space improve image quality?
Changing the color space does not directly improve the quality of an image. However, it does play a crucial role in how colors are represented and displayed.
When choosing a color space, it is important to consider its suitability for accurately rendering colors on various devices and platforms. It is worth noting that converting between color spaces can result in a loss of color information.
How do you change color space to CMYK in Photoshop?
To convert an image from RGB to CMYK, all you need to do is to open the image in Photoshop. Then, navigate to Image > Mode > CMYK.
What color space is CMYK?
In a CMYK color space, different colors are created by combining cyan (bright blue), magenta (bright red-pink), yellow, and black pigments together.
High-Quality & Consistent
Real Estate Photo Editing
Hire a dedicated editor with performance metrics from $7/hour.
Let the Experts at PhotoUp Edit Your Real Estate Photos!
Tired of spending endless hours editing your photos? Becoming proficient in Photoshop and other editing software requires substantial practice.
But what if you could use that time and effort in other areas, especially when dealing with a sizable portfolio?
Let PhotoUp help you with your post-processing!
Our team of highly skilled professionals is here to handle all your real estate photo editing requirements.
With our affordable pricing starting from just $1.10 per image, depending on your subscription, you can finally concentrate on what you do best – capturing breathtaking photographs.
Our real estate photo editors can help with services like:
- Image brightness and exposure correction
- Color and tone adjustments
- Window masking and glare reduction
- Clutter and advanced object removal
- Line and angle corrections
- HDR editing
- Harsh shadows and lack of light
- Sky replacements and grass greening
- Twilight and day-to-dusk editing
- Drone editing, and much more!
Browse Top Dedicated
Real Estate Photo Editors
Ready-to-hire editors for real estate photo editing, and more.
A Complete Real Estate Marketing Partner

Apart from standard photo editing, PhotoUp also offers other real estate marketing services such as:
To start using our photo editors or any of these powerful real estate marketing tools, all you have to do is sign up for a free PhotoUp account, and get to action!
PhotoUp Real Estate Photo Editing Uploader Demo
Check out how easy it is to get started with PhotoUp in this real estate photo editing uploader demo:
As simple as that!
So why not give us a try?
Sign up for a free PhotoUp account today and let PhotoUp take care of your editing needs, so you can fully concentrate on growing your real estate business.
Plus, for a limited time, you’ll even get 5 free edits when you sign up for an account!
We hope this blog post helped you learn how to change the color space in Photoshop. If you found this post useful, you may also want to check out the following resources:

