


Table of Contents
- The Basic Flambient Shooting Techniques Explained
- Why Shoot Flambient for Real Estate Photography?
- Beyond the Basic Process
- Flambient Examples
- Leverage Professional Real Estate Photo Editing
Are you looking into flambient real estate photography and want to learn how to use this technique?
The “flambient” method for shooting real estate photography involves combining both flash and ambient light in your shots. The flambient method is one of the fastest-growing methods for shooting real estate photography.
There are literally hundreds of ways to shoot and edit in the flambient style, and this tutorial is not meant to be comprehensive, but more of a simple introduction to what flambient is and how you can use it to capture great shots that highlight the best features of homes.
Let’s begin by sharing the basic flambient shooting techniques.
The Basic Flambient Shooting Techniques Explained🌅

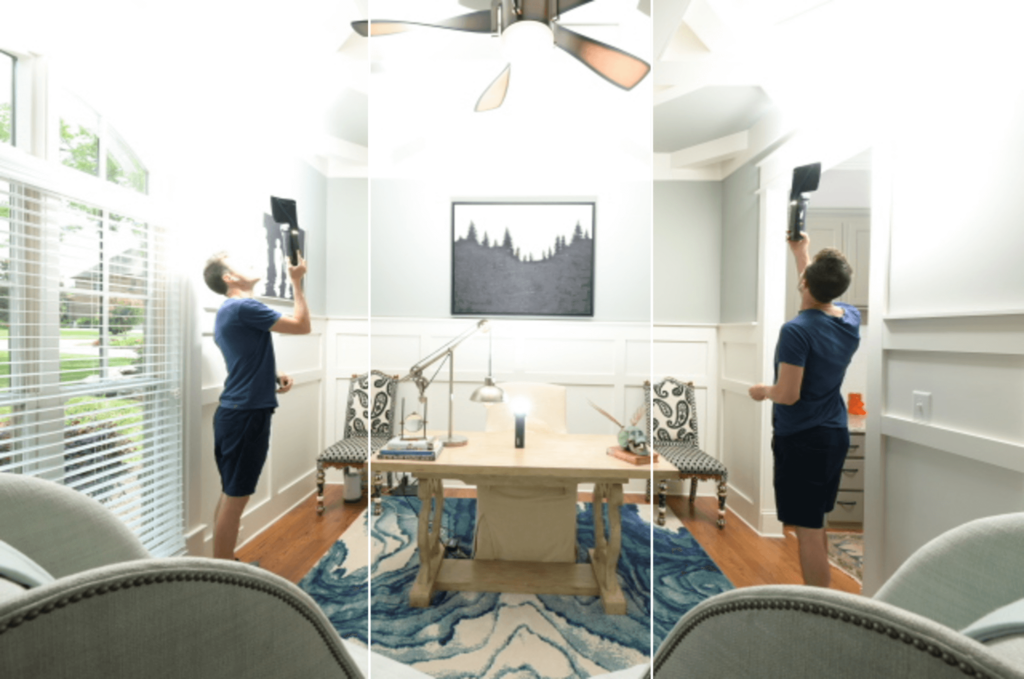
When using the flambient real estate photography technique, we recommend shooting at least 3 shots of a room to produce a final image. Here’s the process:
1. The Ambient Shot
You should use no flash for this shot, just the natural light of the room. Expose in the middle so you get a nice overall picture of the room, and shoot in RAW so you can push the bounds of the dynamic range.
I like to think of the exposure of this shoot as “if only” – i.e. if I could only use this one shot to make my final image, would it capture what it needs to in this room.
If you have a room with extreme dynamic range, you should shoot a bracket of 3 images, with 0 as the “if only” exposure, and add -2 and +2 shots to ensure you capture the shadows and highlights.
In PhotoUp’s master process flambient style, the ambient shot forms the base of your final image, but that is not always the case, as some photographers like to use the flash shot as their base image.
2. The Flash Shot
The goal here is to get a really well-exposed image where the view out the window looks good, the interior is brightened by the flash, and the walls have their natural color.
To accomplish this, we recommend taking your flash off-camera and holding it 18 inches to 2 feet below a nice white ceiling, pointing straight up into the ceiling.
You can leave the flash on the camera and get much the same look, but the closer the light is to the ceiling without being too close, the less likely you are to get flash-created shadows from objects in the room.
Your flash power will depend on how you have to expose to get a nice window exposure. The flash will not reach out the window, so expose for the view and power up or down the flash to get the right interior exposure.
The main purpose of this flash shot for PhotoUp’s master process flambient style is to recover the natural color of the walls and objects in the room, so it’s very important to bounce the flash off a white object in the room, usually the ceiling.
3. The Window Shot(s)
When you have a nice window view you want to capture, we recommend shooting a third shot specifically for the windows. Expose to the windows and point a high-powered flash directly at the window frames.
This may sound strange, but the flash pointed directly at the window frames will make the blending process in the post significantly easier.
It’s much easier to have the flash off-camera for this, but on-camera can work if the flash is powerful enough and the windows are not too far away.
Experiment with angles to ensure a shot with the least flash reflections and if you can eliminate them entirely, turn off your flash and shoot one shot without the flash in addition to your flash frames—just make sure not to adjust the camera exposure at all.
Why Shoot Flambient for Real Estate Photography?📸


The struggle in real estate photography is trying to balance shots that look natural, as the eye would see it in person, with shots that are bright, vibrant, and capture the natural colors of the room.
This is a struggle because shooting in just ambient light, while the most natural-looking, often results in walls that have shifted or lost most of their color and shadow areas that are a little too dark—especially when the home itself is a little on the dark side in terms of natural light.
Shooting just flash, however, unless you are really good at using multiple off-camera flashes, can result in an image that looks fake.
It can lead to shadows pointing towards the windows instead of away from them, and hot spots in areas that were closer to the flash and dark spots in areas that were farther away from the flash.
Flambient photography recognizes both the strengths and limitations of shooting all-flash or all ambient and attempts to combine them to get the best of both worlds.
Beyond the Basic Process🏞️
Three-shot flambient can be just a starting point for some photographers.
I’ve already mentioned simple upgrades such as shooting a bracket instead of a single ambient shot and multiple window shots to get reflections in different windows to make for easier blending.
However, there is no limit to how complicated you want to make the flambient process, remembering, of course, that the more complicated you make the process, the more time it will take to shoot the frames.
The basic process allows for a simple and quick process that will achieve fantastic results in most cases.
And there will always be cases where three shots won’t work, and we’d actually highly recommend starting with the bracket approach for your ambient frames, just in case.
But those are the times when you get to experiment a bit and potentially learn something that will help you in future shoots.
High-Quality & Consistent
Real Estate Photo Editing
Hire a dedicated editor with performance metrics from $7/hour.

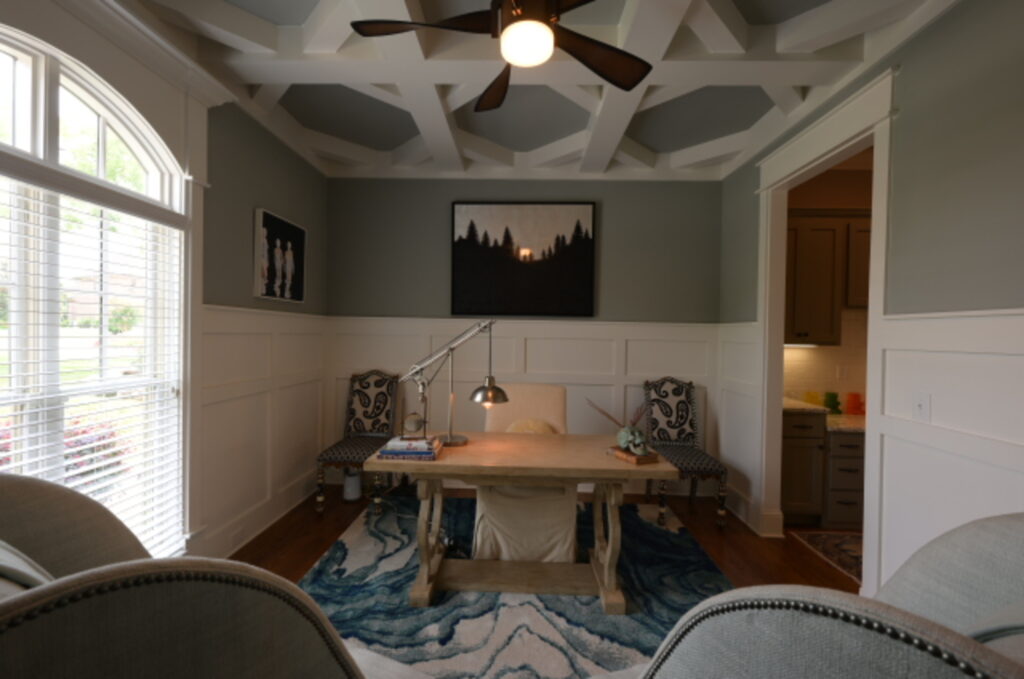
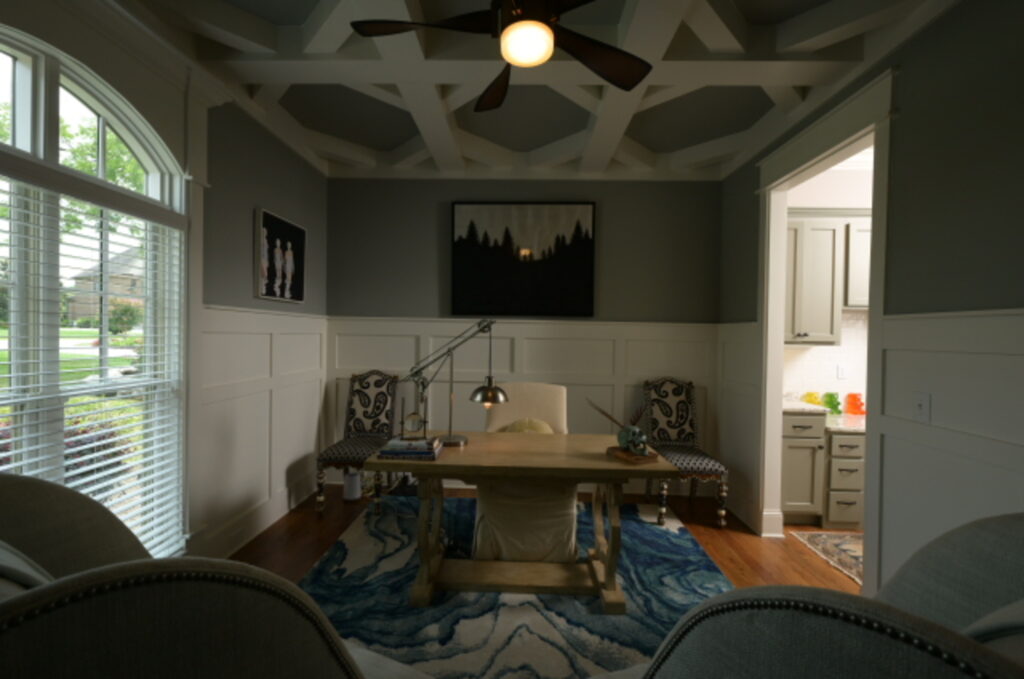
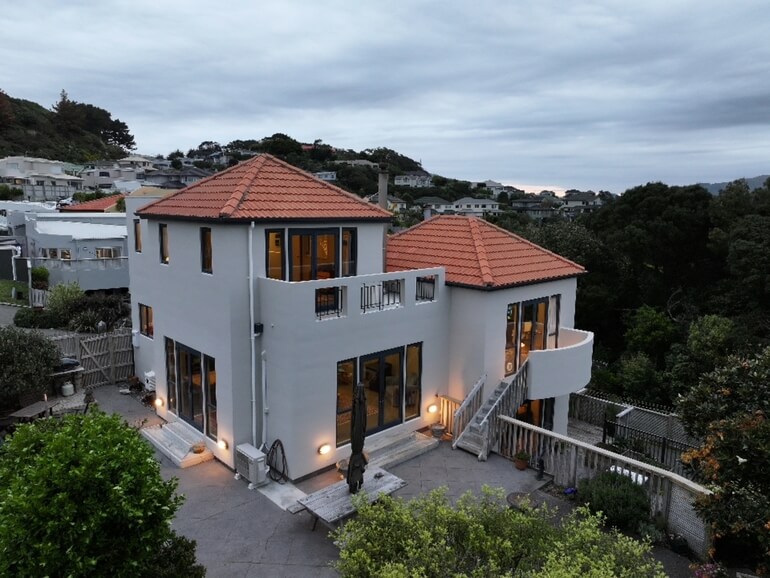
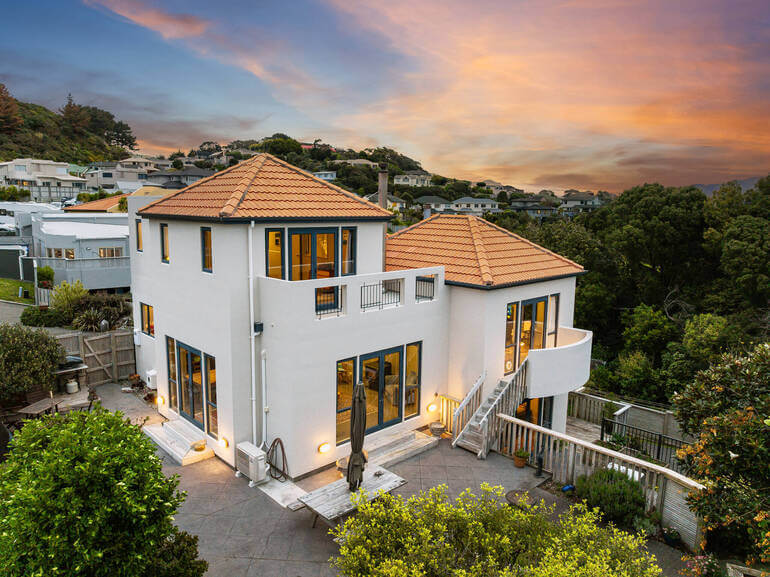
Flambient Examples🖼️
Now, let’s take a look at some examples of flambient real estate photography:


Have You Ever Thought To
Outsource Photo Editing?
Try it today with 5 free edits from three professional photo editors.
And that’s it!
Have you ever considered outsourcing your editing to save time and money? Let’s introduce the leading real estate photo editing service, PhotoUp.
Leverage Professional Real Estate Photo Editing🏘️
To free up time to do more high-impact tasks for your photography business, you may want to consider using a professional real estate photo editing service.
PhotoUp has a team of highly talented photo editors who are ready and waiting to professionally edit your real estate photos at the low cost of $1.50 per image for on-demand editing.
Our skilled editors can help with the following issues:
- Improper exposure levels
- Harsh shadows, lack of light, etc.
- Blurred images that were taken without a tripod
- Images that need cropping or other effects
- Lawn greening and sky replacements
- Twilight editing
- Clutter and object removal
- Line and angle corrections
- And much more!
But that’s not all!
Browse Top Dedicated
Real Estate Photo Editors
Ready-to-hire editors for real estate photo editing, and more.
A One-Stop Shop for Real Estate Marketing
Furthermore, PhotoUp is also a complete one-stop shop for real estate marketing and offers services such as:
You’ll also get access to our user-friendly photo management system, so you can upload and receive photos, send instructions and feedback, track and manage team members and clients, store final images, and more!
Quick & Easy Upload and Order Process
Getting started using PhotoUp’s real estate photo editing service is super easy.
This is all you need to do:
Step 1. Sign up for a free PhotoUp account.
Step 2. Upload your photos to our easy-to-use software.
Step 3. Choose the level of editing that you need and provide instructions (optional).
Step 4. Wait for PhotoUp professional editors to edit and return the photos in less than 24 hours (48 hours for virtual staging).
Step 5. Download and start using your beautifully edited photos.
PhotoUp Real Estate Photo Editing Uploader Demo
Check out how easy it is to get started using PhotoUp’s software in our real estate photo editing uploader demo:
As simple as that!
Sign up for a free PhotoUp account today, and let our talented editors take the extra workload off your hands.
For a limited time, you even get 10 free credits you can use on any of our services when signing up!
We hope this blog post helped you understand the basic techniques for shooting the flambient method for real estate photography. Before you go, you may also want to check out the following resources:

