


Table of Contents
- Why Day-to-Dusk Images Are So Powerful in Real Estate
- Day-to-Dusk vs True Twilight Real Estate Photography
- How to Do Stunning Day-to-Dusk Conversions
- How to Edit a Day to Dusk Image (Video Tutorial)
- Let Your Listings Shine After Sunset With PhotoUp
In real estate photography, first impressions don’t just matter—they sell. In a sea of listings filled with bright daytime photos, day-to-dusk or twilight images stand out instantly. According to recent studies, twilight images boost views by 76%.
They stop the scroll, spark emotion, and create a sense of lifestyle that standard daylight photos often can’t achieve.
In this guide, we’ll break down why twilight images are so powerful, how to edit day-to-dusk conversions the right way, and how to ensure your twilight photos actually help sell homes instead of looking artificial.
Let’s get started!
Why Day-to-Dusk Images Are So Powerful in Real Estate🌆

Twilight photos work because they tap into emotion and psychology, not just aesthetics. According to Home Jab, twilight photography, which captures properties during the golden hour, increases showings by 3x times.
Buyers don’t just want to see a house—they want to imagine living there. Twilight lighting evokes feelings of comfort, relaxation, and luxury.
It’s the moment when a home feels most alive, glowing softly against a dramatic sky. Here’s why twilight images consistently outperform standard daytime shots:
- They create instant visual contrast in MLS galleries and listing feeds, increasing click-through rates on listings
- They elevate perceived value, making homes feel more upscale
- They emphasize architectural lighting, pools, patios, and landscaping
- They tell a story, suggesting evenings spent entertaining or unwinding
- They stand out and boost engagement on social media and ads
In competitive markets, twilight photos often become the hero image—the one agents use for featured listings, ads, and social media. When done well, they don’t just look good—they convert attention into showings.
For agents, this means more interest, stronger branding, and faster results. For photographers, it’s an upsell that delivers real value to clients.
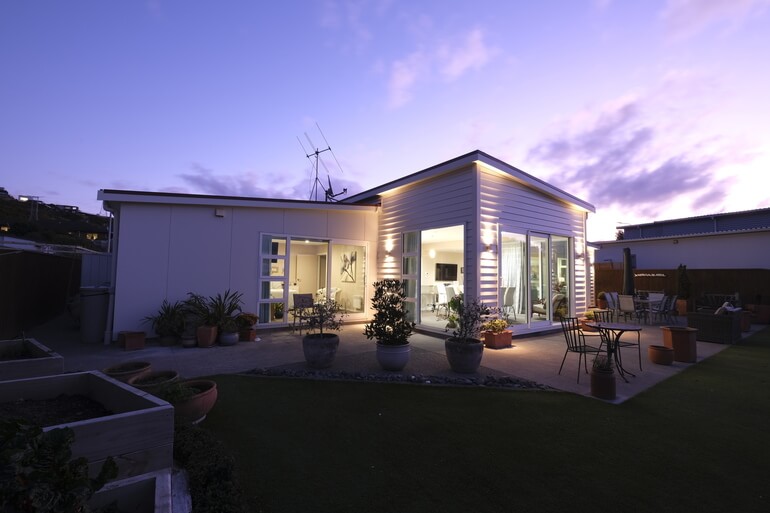
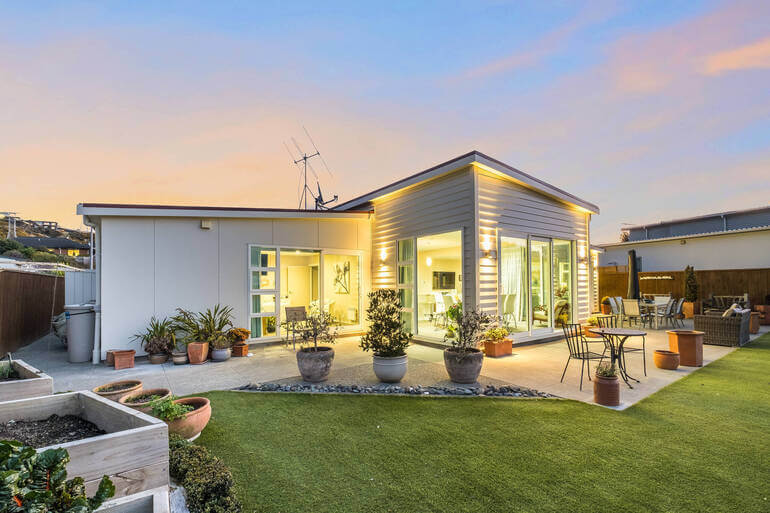
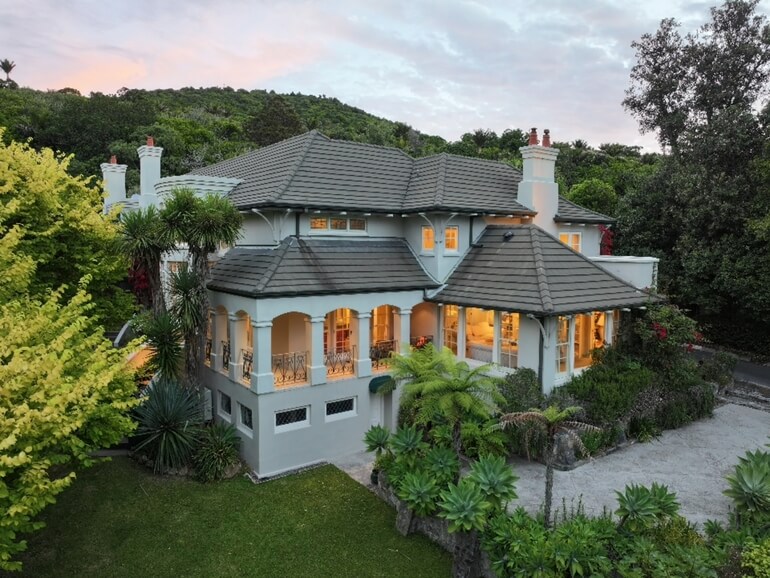
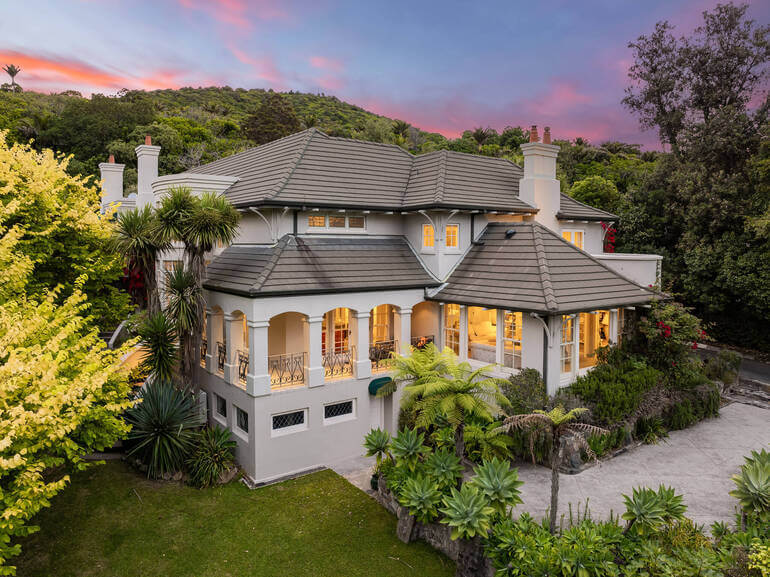
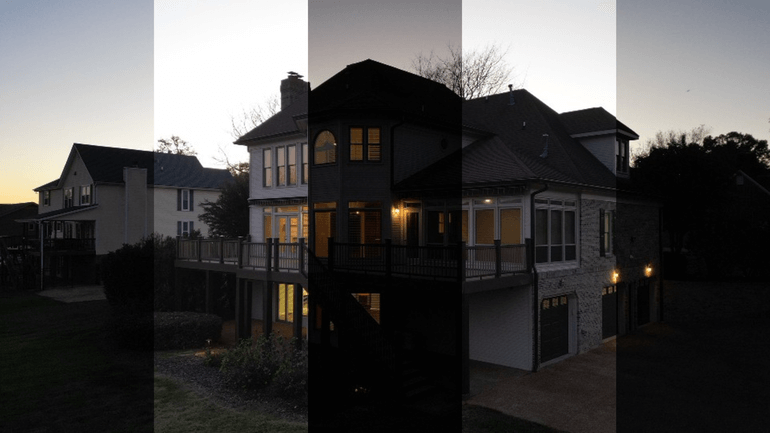
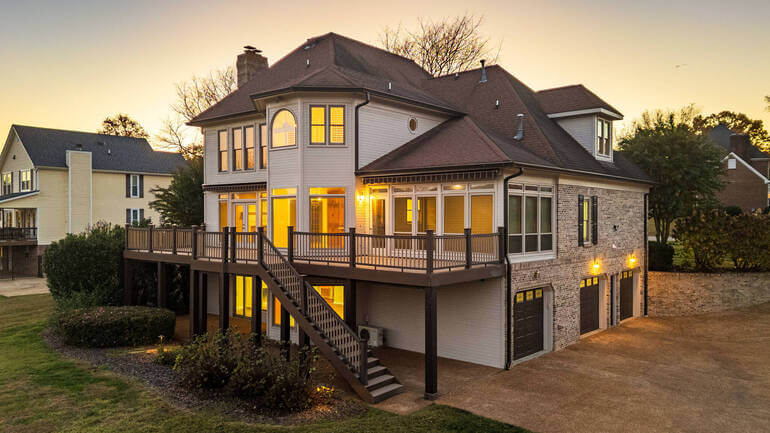
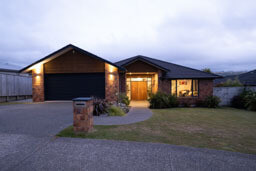
When done correctly, day-to-dusk conversions transform an ordinary exterior into a warm, inviting scene that feels aspirational and high-end—without the cost and logistics of a twilight shoot.
Day-to-Dusk vs True Twilight Real Estate Photography🌅
Before diving into editing techniques, it’s important to understand the difference between true twilight photography and day-to-dusk conversion:
| Twilight Photography | Day-to-Dusk Conversions |
| True twilight photography requires precise timing, on-site lighting control, and often multiple exposures captured in a very small window of time during the golden hour before sunrise or sunset. While beautiful, it’s not always practical for busy agents or photographers. | Day-to-dusk conversions, on the other hand, take a well-shot daytime exterior and digitally transform it into a twilight scene. When edited professionally, the result can be nearly indistinguishable from a real twilight shoot—at a fraction of the cost and effort. |
The key is realism. Poorly executed conversions look fake, overly saturated, or inconsistent. High-quality conversions feel natural, balanced, and believable.
How to Do Stunning Day-to-Dusk Conversions🌌

With this in mind, here are the steps to creating stunning day-to-dusk conversions that actually sell homes, including a step-by-step video tutorial at the end.
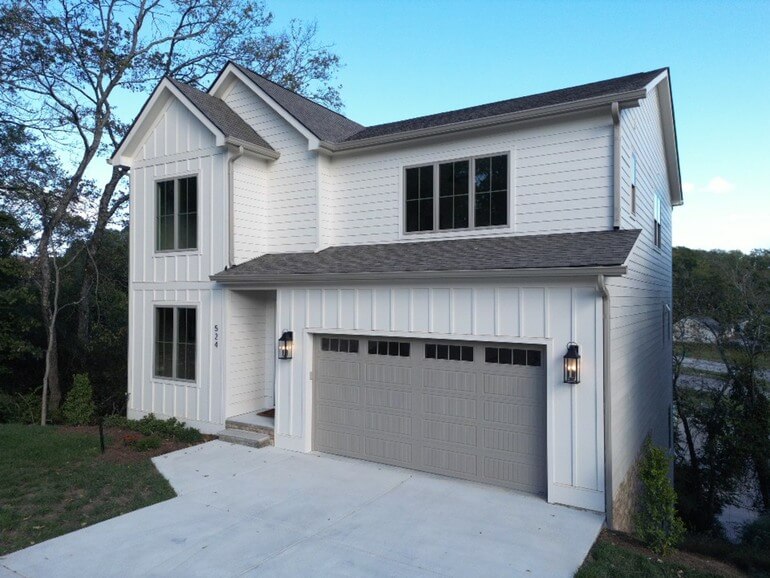
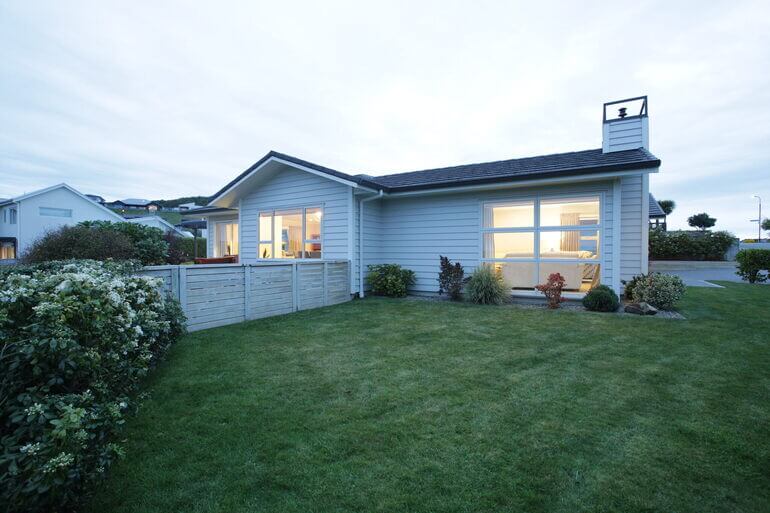
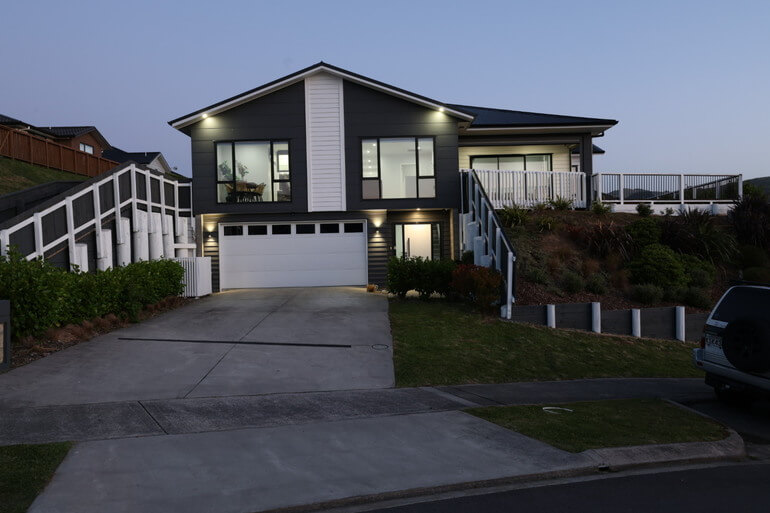
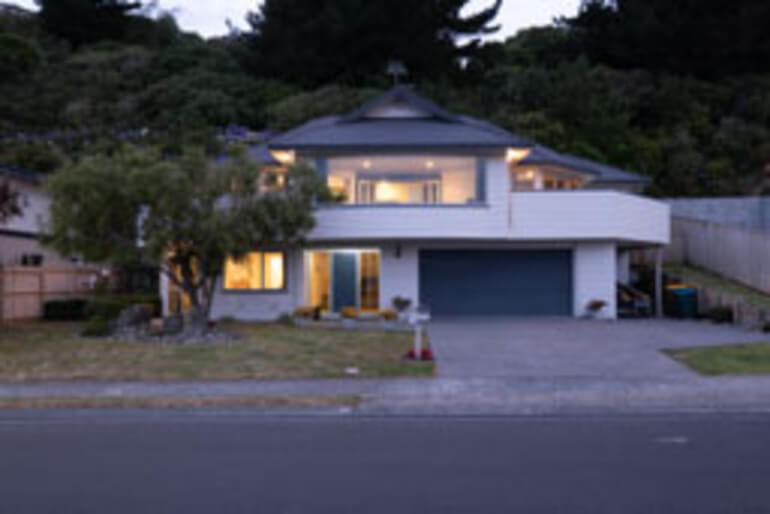
1. Choosing the Right Base Photo
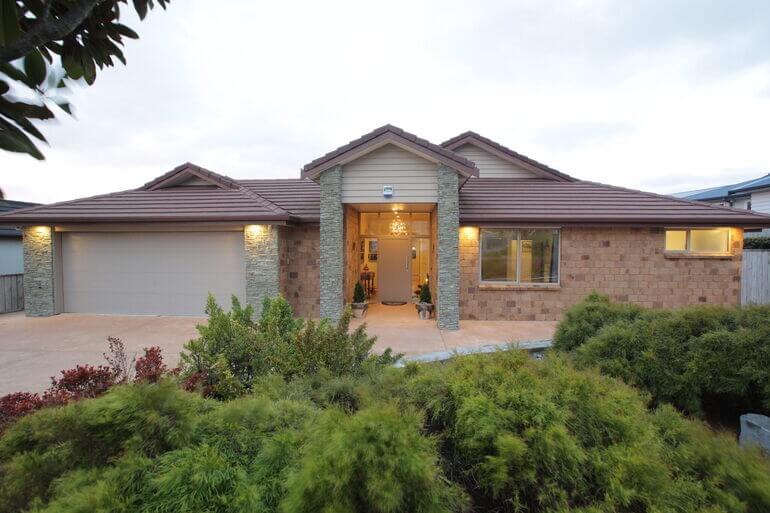
A strong day-to-dusk conversion starts with the right daytime image. Not every exterior is a good candidate.
Look for photos that already have:
- Clean composition with straight verticals
- Minimal harsh shadows across the facade
- Even lighting across the home
- Visible windows and architectural details
Overexposed skies, blown-out highlights, or extremely flat lighting can make conversions harder and less realistic.
Starting with a clean, properly exposed image gives you far more flexibility during editing—and leads to better results overall.
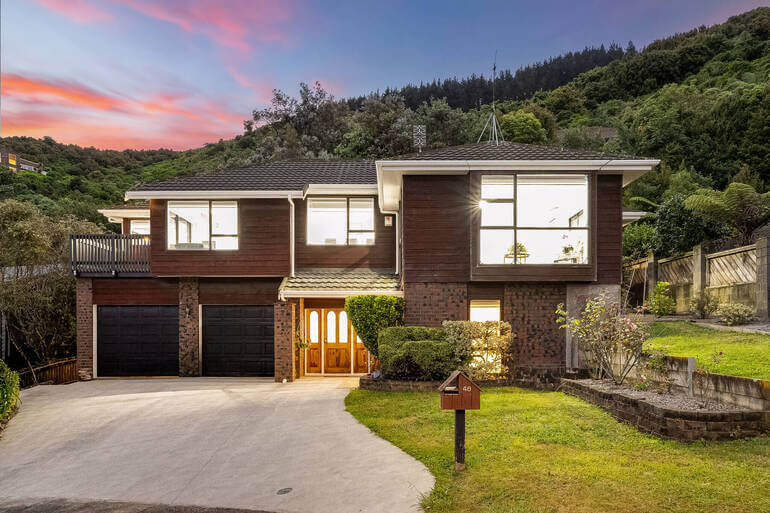
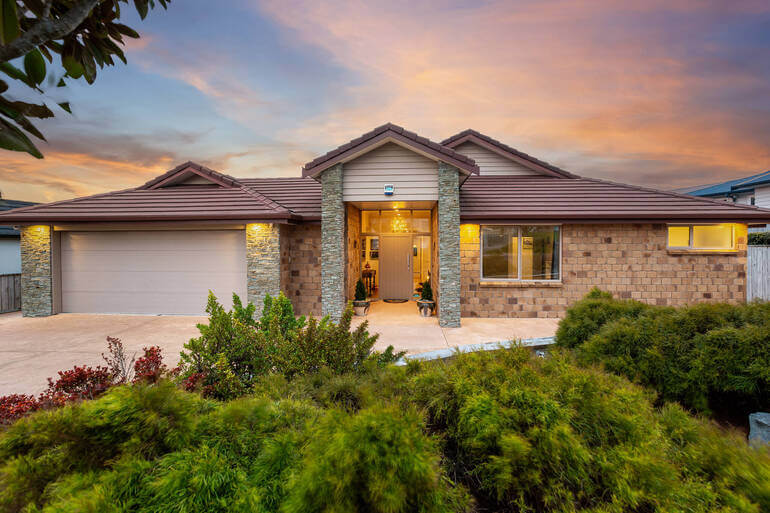
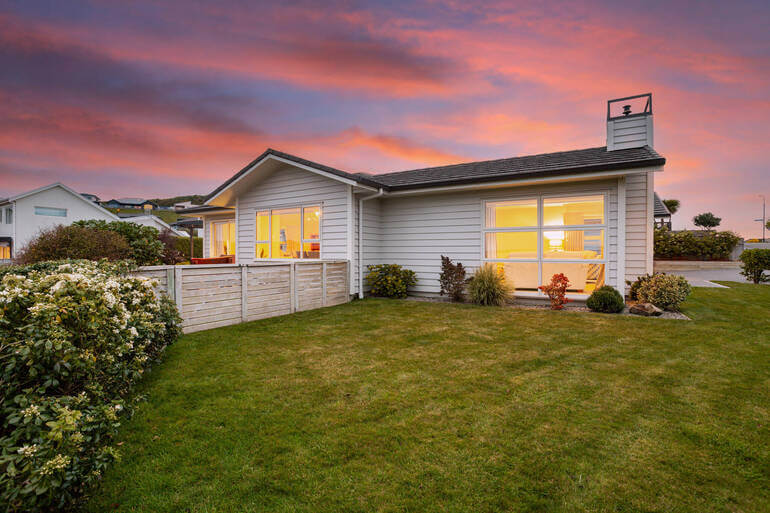
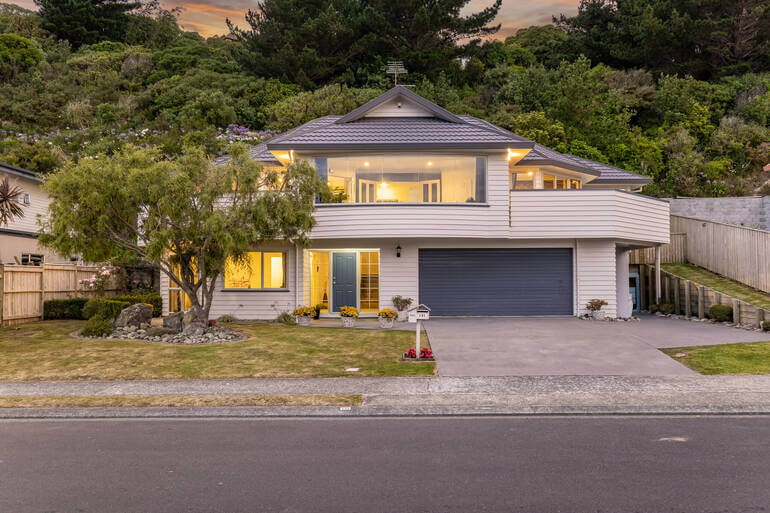
2. Creating a Realistic Twilight Sky
The sky is the foundation of any day-to-dusk conversion. A believable twilight sky typically features:
- Deep blues and purples near the top
- Warmer hues near the horizon
- And subtle gradients instead of harsh color bands
When replacing or enhancing the sky, realism is critical. The sky should match the angle, perspective, and lighting direction of the original photo.
Overly dramatic clouds or neon colors can make the image feel artificial and distracting. A well-edited twilight sky doesn’t overpower the home—it frames it.
3. Enhancing Interior and Exterior Lighting
Lighting is what truly brings a twilight image to life. Here are some key considerations when editing interior and exterior lighting:
Interior Window Glow
Warm interior lights create contrast against the cool dusk sky and instantly make the home feel welcoming. The glow should be:
- Soft, not overly bright
- Warm in tone (golden, not orange)
- Even across multiple windows
Each window should still show subtle variation—perfectly uniform light often looks fake.
Exterior Lighting Accents
Exterior lights such as porch lights, landscape lighting, and pathway illumination add depth and dimension.
These highlights help guide the viewer’s eye and emphasize architectural features. The goal is subtle enhancement, not spotlighting.
The Ultimate All-in-One
Real Estate Photographer Business Platform
Grow a successful real estate photography business with PhotoUp.

4. Balancing Color Temperature and Mood
One of the biggest mistakes in day-to-dusk editing is overdoing color contrast. A successful twilight image balances:
- Cool ambient tones in the sky and surroundings
- With warm highlights from interior and exterior lighting
If the image becomes too blue, it feels cold and uninviting. If the warm tones dominate too much, it loses the twilight atmosphere.
The sweet spot lies in natural balance—cool enough to feel like dusk, warm enough to feel like home.
5. Preserving Realism and Property Accuracy
Real estate photo editing should always enhance—not mislead. A professional day-to-dusk conversion:
- Maintains accurate property colors
- Preserves architectural details
- Avoids unrealistic light sources
- And reflects the true layout of the home
Twilight photos should elevate the listing while remaining honest representations. Over-editing can lead to disappointed buyers and reduced trust, which ultimately hurts sales.
6. Fine-Tuning Shadows, Highlights, and Contrast for Stunning Twilight Scenes
Subtle adjustments make a huge difference in twilight scenes. Here are some tips to fine-tune shadows, highlights, and contrast in your twilight scenes:
- Shadows should deepen slightly to add drama without hiding details
- Highlights should remain controlled—blown lights break realism
- Contrast should enhance structure without flattening textures
These refinements help the home stand out clearly against the darker environment, creating a polished, high-end finish.
7. Consistency Across the Listing Gallery
Twilight images are most effective when they feel intentional. If one photo is dramatically edited while the rest of the gallery is flat or inconsistent, the listing can feel disjointed.
Successful listings often include:
- One standout twilight hero image
- Clean, well-edited daytime interiors
- And consistent color grading throughout
This cohesive presentation reinforces professionalism and builds buyer confidence from the first click to the final showing.
How to Edit a Day to Dusk Image
To see how to perform day-to-dusk conversions in action, you can watch our video tutorial. The edits are performed in Lightroom and Photoshop.
If you would rather read through the steps, the instructions are below:
Start With the Windows
Step 1. Import your image into Lightroom and do basic adjustments. Make it a little darker as it’s a dusk image.
Step 2. Next, create a Virtual Copy.
Step 3. On that copy, adjust the glow of the windows to make it look like the light is on. Boost the Exposure and Temperature to create a glowing effect.
Step 4. Now, move your images into Photoshop.
Step 5. In Photoshop, make the Window Layer on top and add an Inverted Mask (press and hold the ALT key while clicking the Masking button).
Step 6. Select the windows using the Pen Tool (P), then press the Delete button.
Step 7. Next, add an Outer Glow using the Layer style.
Step 8. Within the Layer Style, use the Sliders to adjust to an appropriate level.
Next, Edit the Sky
Once you’re happy with the windows of the house, it’s time to work on the sky:
Step 1. Duplicate the base photo and go to the Channel panel and duplicate the Blue channel.
Step 2. Adjust the Levels in the Sky by pressing CTRL – L on your keyboard.
Step 3. Select the Non-Sky area, make it black, and use the Dodge Brush (O) to lighten the sky.
Step 4. Now, you want to Load the Channel as a Selection, and then click the Masking button.
Step 5. Next, Import the dusk sky photo that you want to use behind the building.
Step 6. Adjust its position and make sure to Blend it properly with the house. E.g you may want to use the Burn Tool to darken the house overall. Then, Save the new image.
Step 7. Back in Lightroom, you can make one or two adjustments to the white balance until you’re happy with the final product.
Use the Dusk Scene to Showcase the Property
Keep in mind that you’re showcasing a home for a potential buyer and not trying to create an award-winning nature photograph.
The dusk scene is there to show off the best features of the property and put the viewers in a calm, welcoming state of mind, so they look favorably on the listing.
The goal is to make home buyers think of themselves living in this incredible home and taking in the beautiful evening sunset.
Final Adjustments for a Seamless Look
To make the final adjustments to your images, make sure to remove any unwanted elements and clutter. Also, remember to edit out harsh shadows or artificial lighting discrepancies to create a flawless image.
Lastly, ensure high-resolution images and vibrant colors to optimize your images for real estate listing platforms.
And there you have it! You’ve now learned the 101 of twilight photo editing.
Before we leave this topic, let’s take a look at some common day-to-dusk editing mistakes so that you become aware of the traps and can avoid them.
Common Twilight Editing Mistakes to Avoid⚠️
Even experienced real estate photo editors can fall into these traps:
- Over-saturated skies
- Unrealistic window brightness
- Misaligned lighting directions
- Flat or muddy shadows
- Artificial glow halos around windows or lights
Avoiding these mistakes is what separates amateur conversions from truly stunning twilight imagery.
However, if you don’t have time to develop these editing skills and just want to be out in the field shooting amazing property photos, we have the perfect solution for you – introducing PhotoUp!
Have You Ever Thought To
Outsource Photo Editing?
Try it today with 5 free edits from three professional photo editors.
Let Your Listings Shine After Sunset With PhotoUp🌃
Day-to-dusk conversions are one of the most powerful tools in real estate photography—when done right.
They transform ordinary exteriors into emotionally compelling images that attract attention, spark imagination, and help buyers connect with a home before they ever step inside.
If you want professional, realistic, and consistently stunning twilight images without spending hours editing, PhotoUp is here to help!
With expert real estate photo editors who understand lighting, realism, and real estate standards, we turn your daytime photos into captivating twilight masterpieces that elevate your listings and help homes sell faster.
Except for twilight editing, we also offer other common edits like:
- Improper exposure levels
- Harsh shadows, lack of light, etc.
- Blurred images that were taken without a tripod
- Images that need cropping or other effects
- Lawn greening and sky replacements
- Clutter and object removal
- Line and angle corrections
- HDR blending
- And much more!
We will handle all types of issues – from basic to complex editing!
Browse Top Dedicated
Real Estate Photo Editors
Ready-to-hire editors for real estate photo editing, and more.
Why PhotoUp?
Here are some benefits of using PhotoUp’s editing service to help you create stunning images:
| High-Quality, Realistic Editing: Professional-level enhancements that create seamless and natural-looking twilight effects. |
| Fast Turnaround Time: Receive beautifully edited images in as little as 12-24 hours, ensuring quick updates to listings. |
| Affordable Pricing: Get premium editing services at budget-friendly rates, making it an excellent investment for real estate professionals. |
| User-Friendly Platform: Easily upload, manage, and receive edited photos through PhotoUp’s intuitive online system. |
| Customizable Edits: Request specific adjustments, such as sky styles, light intensities, and color grading, to match your vision. |
Whether you’re an agent or a real estate photographer, leveraging PhotoUp’s expert editing services ensures that your twilight images are stunning, professional, and impactful.
A Complete Real Estate Marketing Partner
PhotoUp offers more than just editing! We are a complete real estate marketing partner that provides additional services, including:
We have everything you need to enhance and market real estate photography in one user-friendly platform!
How to Get Started
Getting started using PhotoUp’s photo editing service is super easy.
This is all you need to do:
Step 1. Sign up for a free PhotoUp account.
Step 2. Upload your photos to our easy-to-use software.
Step 3. Choose the level of editing that you need and provide instructions (optional).
Step 4. Wait for PhotoUp professional editors to edit and return the photos in less than 24 hours.
Step 5. Download and start using your beautifully edited photos.
As simple as that….so, don’t wait!
Sign up for a free PhotoUp account today, and we’ll help you create stunning twilight images that sell homes.
Did we mention that you get 10 free credits when you sign up for an account that you can use for any of our services?!
We hope this guide helped you learn how to do stunning day-to-dusk conversations that sell homes. Before you go, you may also want to check out the following resources:
- 9 Proven Reasons Why You Should Use Real Estate Twilight Photos
- Why Is Twilight Real Estate Photo Editing so Powerful?
- How to Create Stunning Twilight Photos Without an Evening Shoot
- How to Use Virtual Landscaping to Upgrade Your Backyard
- How to Build & Manage Your Offshore Editing Workflow for 24-Hour Turnaround

