


Table of Contents
- What Does Protecting Your Photos Mean?
- 9 Steps to Protect Your Photos From Unauthorized Use
- Protect and Edit Your Images With PhotoUp!
Are you looking into steps to effectively protect your photos online to make sure no one is copying your hard work and using it without permission?
Let’s face it, publishing your photos online can be risky business. One of the biggest risks is the possibility of your photos being stolen. And trust us, going through the legal system to pursue copyright infringement is no cakewalk!
Instead, we’ve listed some better ways to prevent image theft. In this article, we’ve put together 9 steps to effectively keep your images safe.
Let’s start by taking a look at what protecting your photos really means.
What Does Protecting Your Photos Mean?

As real estate photographers, we know the hard work, time, and dedication it takes to create stunning property photos.
The last thing you want is for your images to be distributed online and used without your permission and credit. That’s why it’s crucial to take the necessary steps to protect your photos.
Protecting your photos means keeping your images safe from download, misuse, theft, and unauthorized use.
In today’s digital world, where anyone can access images online, it’s essential to have tools that offer protection and monitoring to avoid the headache of image theft.
9 Steps to Protect Your Photos From Unauthorized Use
With that being said, here are 9 steps to effectively protect your photos from unauthorized use and theft.
1. Never Share High-Resolution Files

As real estate photographers, we all want our work to shine on the web. However, uploading those high-resolution shots that we love so much might not be the best idea.
Why? Well, if someone gets a hold of the file, they can use it as they please. Plus, it can be tough to prove ownership of the photo if it’s uploaded in its highest form.
Now, there are exceptions to the rule. Some websites, like Zenfolio, work with high-res files behind the scenes but show a lower-res version to viewers. They do this to make it easy for you to sell your photos through the online gallery, and at the same time, protect them from misuse.
However, we recommend never uploading a photo larger than 1600px. It’s enough to showcase the image and give viewers a true sense of the shot, but not good enough for printing reproductions.
2. Compress Your Images to Lower the Quality

As a second step, you can also compress your images to limit the file size and make them less usable for other people.
This lowers the overall quality of the image, which will make it grainy and blurry if viewers try to print or make the image larger.
Here’s what you can do…
If you’re using Photoshop, go to the File > Export menu and click Save for Web. From there, you can comfortably export a photo at 60% JPEG quality and maintain its visual appeal.
Trust us, there’s not much of a difference between 60% and 90% quality, but you’ll get a much smaller file size, which will lower the quality of the image and make it harder for someone to steal your image because the file is more compressed.
If you’re using Lightroom, it’s just as simple. All you have to do is limit the file size in the Export window to around 250kb. This ensures that your photo still looks fantastic while also limiting the options of anyone with bad intentions.
Additionally, compressing your images also makes them faster to upload to online platforms such as your portfolio or social media. Plus, it won’t make your website lag and load slowly because of too large overall file size.
3. Watermark Your Images

Watermarks help to protect the photographer’s work from being used without permission or credit. By clearly identifying the source of the image, photographers can prevent others from using their images without permission.
Watermarks have several important purposes, including:
- Asset Protection: The primary purpose of a watermark is to protect the intellectual property rights of the owner of the image. By adding a watermark to an image, the owner can clearly identify the source of the image and prevent others from using it without permission.
- Adds Clarity: Watermarks also serve as a deterrent to those who may be considering using the image without permission. This makes it clear that the image is protected and not for public domain use.
- Brand Awareness: In addition to protecting the rights of the owner, watermarks can also be used for branding purposes. By including a watermark with a company logo or name, businesses can promote their brand and increase awareness of their products or services.
- Increased ROI: Finally, watermarks can also be used to provide credit to the creator of the image. By including the name or logo of the artist or photographer, others can easily identify and give credit to the original creator when using the image.
Even though watermarks might not always stop theft, images without them are more likely to be taken. Overall, it’s a great feature to consider adding.
And if someone does decide to remove your watermark, it’s a modification of your Copyright Management Information (CMI), and you could be entitled to damages.
How to Add a Watermark in Photoshop
Let’s show you how to add a watermark using Photoshop. You can either watch the video or continue reading the text below:
Step 1. To add a watermark to your image using Photoshop, first, choose the Logo or Watermark that you’d like to use.
Step 2. Next, Drag and Drop the watermark on top of your image.
Step 3. You can then Move and Place the watermark anywhere on your image.
Step 4. Once you’ve placed the watermark on your image, you can Scale it to the appropriate size by pressing Ctrl + T on your keyboard.
Step 5. Now, press Enter to place the watermark. You can then move it anywhere you’d like.
Step 6. You can also lower the Opacity to make the watermark a bit less noticeable.
The Real Estate Photography
Business Systems You Need
PhotoUp is the ultimate real estate photographer business platform.

4. Register an Official Copyright

When you create something original (like shooting real estate), you automatically become its copyright holder. That means you get to call the shots on how it’s used and distributed.
But did you know that registering your work with an official copyright office has added benefits?
In some places, like the US, registering an image can entitle you to damages for unauthorized use and may even get legal expenses covered. Plus, it gives you proof of ownership in an independent database.
The processes and costs of copyright registration vary around the world, so it’s worth checking what is required where you are. But even if you never intend to set foot in the US, we highly recommend registering with the US Copyright Office (USCO).
That’s because a huge majority of online use comes from the US, and recent legal rulings mean you can’t bring a case to a US court without proper registration.
Trust us, registering your work is a smart move. It clarifies ownership rights, can speed up legal proceedings, and can even mean a bigger payout if things go wrong.
5. Add a Copyright Notice

Why not also add a copyright notice? Sure, it’s not a legal requirement in the US anymore, but it identifies you as the copyright holder and can help deter unauthorized use.
If you do go this route, make sure to include the copyright symbol or the word “copyright,” a statement of rights, and your name. You can also add the date and your contact information if you like.
Another option is to license your work under Creative Commons – a set of licenses that determine how your work can be used, shared, and adapted.
Just be sure to signal the appropriate license in your statement of rights, as it’s difficult to undo this once you’ve published under CC.
6. Add Copyright to the Metadata
Did you know that you can embed your copyright information directly into a JPEG file? It’s a nifty trick that modifies the file’s metadata using a photo-editing program.
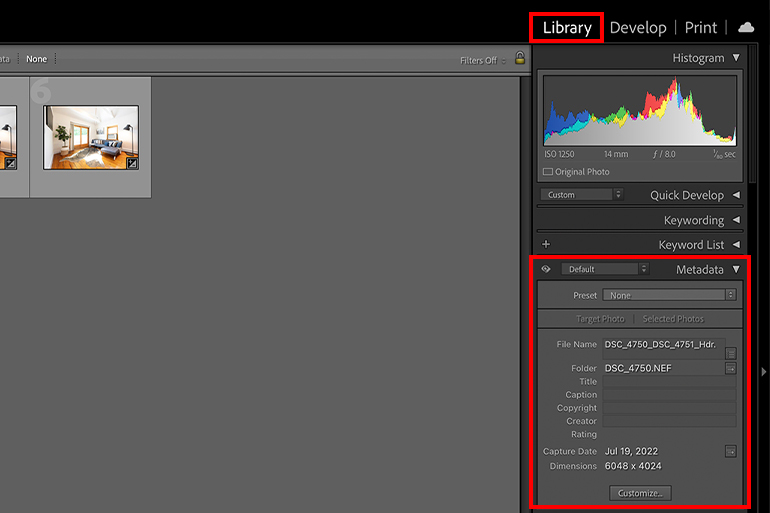
In Lightroom, for example, you can do this under the Metadata tab in the Library. Simply select a photo, scroll down in the sidebar, and look for the Copyright line to insert your information.

Photoshop also offers this feature by navigating to File > File Info and making adjustments there.
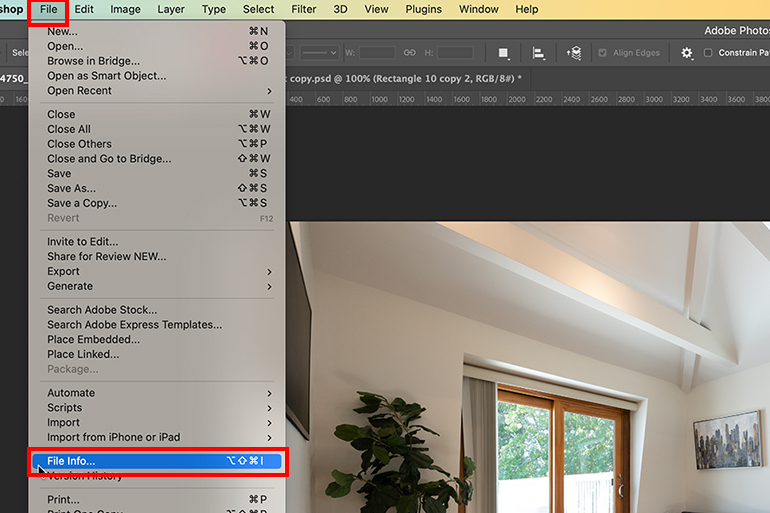
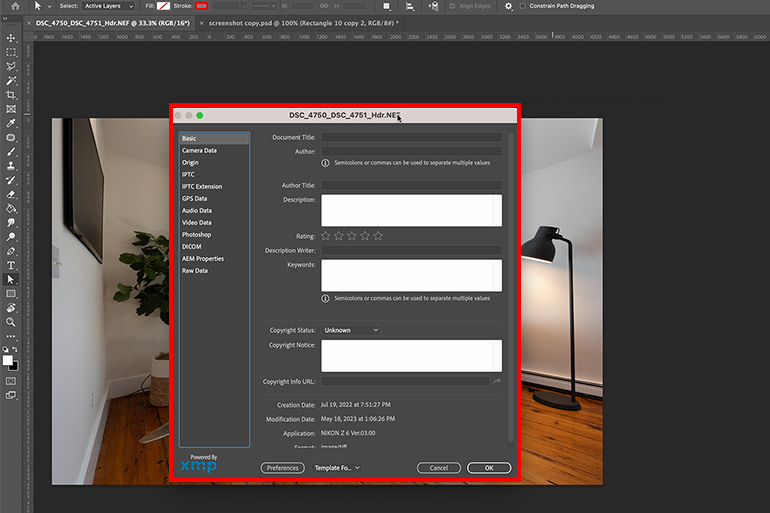
But before you go ahead with this, remember that most social media platforms like Facebook strip metadata from a file to compress it, which means the copyright information might not be visible.
Also, if you’re saving a photo for the web, the metadata will be stripped unless you have specified otherwise in the options.
7. Create a Digital Signature

Did you know that a digital signature, created using image editing software, can be a great deterrent for image theft without hampering the visual appeal of the work?
It’s an image attribute that remains invisible until the file is downloaded, which means anyone who wants to use the image might have to ignore the digital signature or go through the trouble of cropping it out.
So why not add a digital signature and protect your hard work?
8. Disable Right Click and Copy

If you’re a website owner or photographer concerned about your images being downloaded without permission, you may want to disable the right-click option on your site.
By using HTML or JavaScript, a WordPress plugin like Disable Right Click For WP, or an image hosting platform like SmugMug, you can protect your work.
But it’s worth noting that by disabling the right-click option, you’ll also block other right-click options for site visitors, like viewing the site source or opening a Google search for the image in Chrome.
So, while it can help prevent image theft, it’s important to weigh the pros and cons and decide what’s right for you. And, keep in mind that disabling the right-click option isn’t a foolproof solution – screenshots can still be taken.
But don’t worry, we’ve got a tip for that too, which we’ll show you next.
9. Block Screenshots

These days, it’s so easy for anyone to take a screenshot online and save it as an image. In other words, this makes it easy for people to snag your work!
But don’t fret because you can now prevent theft from occurring with some plug-ins.
A lot of them are made available and available for popular publishing platforms, including WordPress, such as CopySafe Web Production, which not only blocks screenshots but also disables right-clicks.
Remember, though, such plugins also have a script-based structure and can also be disabled, so keep your assets safeguarded!
The Ultimate All-in-One
Real Estate Photographer Business Platform
Grow a successful real estate photography business with PhotoUp.
Protect and Edit Your Images With PhotoUp!


If you’re looking to quickly and easily add, for example, a watermark to your images, you can use PhotoUp’s software or have our professional real estate photo editors do it for you.
With over a decade in the industry and hundreds of editors in the Philippines, PhotoUp has all the expertise and tools needed to help you protect your images and edit them to perfection.
Browse Top Dedicated
Real Estate Photo Editors
Ready-to-hire editors for real estate photo editing, and more.
Apart from real estate photo editing, PhotoUp is a complete one-stop shop for real estate marketing and also offers services such as:
All you need to do to start using our services is sign up for a free PhotoUp account, place your first order, and your photographs will be delivered back to you in less than 24 hours.
PhotoUp Real Estate Photo Editing Uploader Demo
To see how quick and easy it is to get started, check out our real estate photo editing uploader demo:
It’s really as easy as 1-2-3!
Sign up for a free account today, and let PhotoUp help you with all your photo editing needs. For a limited time, you even get 5 free credits you can use on any of our services when signing up!
We hope this blog post helped you find effective ways to protect your photos online. If you found this post useful, you may also want to check out the following resources:

