


Table of Contents
- Why Is Curb Appeal Important?
- Top 9 Tips for Shooting Exterior Home Photos
- Leverage PhotoUp’s Expert Real Estate Photo Editing Service
Are you looking for some great tips on how to shoot exterior home photos?
Nine times out of ten, the first image homebuyers see when looking at a listing or a brochure is an exterior shot of the property.
A photo of the outside of a property with beautiful curb appeal is crucial for marketing a listing. And since the photos will likely be printed and used in brochures, flyers, and other marketing material, they have to be of top quality.
So in this post, we’ll share our top 9 tips on how to shoot exterior home photos that will ensure top-notch results.
But first, let’s talk about curb appeal and why it’s such an important selling point.
Why Is Curb Appeal Important?

Curb appeal refers to the exterior design and features of a home and how attractive it is to the people viewing it from the street.
It gives people the first impression of a property and is often a deciding factor if they’d want to step inside and see more of the home.
Curb appeal is designed to sell a home from the outside and in. And it is your job, as a real estate photographer, to boost curb appeal in your exterior home photos.
You must have the ability to take stunning exterior photos that can catch someone’s attention and make them want to see more.
On the other hand, if the exterior images are shot poorly, prospective buyers will typically pass on the property without giving it a second thought.
Top 9 Tips for Shooting Exterior Home Photos
With that in mind, let’s share our top 9 tips for shooting exterior home photos next.
1. Use the Right Gear

It’s crucial to use the right gear to be able to capture top-quality exterior home photos.
We recommend using a full-frame camera with at least a 20 megapixel resolution. Even though you can use a cropped sensor camera to shoot real estate exteriors, there will be situations where you’d want to crop your images.
So, having more pixels to play with gives you more flexibility.
In addition, a 20mm prime lens will help you avoid flares, orbs, haze, or other artifacts appearing.
It’s also lightweight, which is perfect when handholding your camera. But make sure to use a camera strap for extra safety.
Besides, you may want to use monopods or tripods to get the extra support for your camera when, for example, shooting in low light, elevated or aerial stills, twilights with slow exposure, and some indoor and outdoor shots.
Lastly, make sure to invest in a good, hard-shell case to protect the camera and lens from drops and bumps.
2. Be Prepared
Before the shoot, consider visiting the home in advance since every property is different and each one has its quirks and attractive features.
The more familiar you are with a property, the easier it will be to take amazing photos. Work with the Realtor or homeowner to make sure the space is ready to be photographed.
Check for the following:
- Is the lawn freshly cut?
- Are there any cars that need to be moved?
- Are there unflattering objects like garbage bins to remove?
Also, ask the seller what they think are the home’s best-selling features and try to highlight these in your shots. We’ll take a closer look at this later in tip 7.
Remember to look at the shape of the yard. Observing the property layout is critical because it allows you to find the best vantage points from which to take photos.
You can find even more tips in our blog post how to prepare your home for real estate photography.
3. Use Natural Light to Your Advantage

When shooting real estate exteriors you rarely need any additional lights. Using natural light to your advantage is often better than any expensive lighting gear.
Think about the position of the sun and which way the house faces. Plus, consider what time of the day you’ll be shooting.
If you can, shoot the exterior whenever the light on the house will be softest—usually the time furthest away from noon—whether that be at the beginning or end of your shoot. Avoid shooting at noon when the sun is directly overhead creating extreme highlights and harsh, dark shadows.
Additionally, by using HDR or bracketing exposures and blending them together, you can get a well-exposed image throughout without having to use artificial lighting to brighten up darkened areas.
This technique is far more budget-friendly and just requires good photo editing software like Photomatix, Aurora HDR, and Luminance HDR.
Also, if the sun is side-lighting the house’s exterior, you may want to consider using fill flash, for example, a 600 WS moonlight like the XPLOR 600.
Or rather than spending hundreds of dollars on speedlights, softboxes, light stands, other artificial lighting gear, and software, you can take help from PhotoUp’s expert photo editors to blend your bracketed images.
4. Take Twilight Shots
Many property exteriors truly come alive when the sun sets. This time of day is also more forgiving when it comes to lighting.
Shooting with the sun close to or beyond the horizon provides flexibility in lighting and you don’t have to worry about the sun’s angle, the home being backlit, or having harsh shadows.
With the clock ticking during the small window of twilight, the best option is to take multiple ambient exposures and composition them later. And to help catch the short window after sunset, you can use SunCalc.org to plan your shot.
Also, offering additional twilight shots can be a great thing to “up-sell” to your clients, enabling them to show off the house at different times of the day.
5. Check the Geometric Composition

Producing realistic photos is paramount for exterior real estate photography. Horizons should be level and vertical lines shouldn’t radically converge.
Use your viewfinder alignment grid to ensure that lines are level both horizontally and vertically. If the lines are not straight, the property will appear distorted and slide off the photo.
Also, try to avoid extension distortion caused by shooting too close to a house. This can make the house look unrealistic.
In fact, it can make it look cartoonish with the leading edge much taller than its far wall just tens of feet away. To avoid this, make sure you stand far enough away from the subject.
However, if you’re trying something creative, don’t worry too much if the horizon is not perfectly aligned. Perspective can always be corrected during post-processing.
The Ultimate All-in-One
Real Estate Photographer Business Platform
Grow a successful real estate photography business with PhotoUp.

6. Use a Drone for Shooting Aerial Stills
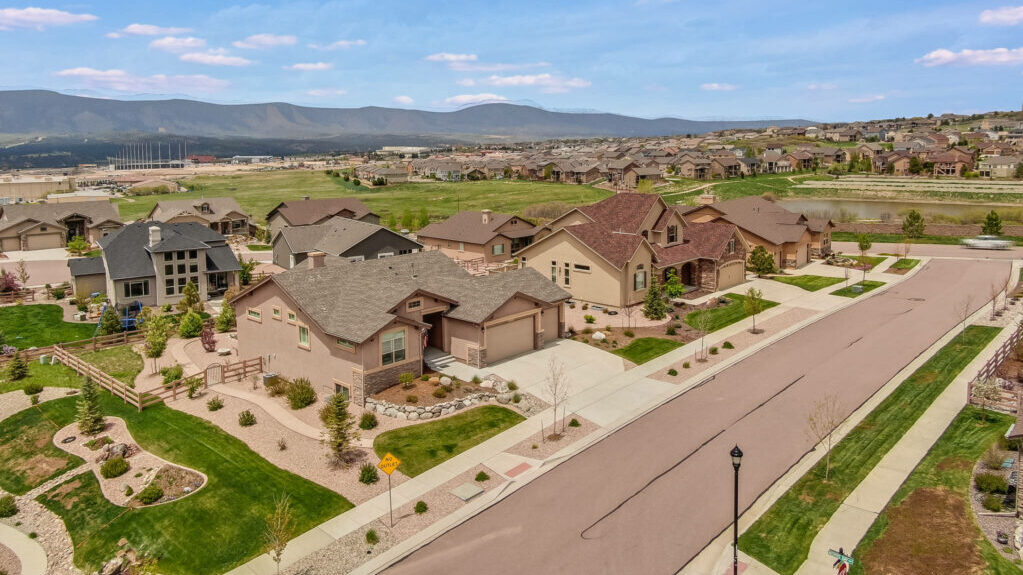
To provide a birds-eye view of a property, you can use a drone to photograph the entire property in a single shot. The aerial view of a home can help prospective buyers get a feel for the entire property, the neighborhood, and its layout in relation to other homes.
You don’t need to get permission every time you fly a drone, but you do need to obtain an FAA license. Luckily, that’s a rather easy process.
Additionally, make sure you’re working with a high-resolution camera of at least 12MP or more. Your camera should be able to shoot video at a minimum of 30 frames per second.
And for the actual shots, focus on framing the different areas of the property and pick a few of its best features to focus on, e.g the swimming pool, the garden, the garage, etc.
7. Highlight Special Features
When shooting exterior home photos, it’s always good to highlight the property’s special features
Check for the following:
- Does the property have interesting architectural elements to capture in the exterior shot?
- Is there a pool?
- Are there beautiful pine trees surrounding the house?
In other words, include details that give each property its own unique personality.
These details are often key selling points for real estate agents, so take some extra time to locate and include them in your shots.
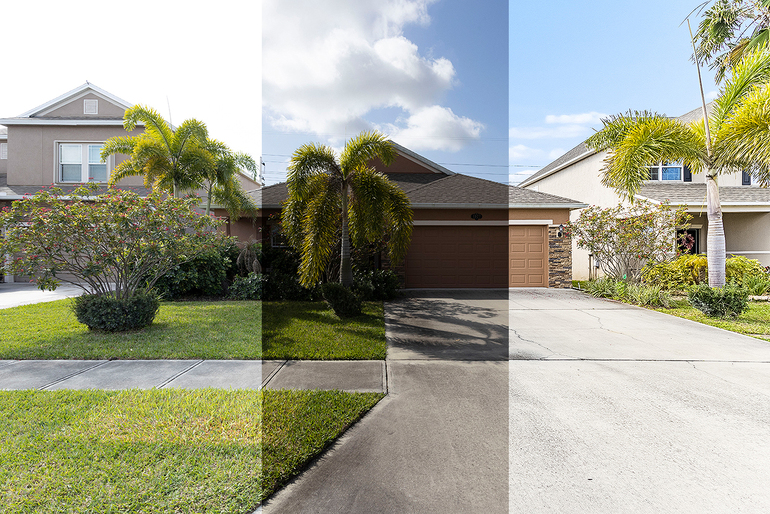
9. Review and Retouch

No matter the quality of your work, editing your exterior home photos is essential to produce the best possible images.
For starters, photo editing allows you to remove blemishes, get rid of unwanted reflections, brighten colors, blend exposures and improve contrast, and more.
Whether you want to retouch a little or a lot, real estate photo editing can make the difference between a good image and an exceptional image.
Beautiful and realistic exterior photos can generate a positive and lasting impression on potential homebuyers and clients, and help sell a home faster.
Better yet, this will likely mean more business for you!
Leverage PhotoUp’s Expert Real Estate Photo Editing Service
If you’re spending too much time post-processing your photos and not enough time growing your business, you should let PhotoUp help alleviate some of the editing workload.
That way, you can focus your time on shooting more, editing less, and spending more time with your loved ones.
So simply sign up for a free PhotoUp account today, and let us help you take your image post-processing to the next level.
Photoup Real Estate Photo Editing Uploader Tutorial
To show you how easy it is to get started, you can watch this quick video tutorial on how to place your first photo editing order with PhotoUp:
As simple as that!
We hope this blog post gave you some good tips on how to shoot exterior home photos. With a little bit of patience and training, you’ll capture stunning real estate photos before you know it.
If you enjoyed reading this post, make sure to check out the following resources as well:

