


Table of Contents
- What Is Text Editing in Photoshop?
- What Is the Importance of the Type Tool in Photoshop?
- How to Edit Text in Photoshop
- Save Time With PhotoUp!
Do you want to learn how to edit text in Photoshop?
Typography or text plays a crucial role in any design and photo editing project. Luckily, Photoshop’s Type Tool is super easy to use when looking to add text to your images.
With this tool, you can add, modify, and edit text with a breeze, and it can open up an abundance of creative possibilities for aspiring real estate photographers and graphic designers.
In this mini tutorial, we will guide you through the process of adding and editing text in Photoshop, which is easier than you might have imagined.
But before we get started, let’s first explain what text editing is and why you may want to edit the text in your images.
What Is Text Editing in Photoshop?
Text editing in Photoshop refers to the process of modifying and manipulating text that has been added to a text layer. This involves tasks such as inserting new text, making changes to existing text, and deleting undesired text.
Additionally, the purpose of text editing is to allow users to modify the content of a text file or document.
While text editors are often included as a basic component of editing software like Photoshop, their primary use has evolved beyond simple notetaking and document creation to include the creation and modification of complex code.
What Is the Importance of the Type Tool in Photoshop?
The Type Tool in Photoshop is essential for adding flair to all your creative projects.
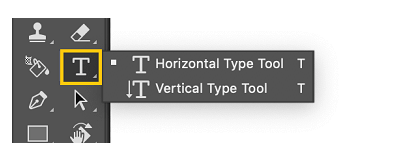
The Type Tool, located in the Tools Panel, comes in four different variations and allows users to create both horizontal and vertical text.
Note that whenever you create text in Photoshop, a new Type Layer will be added to your Layers Palette.
Whether you’re designing a property flyer, or custom poster, creating the perfect holiday card, or even crafting that must-have invitation – this versatile text feature gives you total control over font style, size, and more with just a few clicks.
High-Quality & Consistent
Real Estate Photo Editing
Hire a dedicated editor with performance metrics from $7/hour.

How to Edit Text in Photoshop
That said, let’s show you how to use the Type Tool to edit the text in Photoshop. You can either watch the video or continue reading the text below:
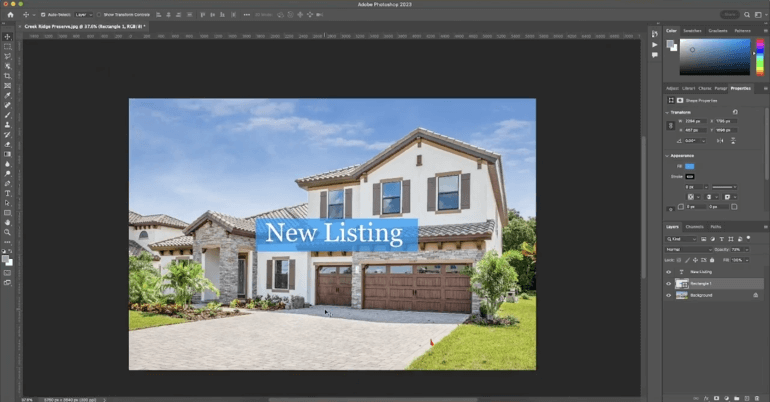
To get started, let’s say we want to add text on top of this image.

Step 1. To add text, go to the Type Tool or press T on your keyboard. Then, click on your image and type your text.
Step 2. Next, click the Checkmark in the Top Menu, and you can use it to change the size, font type, style, or color.
Step 3. Go to the Options Toolbar above and search for the Font Type you’d like to use. You can also set the Font Style as italic, bold, or regular. But be warned some font types don’t have these kinds of options.
Step 4. Now, with this option, you can set the Font Size by clicking or dragging on the Icon to increase or decrease the font. You can also set the Text Alignment to center, left, or right alignment.
Plus, you can click the Color Icon to change the Font Color and the Color Picker window will pop up. In this window, you can choose the next color you’d like for your text and then click OK.
Additional Text Settings

Step 5. For more text options, click to open the Character and Paragraph Panel which contains additional text settings. We can also open this panel in the Window Menu.
This panel has the same options we saw in the character and paragraph bar and many more options like tracking, kerning, vertical scale, horizontal scale, and much more.
Step 6. Additionally, you can also change the Font Size of your text by using Transform. Simply click on your text and press Ctrl T on your keyboard.
You can drag and scale text non-destructively, and you can notice that when you scale your text up or down, the font size will also change.
Step 7. Lastly, to make your text more visible at the top of your image, you can Add a Shape under your text.
To do this, click on the Layer below your Text Layer and then click the Shape Tool or press U on your keyboard. Then create a shape underneath your text. You can also customize the color of the shape or lower the opacity.
And that’s it! You’ve now added text on top of your image in Photoshop!
High-Quality & Consistent
Real Estate Photo Editing
Hire a dedicated editor with performance metrics from $7/hour.
Save Time With PhotoUp!
While editing text in Photoshop is a rather easy task, as a real estate photographer you may not have the time to edit your images.
So if you want to optimize your time and instead focus on shooting more properties and growing your business, PhotoUp’s professional real estate editors can take care of the post-processing for you.
With over a decade in the industry and hundreds of editors in the Philippines, PhotoUp has all the expertise and tools needed to edit your images to perfection.
Browse Top Dedicated
Real Estate Photo Editors
Ready-to-hire editors for real estate photo editing, and more.
Except for editing the text and logo in your images, our skilled photo editors can help with the following issues:
- Improper exposure levels
- Harsh shadows, lack of light, etc.
- Blurred images that were taken without a tripod
- Images that need cropping or other effects
- Lawn greening and sky replacements
- Twilight and day-to-dusk editing
- Manual blending and pano stitching
- Clutter and advanced object removal
- Line and angle corrections
- And much more!

Additionally, PhotoUp is a complete one-stop-shop for real estate marketing and also offers services such as:
Best of all, our real estate photo editing service is affordable, starting at the low cost of $1.15 per image.
All you need to do to get started is sign up for a free PhotoUp account, place your first order, and your photographs will be delivered back to you in less than 24 hours.
PhotoUp Real Estate Photo Editing Uploader Demo
To learn more, check out our real estate photo editing uploader demo:
As simple as that!
Sign up for a free account today, and let PhotoUp take the real estate photo editing off your hands. For a limited time, you even get 5 free edits when signing up!
We hope this blog post helped you learn how to edit text in Photoshop. If you found this post useful, you may also want to check out the following resources:

