


Table of Contents
- Why Edit the Sunset in Real Estate Photography?
- Twilight Photography Is Used for High-End Listings
- How to Easily Edit a Sunset Into a Picture
- Let PhotoUp Help You Create Stunning Sunset Photos!
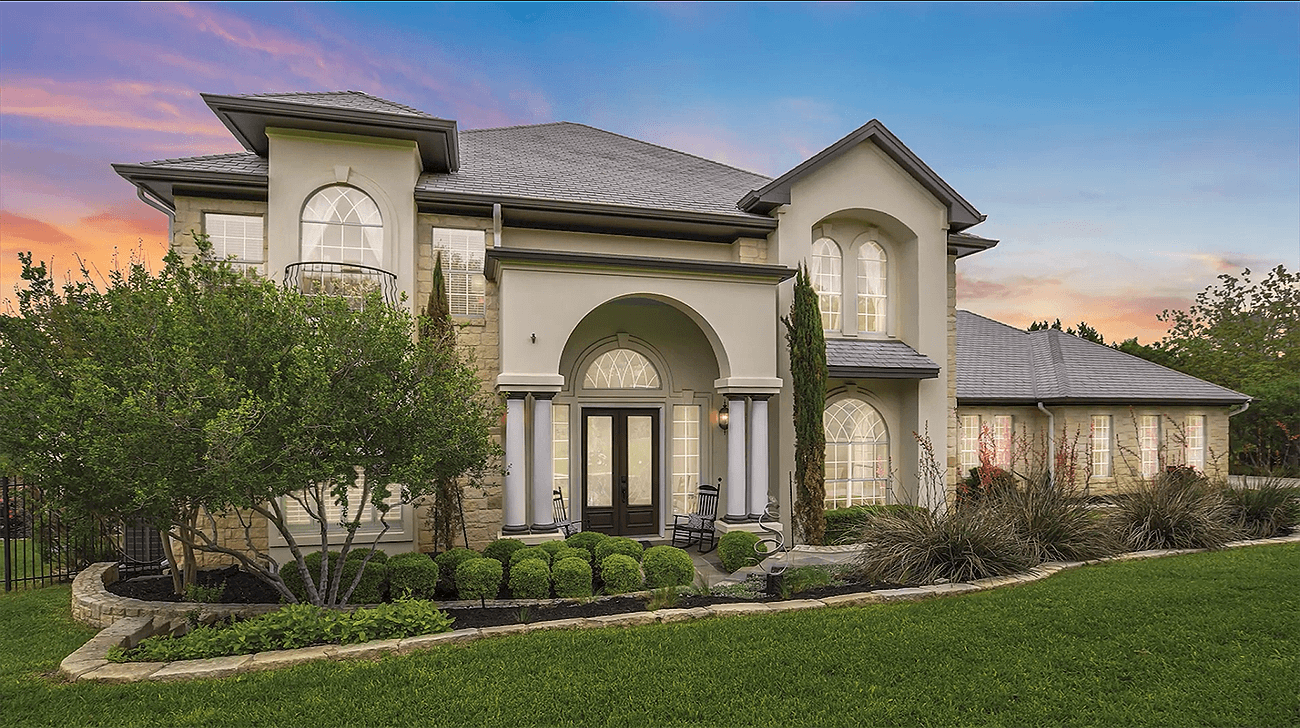
Do you want to learn how to edit a sunset into a picture, also called twilight real estate photo editing?
Capturing the natural beauty of a sunrise or sunset in photos can be quite challenging. The stark contrast between a bright sky and a darker foreground during these times often leads to raw, unedited versions that appear flat and lifeless, lacking the impact seen by the naked eye.
Luckily, there is an easy photo edit that can fix this and create stunning sunsets or sunrises!
In this guide, we’ll show you how to edit a sunset into a picture using Lightroom and Photoshop. We’ll also cover why you should edit the sunset in photos, especially in real estate photography.
Why Edit the Sunset in Real Estate Photography?
Having a sunset photo, also called a twilight image, as the listing’s main photo when marketing real estate typically averages 76% more views than listings without twilight images.
Sunsets create a warm and mysterious glow throughout any shot that’s very appealing to viewers. This can help real estate photographers and agents attract more buyers and sell properties faster.
In addition, a sunset or sunrise sky also gives a luxurious vibe to a property, which can lead to a higher sales price. It’s a great way to make listings stand out since the majority of real estate photographs are taken in broad daylight.
Consider these powerful twilight real estate statistics:

Relying solely on regular daylight photography is a great way to capture all the intricate details and vibrant colors in an image. But it doesn’t always translate into an interesting photo that grabs the attention of potential buyers.
This is particularly true when you consider the fact that multiple listings tend to showcase similar scenes. That’s where twilight photos come into play.
Twilight Photography Is Used for High-End Listings


Another interesting aspect to consider is that twilight photography is more commonly seen in higher-priced homes, with around 59% being homes valued at $500k or more, 32% falling in the $300k to $500k range, and 8% in the $100k to $300k price range.
These statistics show that using twilight or sunset photos is more common for high-end listings to add that extra sense of luxury and showcase the property in its best possible light.
All in all, twilight images have a special quality that can be challenging to capture in a regular photo.
They possess a romantic essence that’s truly captivating, and by investing in the editing process, you can further enhance that distinctive quality.
How to Easily Edit a Sunset Into a Picture


With that being said, let’s show you how to edit a sunset into a picture using Lightroom and Photoshop next. But before we get into the editing process, we’ll explain why you should always shoot in RAW.
Shoot in RAW
When it comes to capturing a stunning sunset photo, your camera settings are crucial.
To ensure you don’t miss out on any details and vibrant colors in the sky, we highly recommend shooting in RAW format. This way, you’ll preserve all the essential information during the editing process.
Here’s another great tip: shoot in manual mode. We know it can be intimidating at times, but trust us, it gives you the flexibility to underexpose your photo and achieve a more breathtaking result.
Additionally, we recommend shooting sunsets and sunrises at an aperture of 2.8 and keeping the ISO as low as possible.
High-Quality & Consistent
Real Estate Photo Editing
Hire a dedicated editor with performance metrics from $7/hour.

How to Edit a Day to Dusk Image
Now, let’s move on to the actual editing process. This type of editing technique is also called day to dusk real estate photo editing. You can either watch the video or follow the steps outlined below:
Start Editing the Windows
Step 1. Import your image into Lightroom and do the basic adjustments. Make it a little darker as it’s a dusk image.
Step 2. Next, create a Virtual Copy.
Step 3. On that copy, adjust the glow of the windows to make it look like the light is on. Boost the Exposure and Temperature to create a glowing effect.
Step 4. Now, move your images into Photoshop.
Step 5. In Photoshop, make the Window Layer on top and add an Inverted Mask (press and hold the ALT key while clicking the Masking button).
Step 6. Select the windows using the Pen Tool (P), then press the Delete button.
Step 7. Next, add an Outer Glow using the Layer style.
Step 8. Within the Layer Style, use the Sliders to adjust to an appropriate level.
Next, Edit the Sky
Once you’re happy with the windows of the house, it’s time to work on the sky:
Step 1. Duplicate the base photo and go to the Channel panel and duplicate the Blue channel.
Step 2. Adjust the Levels in the Sky by pressing CTRL – L on your keyboard.
Step 3. Select the Non-Sky area, make it black, and use the Dodge Brush (O) to lighten the sky.
Step 4. Now, you want to Load the Channel as a Selection, and then click the Masking button.
Step 5. Next, Import the dusk sky photo that you want to use behind the building.
Step 6. Adjust its position and make sure to Blend it properly with the house. E.g you may want to use the Burn Tool to darken the house overall. Then, Save the new image.
Step 7. Back in Lightroom, you can make one or two adjustments to the white balance until you’re happy with the final product.
Use the Dusk Scene to Showcase the Property

Keep in mind that you’re showcasing a home for a potential buyer and not trying to create an award-winning nature photograph.
The dusk scene is there to show off the best features of the property and put the viewers in a calm, welcoming state of mind, so they look favorably on the listing.
The goal is to make home buyers think of themselves as living in this incredible home and taking in the beautiful sunset.
High-Quality & Consistent
Real Estate Photo Editing
Hire a dedicated editor with performance metrics from $7/hour.
Let PhotoUp Help You Create Stunning Sunset Photos!


If you’re swamped with editing sunsets or twilight images, PhotoUp’s team of professional real estate photo editors is here to help!
With over 10 years of experience and hundreds of talented photo editors from all over the globe, PhotoUp offers top-notch quality, excellent service, and competitive pricing that’s tough to beat.
Whether you need basic touch-ups or more extensive edits, rest assured that PhotoUp’s editors will make your photos shine with the utmost quality.
Our talented real estate photo editors can help you with:
- Image correction and enhancement
- Color and tone adjustments
- Window masking and glare reduction
- Clutter and object removal
- Line and angle corrections
- Improper exposure levels
- HDR editing
- Harsh shadows, lack of light, etc.
- And more.
Browse Top Dedicated
Real Estate Photo Editors
Ready-to-hire editors for real estate photo editing, and more.
But that’s not all!
Your One-Stop-Shop for Real Estate Marketing

PhotoUp does more than just photo editing…
We also offer other real estate marketing services such as:
We have everything you need to market real estate in one easy-to-use platform.
Easy & Quick Ordering Process
Getting started using PhotoUp’s real estate photo editing service is super easy.
All you need to do is sign up for a free PhotoUp account, upload your images, choose export settings and turnaround time, and that’s it!
PhotoUp Real Estate Photo Editing Uploader
Check out our real estate photo editing uploader tutorial to see how easy it is to get started:
And that’s it!
Sign up for a free PhotoUp account today, and let us help you create captivating, romantic, and mysterious sunsets to enhance your real estate photography!
Plus, for a limited time, we even offer you 5 free edits when signing up for an account.
We hope this blog post helped you understand how to edit a sunset into a picture in Lightroom and Photoshop. If you found this guide useful, you may also want to check out the following resources:

