


Table of Contents
- What Is a Watermark?
- What Is the Purpose of a Watermarking Brand Assets?
- Watermark Examples
- How to Easily Add a Watermark in Photoshop
- Leverage Professional Real Estate Photo Editing
Do you want to learn how to add a watermark in Photoshop to protect your images or brand assets?
Watermarks help to protect the photographer’s work from being used without permission or credit. By clearly identifying the source of the image, photographers can prevent others from using their images without permission.
In this mini tutorial, we’ll show you how to add a watermark in Photoshop in a few simple steps. We’ll also explain what a watermark is and how to ensure that your brand assets are protected.
Alright, let’s get started!
What Is a Watermark?

A watermark is a faint logo or text that you can add to an image, usually as a protective measure to prevent unauthorized use or reproduction of the image.
Watermarks are often used by photographers and artists to protect their work and prevent it from being used without permission or credit.
Typically, they are transparent or partially transparent, so they do not completely obscure the image.
And often they are placed in a location that is difficult to remove or obscure, such as in the center of the image or in an area with a lot of detail.
What Is the Purpose of a Watermarking Brand Assets?

Watermarks have several important purposes, including:
- Asset Protection: The primary purpose of a watermark is to protect the intellectual property rights of the owner of the image. By adding a watermark to an image, the owner can clearly identify the source of the image and prevent others from using it without permission.
- Adds Clarity: Watermarks also serve as a deterrent to those who may be considering using the image without permission. This makes it clear that the image is protected and not for public domain use.
- Brand Awareness: In addition to protecting the rights of the owner, watermarks can also be used for branding purposes. By including a watermark with a company logo or name, businesses can promote their brand and increase awareness of their products or services.
- Increased ROI: Finally, watermarks can also be used to provide credit to the creator of the image. By including the name or logo of the artist or photographer, others can easily identify and give credit to the original creator when using the image.
By watermarking your photos, you can ensure that they are only being used in approved on-brand campaigns and protect them from being stolen or altered.
Watermark Examples
Some simple watermark ideas include using the company logo, a copyright statement, or a website link in your brand assets.
For example, most free stock image websites use watermarks for certain images that they don’t want people to use for free.
Here are two examples of watermarked photos where the company logo covers the images, making them more or less useless:

Image Source: iStockphoto.com

Image Source: Unsplash.com
This helps them protect their assets or at least get credit for them if a person would still use their images.
High-Quality & Consistent
Real Estate Photo Editing
Hire a dedicated editor with performance metrics from $7/hour.

How to Easily Add a Watermark in Photoshop
With that said, let’s take a look at how to add a watermark in Photoshop in a few simple steps next.
You can either watch the video or continue reading the text below:
Step 1. To add a watermark to your image using Photoshop, first, choose the Logo or Watermark that you’d like to use.
Step 2. Next, Drag and Drop the watermark on top of your image.
Step 3. You can then Move and Place the watermark anywhere on your image.
Step 4. Once you’ve placed the watermark on your image, you can Scale it to the appropriate size by pressing Ctrl + T on your keyboard.
Step 5. Now, press Enter to place the watermark. You can then move it anywhere you’d like.
Step 6. You can also lower the Opacity to make the watermark a bit less noticeable.
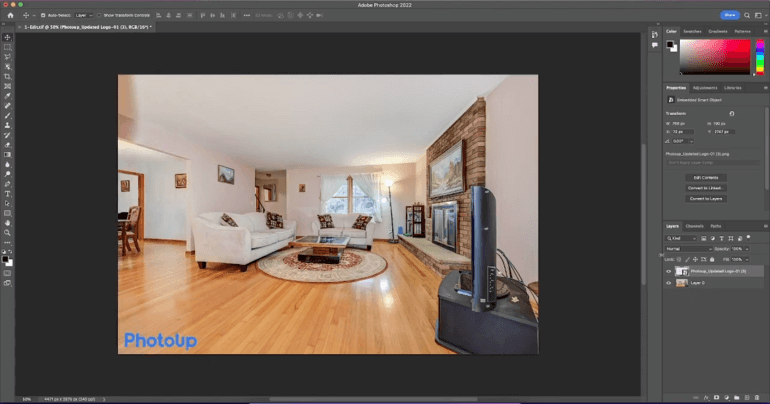
And that’s it! You’ve now added a watermark to your image in Photoshop.
High-Quality & Consistent
Real Estate Photo Editing
Hire a dedicated editor with performance metrics from $7/hour.
Leverage Professional Real Estate Photo Editing


If you’re looking to quickly and easily add a watermark to your images, you can use PhotoUp’s software or have our professional real estate photo editors do it for you.
With over a decade in the industry and hundreds of editors in the Philippines, PhotoUp has all the expertise and tools needed to edit your images to perfection.
No matter the project — big or small or complex, PhotoUp can handle any job!
For example, our skilled photo editors can help with the following issues:
- Improper exposure levels
- Harsh shadows, lack of light, etc.
- Blurred images that were taken without a tripod
- Images that need cropping or other effects
- Lawn greening and sky replacements
- Twilight and day-to-dusk editing
- Manual blending and pano stitching
- Clutter and advanced object removal
- Line and angle corrections
- And much more!
Browse Top Dedicated
Real Estate Photo Editors
Ready-to-hire editors for real estate photo editing, and more.
Additionally, PhotoUp is a complete one-stop-shop for real estate marketing and also offers services such as:
All you need to do to start using our services is sign up for a free PhotoUp account, place your first order and your photographs will be delivered back to you in less than 24 hours.
PhotoUp Real Estate Photo Editing Uploader Demo
To see how quick and easy it is to get started, check out our real estate photo editing uploader demo:
It’s really as easy as 1-2-3!
Sign up for a free account today, and let PhotoUp take the real estate photo editing off your plate. For a limited time, you even get 5 free edits when signing up!
We hope this blog post helped you learn how to add a watermark in Photoshop in a few simple steps. If you found this post useful, you may also want to check out the following resources:

