


Table of Contents
- Why the Sky Matters in Real Estate Photos
- How Sky Replacement Changes Mood & Buyer Perception
- Sky Replacements Take the Weather Out of the Equation
- How to Easily Replace a Summer Sky in Photoshop
- How PhotoUp Can Help You Swap Out Dull Skies
Great listing photos don’t just look nice—they sell homes. In an online-first market where buyers decide within seconds whether to click or scroll, the mood of a photo matters.
Sky replacement is a simple, high-impact editing technique that swaps a dull, overcast, or blown-out sky for a more appealing one. Used well, it changes how a property feels, how many buyers click to view the listing, and how long it stays on the market.
In this blog post, we’ll explain why sky replacements work, the measurable advantages they bring, and how they free photographers from the tyranny of weather. We’ll also show you how to easily swap out dull skies with sunny, bright ones in Photoshop.
Let’s dive in!
Why the Sky Matters in Real Estate Photos🌤️

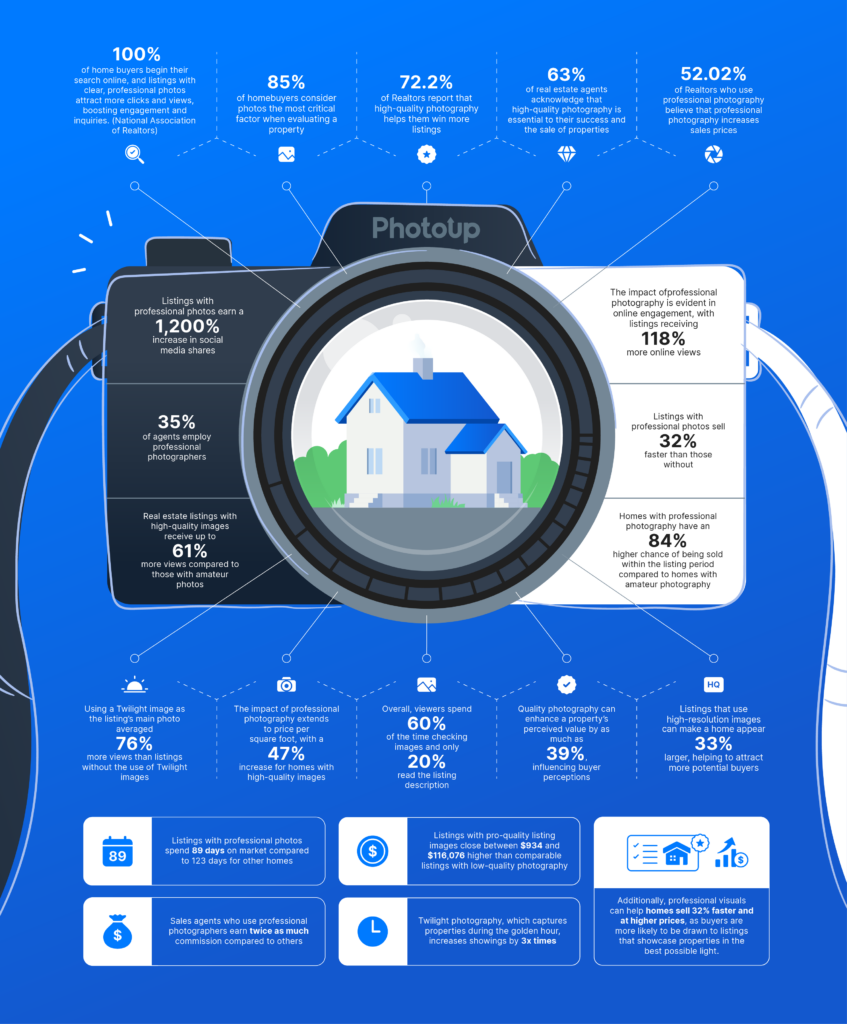
100% of home shoppers start their search online, and photos are the single most valuable piece of listing content for buyers.
According to the National Association of Realtors (NAR), photos are among the top things buyers value when searching for homes.
Eye-tracking and engagement studies also show people spend a huge share of their browsing time looking at images rather than text. In fact, one analysis found users spend about 60% of their time on property photos versus 20% on descriptions.
That means the visual tone you set with the sky influences the viewer’s emotional reaction immediately, which can lead to more showings and faster sales.
Hard Numbers: Photography (and Sunny Skies) Move Listings
Data consistently shows that higher-quality images help properties sell faster and attract more viewers.
Multiple industry studies find that listings with professional, high-quality photos sell significantly faster—commonly cited figures point to around 32% faster sales for listings with professional photography.
Real estate photographers and agents who use high-quality imagery report large uplifts in engagement (more views and clicks), and edited photos, including enhancements such as sky replacement, are a major part of that visual advantage.
High-quality images can produce 118% more listing views, which translates into more showings and more offers.
In this cool infographic, you can find the above and other powerful real estate photography statistics, which show that high-quality listing photos increase views and sales:
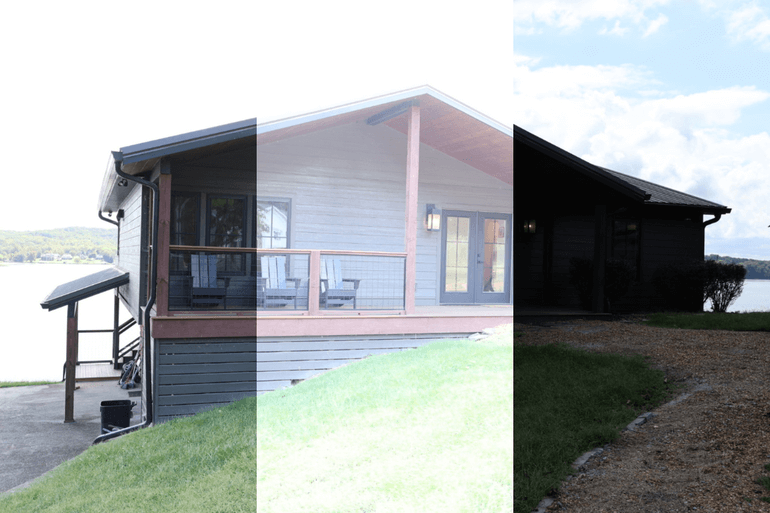
How Sky Replacement Changes Mood & Buyer Perception☁️

A sky does more than fill negative space—it sets context, temperature, and mood. A dull, overcast sky can feel gloomy and doesn’t show the property in its best light.
Consider these advantages of a sky replacement:
- Bright blue skies signal ideal conditions and optimism, making outdoor spaces look inviting and well-lit
- Warm sunset or “golden hour” skies add romantic or premium vibes, great for lifestyle positioning
- Dramatic clouds in twilight settings can emphasize architecture and texture without feeling gloomy if handled tastefully. It also adds a cozy and romantic feel to exterior property photos
When you replace a flat gray or blown-out sky with a curated blue or sunset, the home instantly feels cared-for, well-lit, and move-in ready.
That emotional nudge—even if subtle—increases the chance a buyer clicks through, saves the listing to revisit later, or requests a showing.
Let’s take a look at what this means for real estate photographers and their working day.
Have You Ever Thought To
Outsource Photo Editing?
Try it today with 5 free edits from three professional photo editors.

Sky Replacements Take the Weather Out of the Equation☔

Weather is one of the most frustrating variables for real estate photographers and agents. Last-minute cloud cover, unexpected rain, or poor light can turn a perfect shoot into a salvage job.
Sky replacement gives photographers post-shoot control over that variable. Here are some benefits of sky swaps for photographers and agents:
- Fewer reshoots (time and travel cost saved)
- Consistent portfolio/look across a listing set or neighborhood
- Predictable delivery times for clients regardless of the weather
- And the ability to choose a sky that matches the property’s marketing angle (beachy, suburban, modern urban)
Practical guides and industry write-ups recommend sky replacement as a reliable rescue for “bad shoots” and a way to standardize listing aesthetics across a brokerage.
However, there are some ethical aspects⚖️to consider to avoid misrepresenting the property. You should use sky replacement as an enhancement, not a deception.
Here are some best practices✅:
- Choose skies that are plausible for the location and time of day
- Avoid extreme color grading that misrepresents brightness or shadows on the property
- Match color temperature and contrast so the sky feels integrated
- Preserve realistic shadows and reflections on the property
- Also, remember to disclose retouching in listing notes when local rules or MLS require it
Used ethically, sky replacement highlights the property without lying about its condition.
Time and Cost Savings⏱️
Hiring a real estate photographer, having them travel to a shoot, and scheduling reshoots are expensive in time and money.
Virtual fixes like sky swaps reduce the need to go back, boost turnaround time, and let agents publish listings faster.
This can improve how quickly a property attracts its first wave of viewers (the most critical time window after listing).
Combine these effects and you get a clear chain: better-looking photos → more clicks and longer viewer attention → more showings → more offers and (often) faster sales.
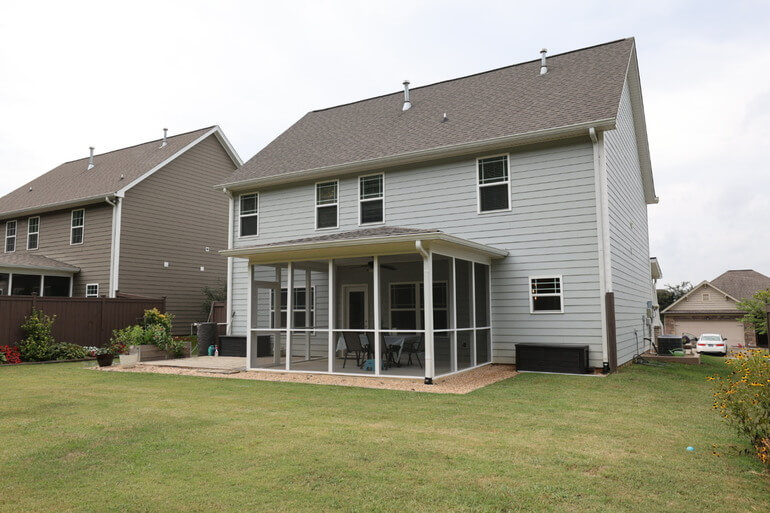
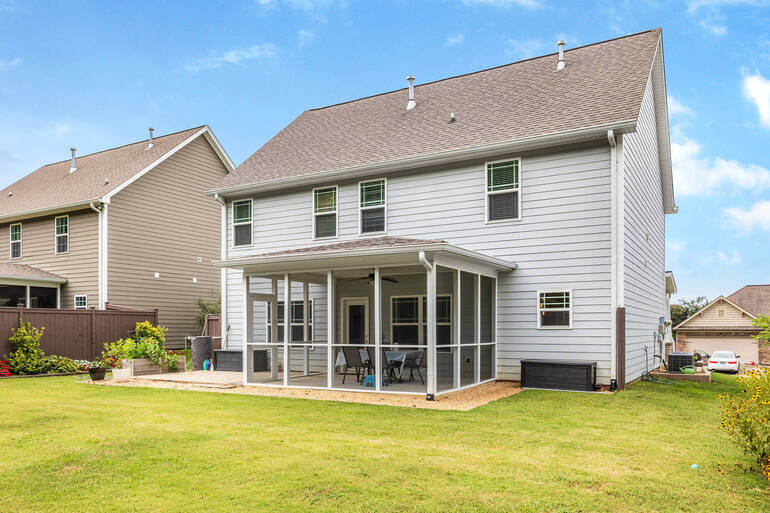
How to Easily Replace a Summer Sky in Photoshop☁️🌤️
We can’t just talk about all the benefits of sky replacements without showing you how this is done.
By following these simple steps in Photoshop, you can make your skies pop and look warm, sunny, and inviting.
To get started, you can either watch the video tutorial or continue reading the text below:
Step 1. First, open your photo in Lightroom and make the necessary adjustments.
Step 2. When done, move your image to Photoshop, where we are going to replace the sky using the Channels.
Step 3. Next, duplicate the Layer, and then go to the Channel Panel and Duplicate the Blue Channel. This will help us process the sky replacement.
Step 4. Then, adjust the levels by pressing CTRL +L on your keyboard. Simply move the slider to adjust its level.
Step 5. Once you’ve adjusted the levels, we’re going to use the Lasso Tool to select the other areas. Press Delete to paint them black.
Step 6. Now, we’ll use the Dodge Brush Tool to lighten the sky for easy selection. Click to load the Channel as Selection.
Step 7. Add Inverted Making by pressing the ALT Key and then clicking the Masking icon.
Step 8. A summer sky is a blue sky with fluffy clouds, so import the chosen sky and then place it under the Duplicate Layer. Position the sky, then click OK.
Step 9. Lastly, we’ll add a White Gradient on the horizon. Add a new Blank Layer on top of the Sky Replacement Layer and then use a White Foreground to Transparent Gradient Tool. This will blend the sky in the house naturally.
And there you have it! You’ve now learned how to swap out a dull sky with a warm and inviting summer sky in Photoshop.
Wrapping Up
In short, sky replacement is a low-cost, high-impact tool in the real estate photographer’s toolbox.
It lifts mood, increases visual engagement, reduces weather-driven delays, and helps properties get noticed faster.
If you want to turn dull, gray photos into bright, attention-grabbing listings without rebooking the shoot, PhotoUp can do the swap quickly and affordably—saving you time and money while making every listing look its best.
Let’s show you how to outsource your editing needs to PhotoUp.
Have You Ever Thought To
Outsource Photo Editing?
Try it today with 5 free edits from three professional photo editors.
How PhotoUp Can Help You Swap Out Dull Skies🌞
If you want to ensure every listing looks polished and market-ready, PhotoUp offers professional sky-replacement services tailored for real estate.
For example, our expert team of real estate photo editors can help you:
- Replace dull, overcast skies with realistic blue or golden-hour skies that match the property lighting
- Create dramatic and captivating twilight images
- Deliver edits quickly so listings can go live on schedule
- Reduce the need for reshoots and cut travel time/costs for photographers and agents
- Help you maintain a consistent, attractive aesthetic across all listings, which improves click-through and viewer engagement
- And much more!
We can help you with any type of editing, no matter how small or large, or complex, with a fast turnaround time of 12-24 hours.
Browse Top Dedicated
Real Estate Photo Editors
Ready-to-hire editors for real estate photo editing, and more.
Why Choose PhotoUp?
Here are some reasons why you should consider outsourcing your editing to PhotoUp:
| ✔ Affordable Pricing – Starting at just $1.50 per image for on-demand editing, PhotoUp provides budget-friendly editing solutions for real estate professionals. |
| ✔ Fast Turnaround Times – Get professionally edited images back in less than 24 hours, ensuring quick and efficient marketing. |
| ✔ Advanced Editing Techniques – From AI virtual staging and sky replacements to twilight conversions and HDR blending, PhotoUp offers a wide range of editing services tailored to real estate photography. |
| ✔ User-Friendly Platform – Easily upload images, manage orders, and provide feedback through PhotoUp’s intuitive online system. |
| ✔ Dedicated Support – PhotoUp’s team of expert editors and customer service professionals ensures high-quality results and personalized service. |
| ✔ Access to Dedicated Editing – With a Dedicated Editor, you get access to an editor or team of editors who are 100% dedicated to your business and learn your style. This ensures maximum image consistency, which can help you improve your brand. |
Wait! There are more reasons to choose PhotoUp…
Real Estate Marketing Ecosystem
Furthermore, PhotoUp has built an entire ecosystem around real estate photography. We also offer other powerful marketing services like:
We have everything you need to enhance and market real estate photography in one user-friendly software!
How to Get Started
If you’re wondering how to get started with PhotoUp, it’s super easy!
Here’s all you need to do:
Step 1. Sign up for a free PhotoUp account.
Step 2. Upload your photos to our easy-to-use software.
Step 3. Choose the level of editing that you need and provide instructions (optional).
Step 4. Wait for PhotoUp professional editors to edit and return the photos in less than 24 hours (48 hours for virtual staging).
Step 5. Download and start using your beautifully edited photos.
As simple as that!
Let your next listing shine with the help of beautiful, sunny skies.
Sign up for a free PhotoUp account today and let our expert editors help take your real estate photos to the next level!
For a limited time, you’ll receive a bonus of 10 free credits you can use on any of our services when signing up for an account.
We hope this blog post showed you how sky replacements can boost real estate photo appeal and home sales. Please support our content efforts and check out the following related resources before you go:

