


Table of Contents
- Why Use a Virtual House Tour to Sell Your Listing?
- How to Easily Create a Virtual House Tour (Step-by-Step)
- Why Use PhotoUp’s Platform?
- Virtual House Tours FAQ
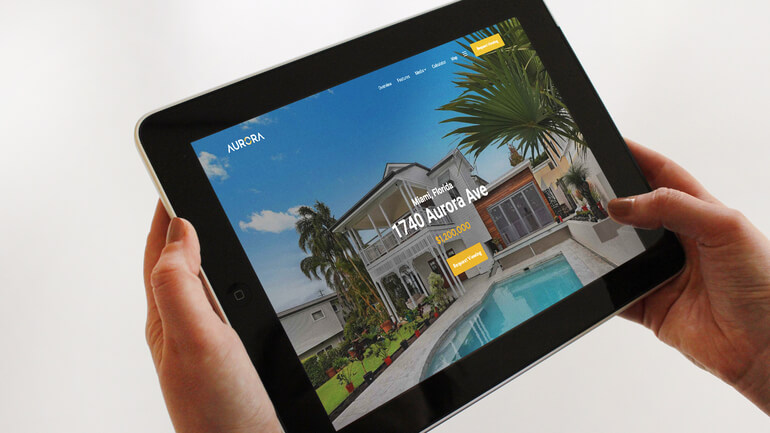
Virtual house tours, made using 360-degree and 3D tour technology, create an immersive experience for viewing homes while also limiting in-person contact.
In this post, we’ll share a step-by-step guide on how to easily create a virtual house tour that will grab potential homebuyers’ attention at record speed and accelerate the sale.
Before we get into the nitty-gritty details, let’s first take a look at why you should use a virtual tour to sell your home.
Why Use a Virtual House Tour to Sell Your Listing?
The pandemic sparked a surge in virtual tours and home walk-through videos, and this virtual trend won’t go away anytime soon. Quite the opposite!
National Association of Realtors Research Group found out that 41% of recent homebuyers begin their buying journey online, and 95% of them use online tools like virtual tours to find their perfect home.
Not only do they keep up with online demand, but they can also help sell your home above the asking price and significantly faster. For example, according to research by Matterport, listings with a 3D tour sold for up to 9% more and closed up to 31% faster than listings without them.
Additionally, a nationwide survey found that nearly 50% of potential buyers would make an offer on a home based solely on a virtual tour.
Here are some other powerful virtual tour statistics to consider:
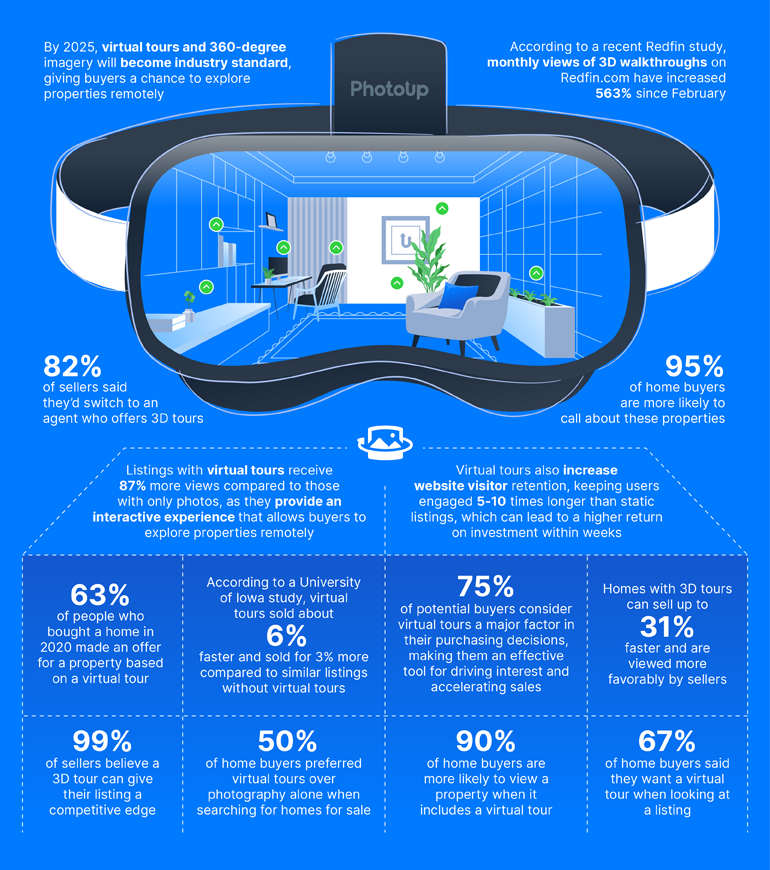
Overall, virtual house tours can help your listing stand out from the competition and increase engagement by providing an interactive and immersive experience that grabs the viewer’s attention.
How to Easily Create a Virtual House Tour (Step-by-Step)
With that said, let’s take a look at how to easily create a virtual house tour to help you engage buyers and sell your listing faster.
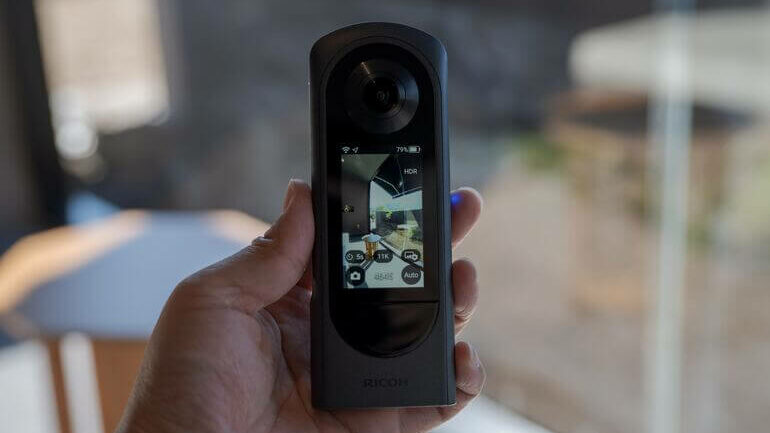
Step 1: Choose Your Camera
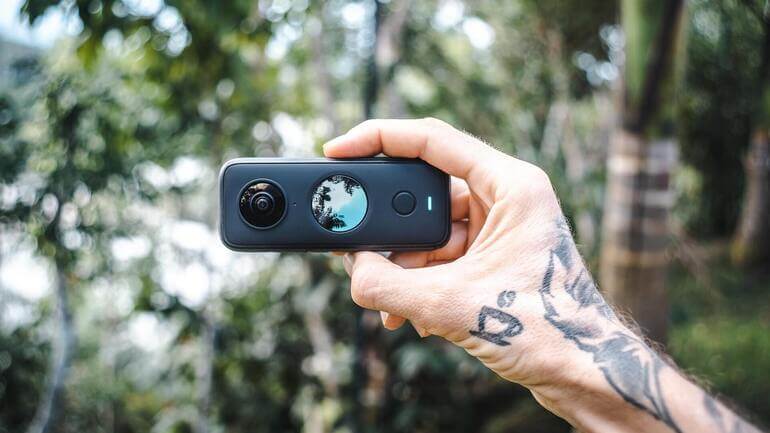
As real estate professionals, we understand the importance of giving your potential buyers a proper perspective on the home.
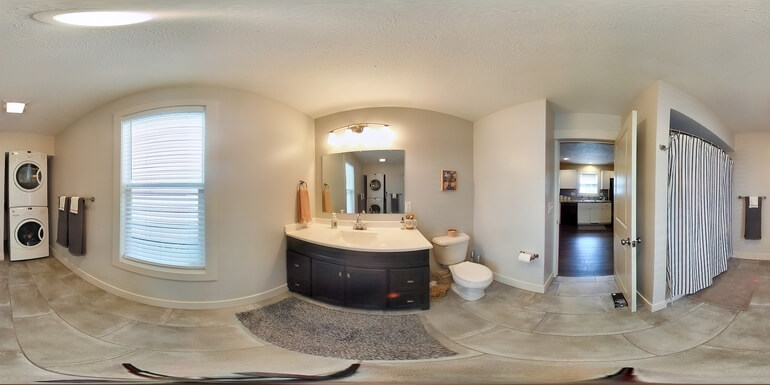
To do this effectively, you need to invest in a great 360-degree camera to help you record all angles of any given scene.
You could say that 360 cameras put you right in the heart of a sphere, thanks to super wide-angle lenses that see everything surrounding that point.
Pairing two hemispherical shots together creates gorgeous, expansive visuals, allowing viewers to explore the space like they’re actually right there.
While the sensors are standard ‘flat’ ones, it’s the fisheye lenses that make all the difference. They have an extraordinary ability to capture 180-degree views when placed back-to-back.
Our recommendations for the best 360 cameras are:
| Make | Price |
| Ricoh Theta SC2 | $329.99 |
| Insta360 X3 360-Degree Camera | $496.00 |
| Pergear Trisio Lite 2 8K | $399.00 |
| Kodak Orbit360 | Starting at $199.99 |
| GoPro Max | $504.95 |
For more details about each camera and its features, you can check out our blog post on the best 360 cameras for real estate virtual tours.
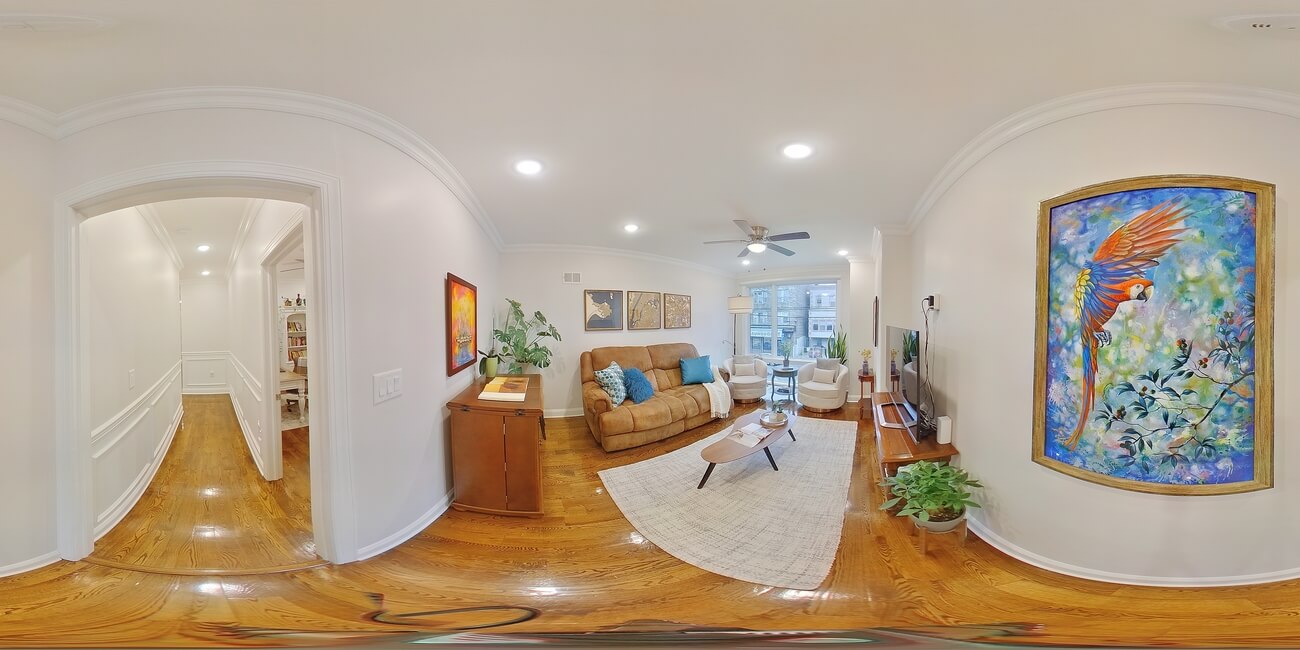
Step 2. Take Photos of the Home
To get great photos of a house’s interior and exterior, there are a few tips to keep in mind.
First, try to take photos like you would walk around in the home to make sure your virtual house tour will flow naturally.
Next, capture your home’s exterior from across the street and from its front and sides. Make sure to lock in the backyard, too.
Once finished with all exterior shoots, head inside and switch on all lights, open blinds and curtains, and take a snapshot of the entrance area.
As you make your way through the property, snap photos that allow people to move easily from one area to the next.
Set the tripod in the center of each room, about eye height, then step back and take the photo with the help of a remote trigger app.
Typically, one photo per room will be enough, but feel free to take more if the space is large or if you need to bracket your exposures.
Step 3. Upload Your Photos and Create Your Virtual House Tour
Now, it’s time to upload your photos to a platform like PhotoUp’s virtual tours and create your tour. With PhotoUp’s user-friendly interface, you can create your virtual house tour in minutes.
Best of all, you can build your first tour for free when signing up for a PhotoUp account.
Let’s show you step-by-step how to create a virtual house tour using PhotoUp’s software, so you can see exactly how easy the process is.
PhotoUp Virtual Tour Demo
To get started, you can either watch the demo or read the text with screenshots below:
Step 1. From your dashboard, hover over Virtual Tours and click the Green Plus icon.
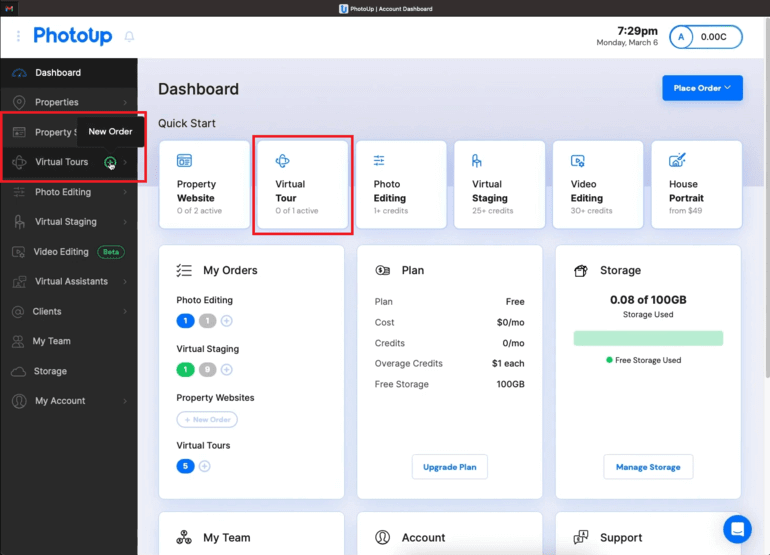
You can also click on Virtual Tour from the Quick Start Menu. This will take you to our Virtual Tour Builder.
Step 2. Next, you can select Search or Add a New Property.
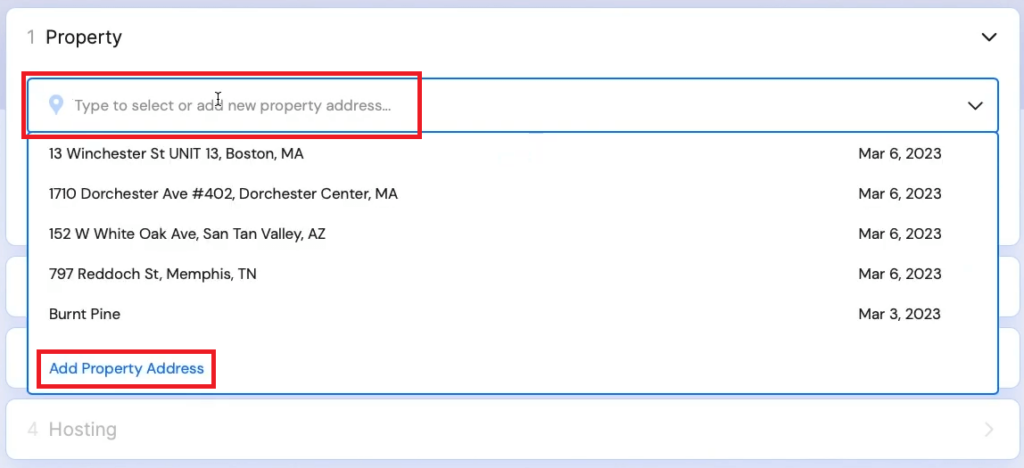
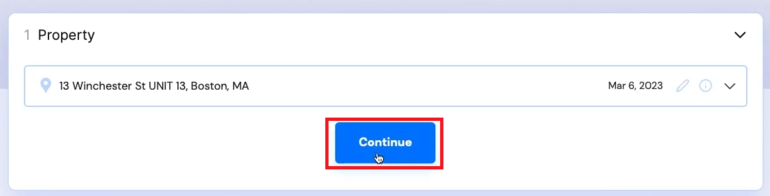
For this tutorial, we’ll select an existing property. Once selecting a property, click Continue to proceed.
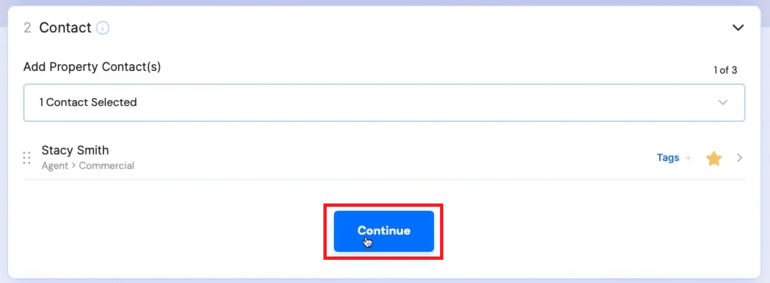
Step 3. Now, you can Select or Add a Contact.
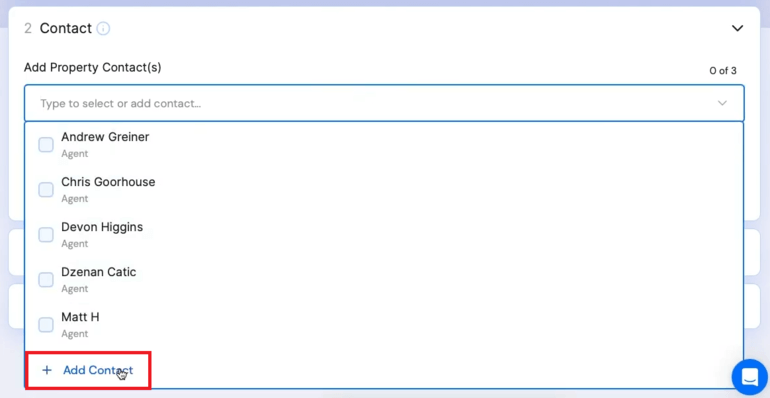
In this example, we’re going to be building this tour for Stacy, so we will add Stacy’s contact details by clicking Add a Contact and by filling in the Form.
Moreover, you can add more information in the Text Fields and include a Photo.
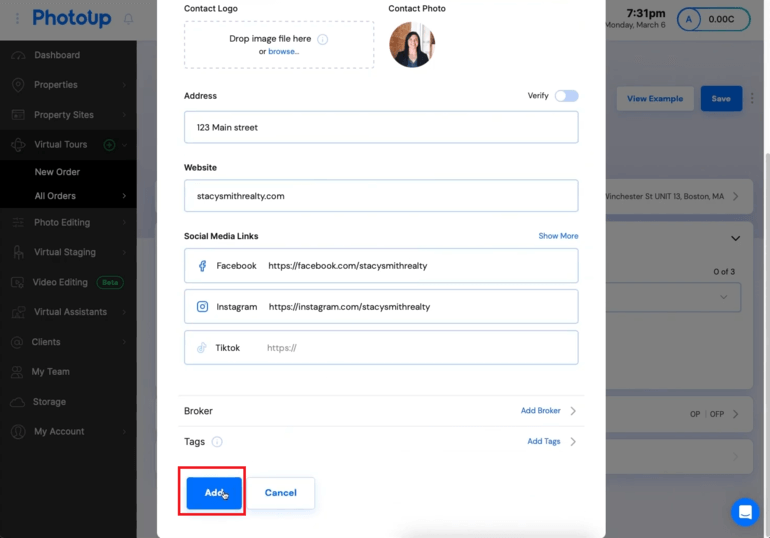
Click the Add button and Stacy’s contact info will show up on the tour as you will see later.
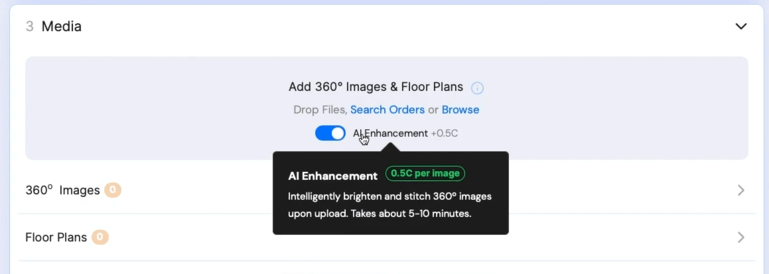
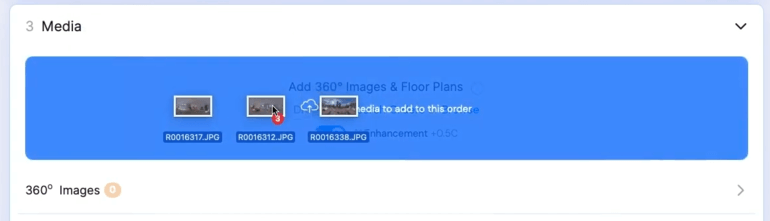
Step 4. Next, click Continue and proceed to Media. In Media, you can add 360 images by searching previous orders or adding photos manually.
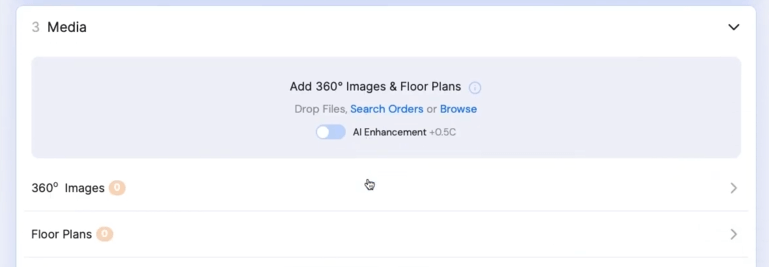
Step 5. PhotoUp even offers AI Enhancement on your 360 images. The enhancement includes color correction, white balance, vibrance adjustments, and exterior sky replacements.
Simply slide the Toggle bar to On before uploading your images. In order to receive AI Enhancements, you need to Upload your 360 images or you can simply Drag and Drop them into the Media window.
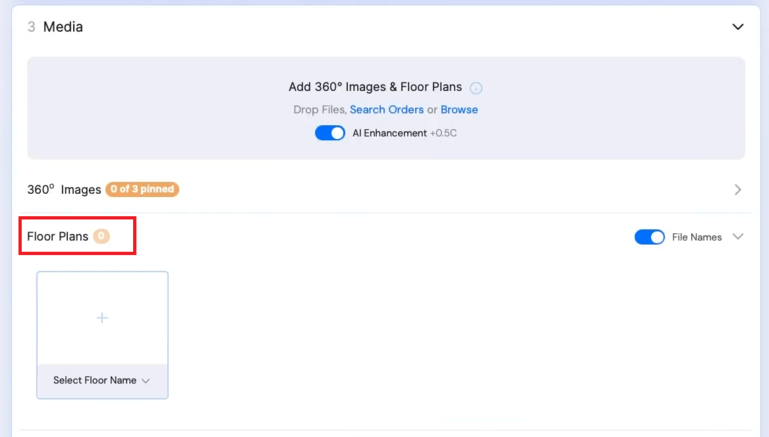
Step 6. If you want, you can also add a Floor Plan to your tour to accompany your tour.
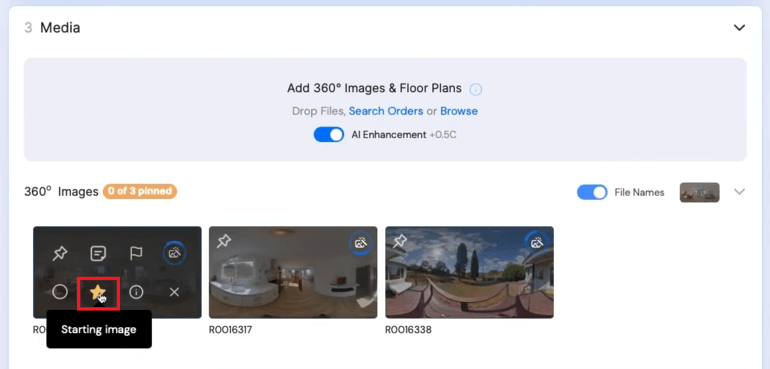
Step 7. Once your images are uploaded, you can upload your Featured Image by clicking on the Star icon.
It's Time To Level-Up Your
Real Estate Marketing
Capture more leads with virtual tours and single property websites.

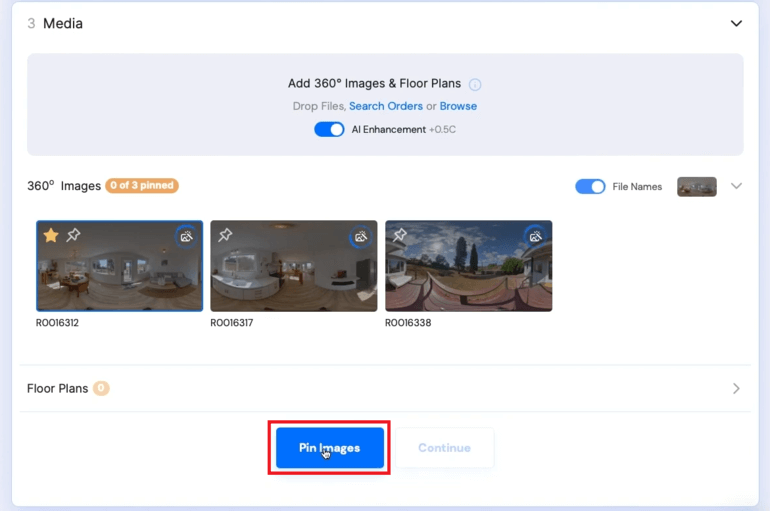
Pin Your Images to Create the Virtual Tour
Step 8. Next, click the Pin Images button to create your tour. This is where you’ll link your images together.
Step 9. In the left menu, you’ll have the option to Rename the Title of your photos.
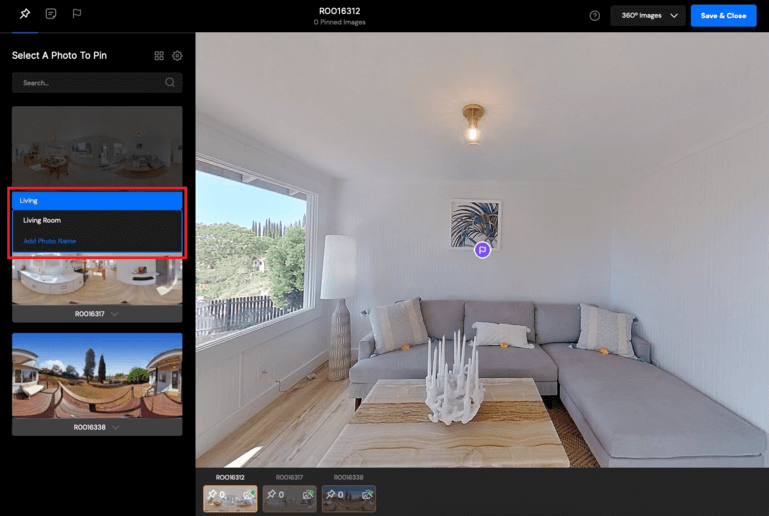
After renaming your image titles, Select which image to start with from the Bottom Thumbnails.
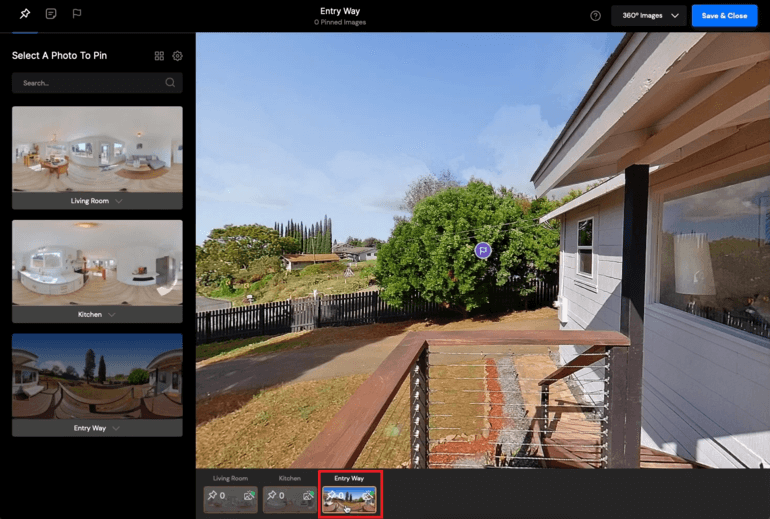
In this example, we’ll start with the entryway. Let’s now link this image to the next image in the tour.
To do that, Select your next image on the left and click on the Main Image to leave a pin. This will show users where to go next in the virtual tour.
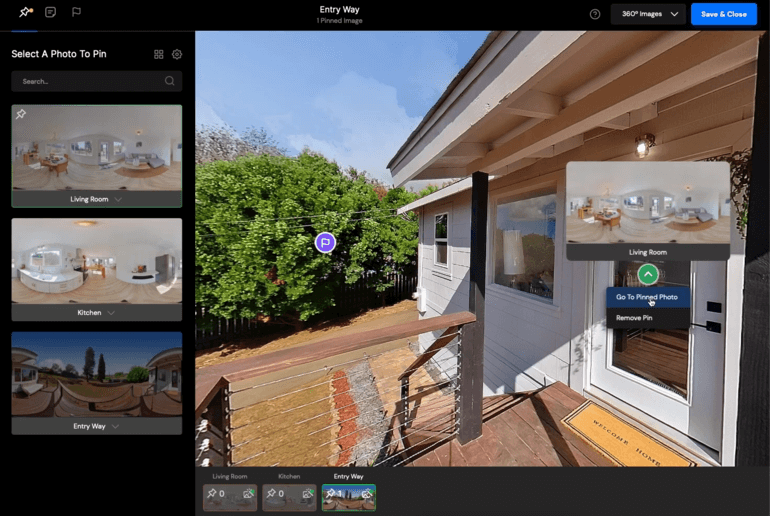
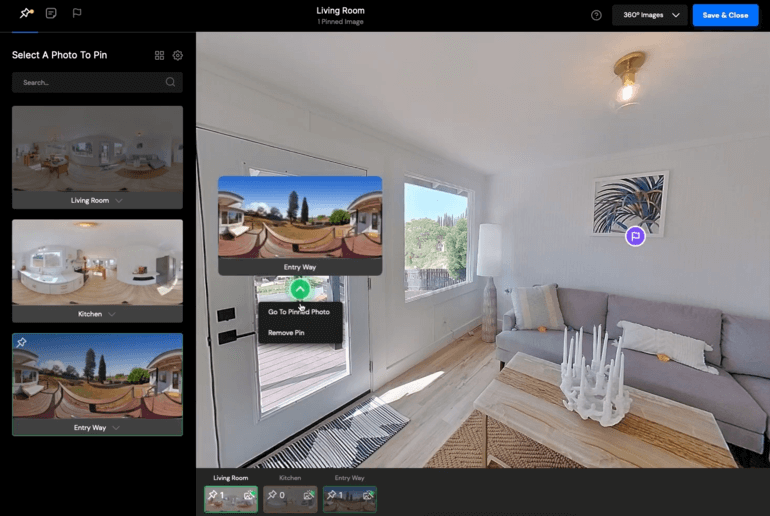
Now, let’s link back to the first photo. Click the Thumbnail on the left and click on the Door that leads back to the entryway, and you can go back and forth.
Step 10. In the top left corner, you will notice that there are three icons. You can click on the Note icon to leave detailed text inside of your tour.
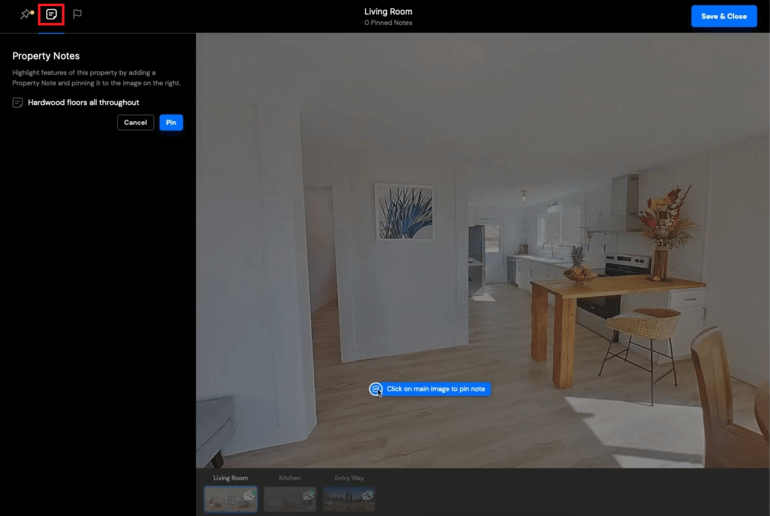
Simply type in the note and click Pin and pin the note on the photo. You will then see the notes by hovering on the icon.
You’ll also have the ability to set the Orientation of your images. You can set the Default Orientation, which will be the current orientation.
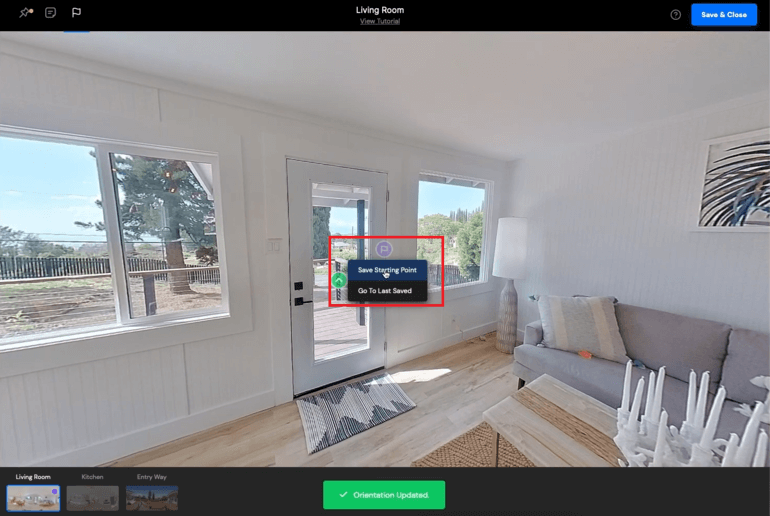
Furthermore, you can Reorient the photo by hovering over the purple Orientation icon and clicking Save Starting Point.
Step 11. Continue Pinning all your photos to each other and you’ll end up with a completed virtual tour.
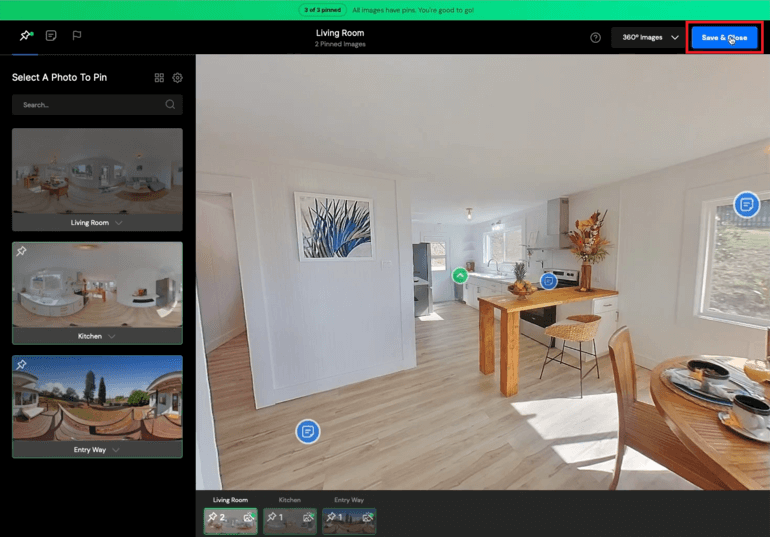
Click Save & Close to finish building your tour.
If you can’t complete your tour all at once, you can save your progress and come back to building the tour at a later time.
Select Hosting
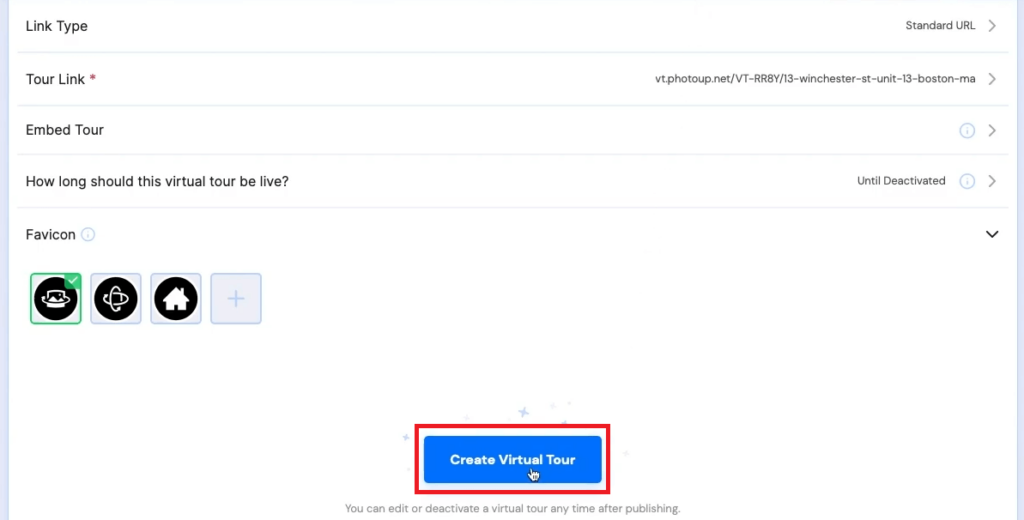
Step 12. You’re almost finished and before you leave you’ll need to select Hosting Settings.
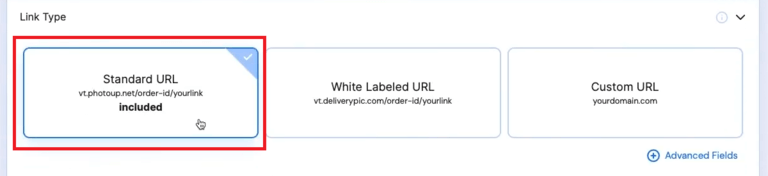
For this example, we’ll select the Standard URL option.
You also have the option to Embed the tour and set how long it will stay active.

Plus, you can also upload a Favicon, which is an icon that will show up on the top left-hand side of your browser.
Step 13. When you’re happy with your tour, you click the Create Virtual Tour button and your virtual tour is now complete.
Congratulations on building your first virtual house tour!
Step 5. Share & Market Your Virtual Tour
When it comes to sharing and marketing your virtual house tour, realtor.com®, numerous MLSs, and social media platforms are great choices to share your tour and attract potential buyers to your listing.
To share your tour, click on Copy to copy the link to the virtual tour and you can now share it on any platform of your preference.
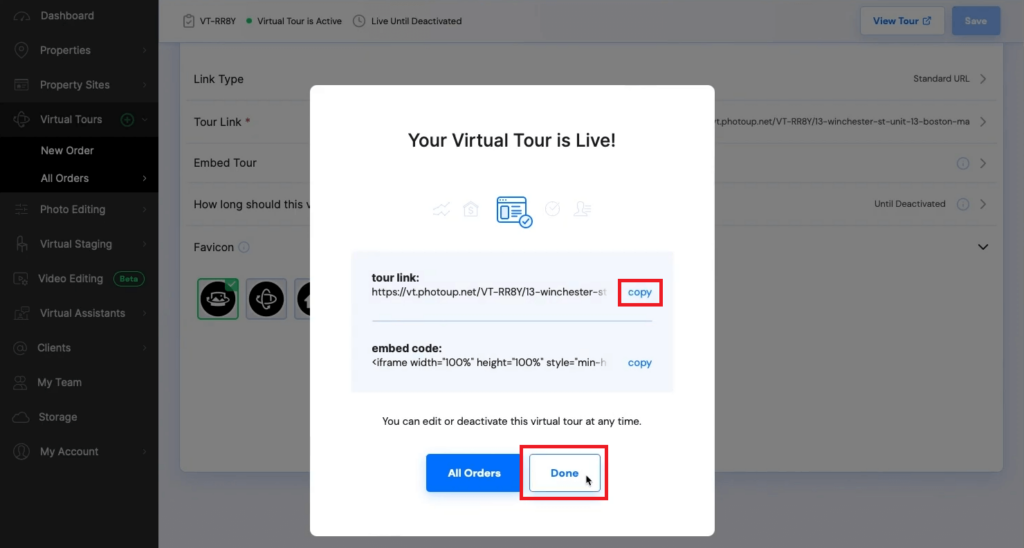
And to view your tour, click on the Done button and go back to the Builder page and click the View Tour button.

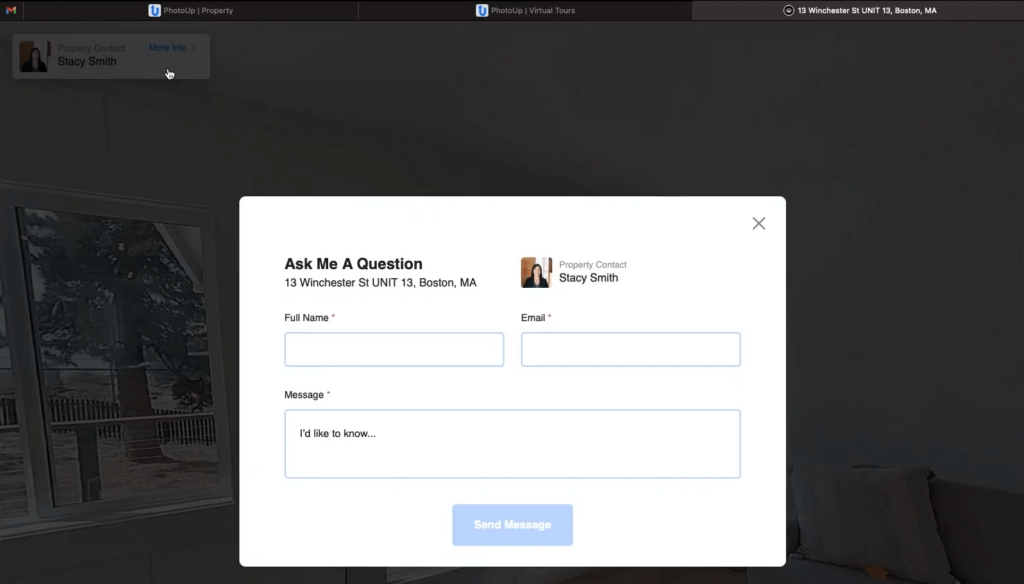
Lastly, inside the tour, you’ll have the option to send a message to the contact you’ve assigned.
And that’s it!
It's Time To Level-Up Your
Real Estate Marketing
Capture more leads with virtual tours and single property websites.
Why Use PhotoUp’s Platform?
By now, you understand why virtual house tours are an amazing tool for real estate professionals to showcase their listings, offering an immersive experience that can generate more engagement.
But why use PhotoUp’s virtual tours?
With PhotoUp’s easy-to-use platform, you can create a professional and compelling virtual house tour in as little as 5 minutes. And we make using virtual tours as easy as possible:
| No Special Camera Needed – Use any 360 camera that shoots JPEGs. |
| AI Enhancement – Let AI enhance and perfectly stitch your photo edges. |
| Simple Pinning – Customize your tour with simple image pinning for each scene. |
| You Choose the Highlights – You control what the buyer sees and can point out a home’s amenities, updates, and unique features. |
| White Labeled – Virtual tours can be white-labeled for a premium viewing experience. |
| Unlimited Hosting – Our 3D tours also come with unlimited hosting. |
For just $39 per month, PhotoUp provides 5 active virtual house tours and 5 single property websites, plus 10 credits. You can even build one demo tour for free!
Get Access to an Ecosystem of Real Estate Marketing Tools
To make your marketing efforts easier, PhotoUp also offers additional real estate marketing services such as:
Virtual House Tours FAQ
What is a virtual house tour?
Virtual house tours, also called 3D tours or 3D walkthroughs, let buyers digitally explore a house for sale. You get to control which rooms and angles you want to see and walk through a home, just like Google Maps Street View, but for the interior and exterior of a home.
Are virtual house tours worth it?
Overall, interactive 3D virtual tours are a valuable tool when marketing a listing, as they can help to attract more potential buyers. They can also help streamline the selling process since prospective buyers can get an immersive walkthrough of the whole home from the comfort of their sofa.
What is the cost to create a PhotoUp virtual tour?
Virtual tours can be purchased by subscribing to one of our PhotoUp plans:
| Starter Plan | Pro Plan | Growth Plan |
| $39/month 5 active single property websites 5 active virtual tours 50 Monthly Credits 100GB total storage | $99/month 50 active single property websites 50 active virtual tours 130 Monthly Credits 250GB total storage | $319/month 500 active single property websites 500 active virtual tours 400 Monthly Credits 500GB total storage |
* All pricing above is based on a quarterly subscription.
Join the PhotoUp family today! Sign up for a free PhotoUp account and start your free trial!
We hope this post helped you learn how to easily create a virtual house tour step by step. If you found this blog post useful, you may also want to check out the following resources:

