


Are you looking into how to best reduce noise in photos?
As a real estate photographer, you’ve probably struggled with that pesky grainy look in your photos. You know, those irritating little specks strewn all over the image?
Well, guess what? They’re called noise. Yep, it’s a fancy term for those unwanted grains. It can be very frustrating, especially when you’ve put your best effort into taking high-quality real estate pictures.
Fortunately, there are several ways to effectively reduce noise in your real estate photographs, and we’ll be exploring the 7+ best ways in this article.
Let’s first take a look at what noise in photography is.
What Is Noise in Photography?
In photography, noise is like those pesky audio imperfections but for visuals. Imagine these tiny colored specks, dots, or pixels in your image that make it look all grainy. Annoying, right?
There are two broad types of noise that exist in photos: shot noise and digital noise.
1. Shot Noise
Shot noise, also called photon noise, is caused by the natural property of light itself. It’s the randomness of the photons (elementary particles of light) in the environment that you are trying to shoot.
You see, light reflects off everything we see. However, these reflections have random patterns, and the number of photons emitted in these reflections varies widely. And this randomness causes the grain.
2. Digital Noise
Digital noise, also called electronic noise, is caused by internal electronics, your camera sensor, or settings (particularly ISO).
All these cause image imperfections in the form of noise.
Now that you know the two types of noise, let’s also explain the signal-to-noise ratio to help you better understand how and why noise is created.
3. Signal-to-Noise Ratio
Understanding noise is a key principle in real estate photography.
Let’s explain this with an example. Imagine you captured a scene with insufficient light. The image you took will naturally be darker than usual because you didn’t capture enough light.
Now, when you try to brighten the image using photo-editing software, you’ll also amplify the noise, resulting in a grainy and discolored look.
This happens because when you increase the signal (making the photo brighter), you also enhance the noise. It’s called the signal-to-noise ratio.
The key to obtaining the highest-quality image is capturing as much of the signal as possible, overpowering the ever-present backdrop noise. It’s how you ensure your real estate photos are engaging and visually appealing.
Note that you cannot eliminate noise entirely. Due to the natural property of light and the inherent limitations of photographic equipment technology, there will always be noise in a photo.
High-Quality & Consistent
Real Estate Photo Editing
Hire a dedicated editor with performance metrics from $7/hour.

7+ Best Ways to Reduce Noise in Real Estate Photos


Luckily, there are simple and effective ways to reduce noise in photos. Here are our 7+ best noise-reduction techniques for creating clear, sharp, and noise-free images.
1. Use RAW Image Format
RAW files contain a lot more data compared to JPEGs. Unlike JPEGs, raw files are not compressed, which means they don’t suffer from noise or other imperfections in the image.
Additionally, since raw files are uncompressed, they naturally have more data at various exposure levels.
This allows you to brighten the image during post-processing without significantly affecting the signal-to-noise ratio.
2. Invest in a Quality Camera
It’s vital to have a suitable camera to capture high-quality, noise-free images. For this purpose, your camera should have a high resolution paired with a low noise profile.
For camera suggestions, here’s our recommendation for the top 12 cameras for real estate photography, both DSLR and mirrorless options that will help you take noise-free images.
3. Use a Full-Frame Sensor
Also, to increase the sharpness and clarity of your images, you should use a full-frame image sensor camera.
A camera’s sensor is equipped with millions of light-sensitive photosites that collect information from the lens.
The remarkable thing is, a larger sensor can gather more information without any digital noise distortions. So, the bigger the sensor, the less noise you’ll have in your photos.
For more information, you can check out our blog post on full frame vs crop sensor: which is best for real estate photography?
4. Lower Your ISO
One of the most common causes of noise in real estate photographs is high ISO. ISO affects the sensitivity of your camera’s sensor to light.
The higher the ISO, the more sensitive your camera will be to light, but it will also increase the amount of noise in your picture.
So to reduce noise, you should lower your ISO to the lowest possible setting.
5. Ensure Appropriate Lighting
Poor lighting can also cause noise in real estate photographs. When you take pictures in dim environments, your camera will need to use higher ISO levels to get an accurate exposure.
To avoid this, use good lighting with a combination of natural and artificial light sources. You can also use a tripod to stabilize your camera.
6. Shoot or Expose to the Right
When capturing real estate photos, it’s important to slightly overexpose your images while avoiding “clipping” the image. But how can you determine if you’re on the right track?
Simply check the histogram. If the majority of the curves are positioned towards the center or left side of the graph, it’s a sign that you should increase the exposure.
Conversely, if the curves are already leaning towards the right side, you’re “clipping” the image, and it’s time to reduce the exposure.
The ideal scenario is to have the highlights on the right side of the histogram. By slightly overexposing your image, you’ll maximize the signal and diminish noise, which generally appears in darker pixels.
And don’t forget to avoid long exposures that can heat up the sensor and always shoot in RAW format for optimal results.
7. Leverage Noise Reduction Software
There’s a wide range of noise reduction software available in the market that can help you reduce noise in your real estate images.
For example, such software includes:
These applications can help balance the noise and overall detail of your picture.
8. Clean Up the Image in Post-Processing
Lastly, another easy way to reduce noise in real estate photos is by cleaning up your images in post-processing.
This involves getting rid of grainy or pixelated areas by using editing software like Photoshop and Lightroom.
High-Quality & Consistent
Real Estate Photo Editing
Hire a dedicated editor with performance metrics from $7/hour.
How to Reduce Noise in Lightroom and Photoshop
To learn how to do this, check out our video tutorial on how to reduce noise in Lightroom and Photoshop or continue reading the text below:
How to Reduce Noise in Lightroom
Step 1. To get started, we have a photo with a fair amount of noise as you can see in the video. Next, go to Detail under Manual Noise Reduction and set the Luminance to around 50.
As you can see, the noise has already been reduced.
You can now play with the Luminance slider to see what works for your photo. Make sure you don’t overdo it and lose a lot of detail. You don’t want to end up with a photo that looks too smooth.
Step 2. The Detail slider below the Luminance slider allows you to bring back some detail in your image. These are really the only two sliders you need to perform noise reduction.
Step 3. And if you have some color noise in your photo, you can also adjust the Color slider.
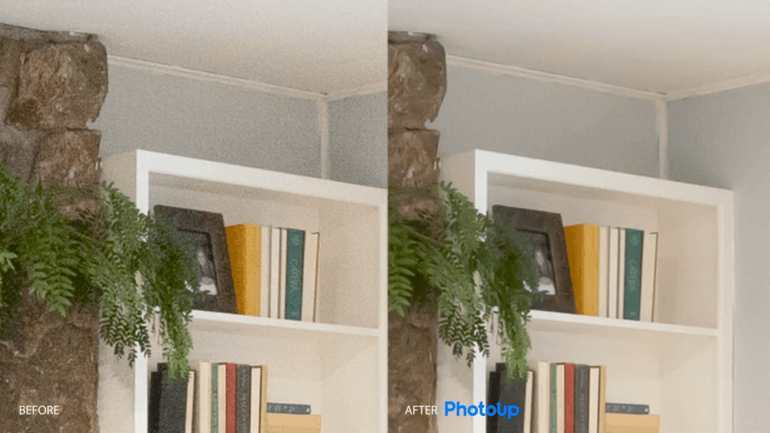
To show you the before and after, here’s the photo without noise reduction.
And here it is with noise reduction.
Step 4. Additionally, Lightroom has a new feature where you can let AI do the noise reduction for you. To do that, simply click the Denoise button and viola!
How to Reduce Noise in Photoshop
Now, let’s move on to how to reduce noise in Photoshop.
Step 1. To begin, import the RAW photo into Photoshop. It will open with Camera Raw. Let’s now zoom in so we can see the noise.
Step 2. Next, go to Detail and Manual Noise Reduction. You will see the same sliders as in Lightroom. Bring Luminance to around 50 and see how it affects the photo.
Then, move it around to find the right amount for your photo. Click the drop-down menu for even more options and bring back some detail if necessary.
Step 3. Again, if you have color noise in your photo, you can reduce that using the Color slider.
Here’s a before and after comparison. This is the image before noise reduction.
And this is the image after noise reduction.
Just like Lightroom, Photoshop also has a new feature where you can let AI do the noise reduction for you. Simply, click the Denoise button, and the noise will be reduced.
And that’s how you can quickly perform noise reduction in Lightroom and Photoshop!
And that’s it!
If you lack the skill or don’t have time to do the editing yourself, our professional real estate photo editors at PhotoUp can clean up your images in no time.
We use advanced photo-editing software, eagle eyes, and a profound sense of artistry to help you achieve crisp, clear images.
All you need to do is sign up for a free PhotoUp account, upload your images, provide instructions, choose export setting and turnaround time, and that’s it!
PhotoUp Real Estate Photo Editing Uploader
To see how easy it is to get started with PhotoUp’s software, check out our real estate photo editing uploader tutorial:
As simple as that!
Sign up for a free PhotoUp account today, and let us help take your noisy, granny images to clear perfection! Plus, for a limited time, we even offer you 5 free edits when signing up for an account.
And there you have it!
We hope this blog post gave you some valuable tips on how to reduce noise in photos. If you found this guide useful, you may also want to check out the following resources:

