


Table of Contents
- The Lighting Issue in Real Estate Photography
- What Is HDR Photography in Real Estate?
- How to Create HDR Photos: Bracketing 101
- How to Edit HDR Photos in Lightroom (Video Tutorial)
- When Should You Use HDR in Real Estate Photography?
- HDR FAQ
- Spending Too Much Time Editing HDR Photos?
According to recent studies, HDR photography can increase online views by 118%. It can also boost buyer interest and help sell a property 50% faster.
HDR editing enhances the visual appeal of a property through richness and depth, providing potential buyers with a clearer picture of a home’s features.
In this comprehensive guide, we’ll share what HDR really is, how to create HDR images correctly, and how to edit them like a professional real estate photographer.
Let’s begin by taking a look at the lighting issue in real estate photography and how HDR effectively tackles this.
The Lighting Issue in Real Estate Photography🌟
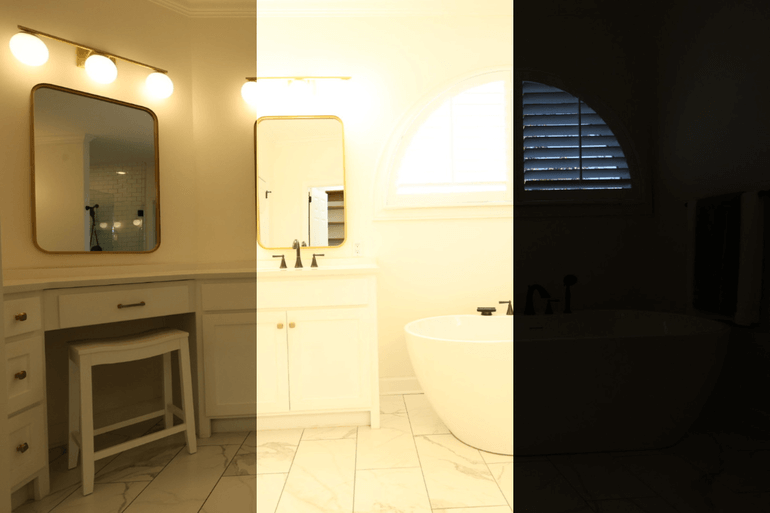
Every real estate photographer knows the struggle: you walk into a beautifully lit room with bright windows and cozy interior shadows… yet your camera can’t capture it all in one perfect shot. Either the windows blow out into a white haze, or the interior sinks into muddy darkness.
When this happens again and again, it can feel frustrating—not because the space lacks beauty, but because the camera can’t properly showcase it.
Fortunately, that’s exactly where HDR (High Dynamic Range) photography comes in.
By blending multiple exposures together, HDR allows you to capture both the brightest highlights and the darkest shadows in a single, perfectly balanced image.
Even better, when HDR is edited well, it keeps everything natural, realistic, and visually appealing—exactly what buyers expect when browsing listings online.
With this in mind, let’s take a closer look at what HDR in real estate photography is all about.
Have You Ever Thought To
Outsource Photo Editing?
Try it today with 5 free edits from three professional photo editors.

What Is HDR Photography in Real Estate?🌅


While the human eye can easily adjust to extreme lighting differences, most camera sensors can’t capture that full spectrum in a single shot.
This is especially true in real estate photography, where bright windows and darker interiors often exist in the same frame.
As a result, photographers are usually forced to choose between properly exposing the windows and underexposing the interior, or brightening the room and blowing out the highlight details.
Neither is ideal, and both fail to showcase the true beauty of the space.
This is where HDR changes the game. Instead of relying on a single exposure, HDR photography blends multiple images taken at different exposure levels to create one well-balanced final image.
Typically, photographers shoot:
- One underexposed image for highlight detail
- One well-exposed image for accuracy
- One overexposed image for shadow detail
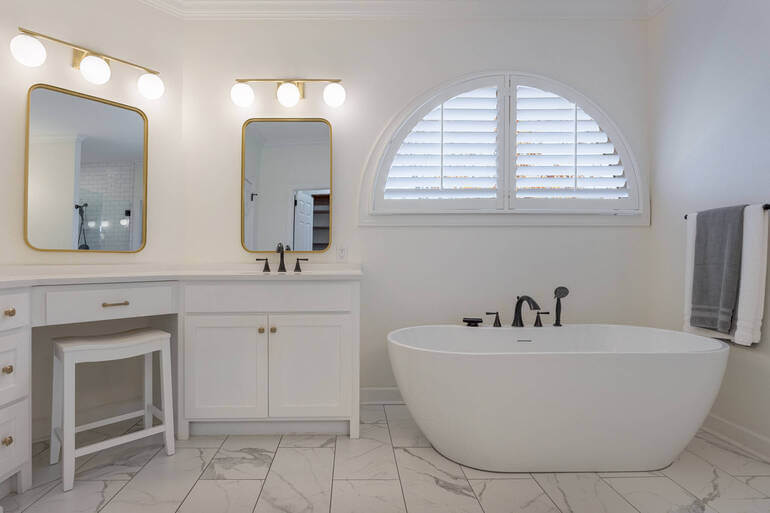
Once blended, the final image maintains crisp window views, bright and welcoming interiors, natural contrast, and true-to-life color.
Because of this, HDR has become one of the most powerful tools in real estate photography.
Let’s move on to how to shoot bracketed images for HDR.
How to Create HDR Photos: Bracketing 101📸
Before you can edit HDR photos, you first need to create them correctly. The foundation of HDR real estate photography is something called bracketing, which simply means capturing multiple versions of the exact same shot at different exposure values.
However, accuracy is everything. Since your HDR result depends on layering images, even the slightest shift can ruin alignment. That’s why your first step is stabilization.
Step 1. Stabilize Your Shot

HDR requires absolute consistency between frames. If your camera moves, the merging software will struggle to line up the images, causing blur or distortion. To prevent this, always:
- Use a tripod
- Turn off image stabilization
- Use a timer or remote trigger
By doing this, your camera captures multiple identical frames, changing only the exposure—not the composition.
Step 2. Set Up Exposure Bracketing
Once your camera is stable, the next step is enabling Auto Exposure Bracketing (AEB)—a feature available on most DSLR and mirrorless cameras.
With AEB turned on, your camera automatically shoots multiple exposures in rapid succession, ensuring consistency.
For real estate photography, the most common exposure brackets are:
- 3 frames at −2, 0, +2 EV
- 5 frames at −4, −2, 0, +2, +4 EV for high-contrast spaces
This gives you everything you need to merge a balanced and beautiful HDR photo later in editing.
Step 3. Keep Aperture Constant
As you work through your HDR process, one important rule is to keep your aperture constant.
Many beginners mistakenly change their F-stop, but doing so alters depth of field, which results in images that don’t blend well.
Instead, keep your aperture locked between f/5.6 and f/8 for maximum clarity, and adjust only shutter speed to change exposure. This ensures sharpness, depth consistency, and smooth blending.
Step 4. Shoot Fast and Avoid Movement

Finally, it’s important to remember that HDR works best when your scene is still.
Because you’re capturing multiple images, any movement—like blowing curtains or swaying trees—can cause ghosting.
That’s why HDR is especially suited for still environments like:
- Rooms with windows
- Static interior compositions
- Exterior shots during calm weather
With your shots captured correctly, the next step is bringing them to life through editing.
How to Edit HDR Photos in Lightroom (Video Tutorial)🖥️
Once you’ve captured your bracketed images, the real transformation begins during editing.
At this stage, your goal is to bring together each exposure into one clean, polished image that feels realistic, welcoming, and professional.
Let’s walk through the process step-by-step. You can either watch the video tutorial or continue reading the text below:
Import and Infuse Photos
Step 1. To get started, Import your photos into Lightroom. Then, Sort your Photos by File Name to keep the photos in order during the HDR process.
Step 2. To produce an HDR photo, we need to infuse them. So, Select your images, right-click, and select Stacking and Group into Stack. Or you can select them all and Auto Stack by Capture Time, and Lightroom will automatically stack them.
Step 3. For the infuse process, you can also infuse multiple stacks of photos. Just select them all, and then go to File >> Plug-in Extras, and then click on Blend exposures using LR/Enfuse. This will open a dialog box.
Step 4. In the Auto Align tab, you need to make sure the option Automatically align images before blending them is checked so that Lightroom will automatically align the photos before blending them.
Step 5. Since we stack our photos, in the Output tab, the Batch Mode should be checked. Next, in Output files (on the same tab), you need to also check the Create blended images in the same folder as the images in the stack option.
Saving Your Infused Files
Step 6. To save the infused files in the same folder as the original (still on the same tab under after blending), check the Reimport image into Lightroom option so the infused product will automatically appear in Lightroom after reviews.
Besides that, you have the option to Stack with originals. Stacking with originals will automatically group with the images you’ve stacked beforehand. It’ll be the first image on the stack.
On the other hand, if you opt not to stack with originals, the infused image will appear beside the stacked images. Either way is fine.
Step 7. Next, click Infuse Images. The progress can be viewed in the upper left corner of the screen. However, since we infused multiple stacks of photos, this will take time.
Step 8. When the infuse is done and you don’t see the infused photos, go to the Library and select the Folder, where you put the images. This will sort of refresh the folder.
If you are still confused, the infused image will always be a tiff file. When the infuse is done you can now start editing the photos with basic editing.
And that’s it!
When Should You Use HDR in Real Estate Photography?🏡
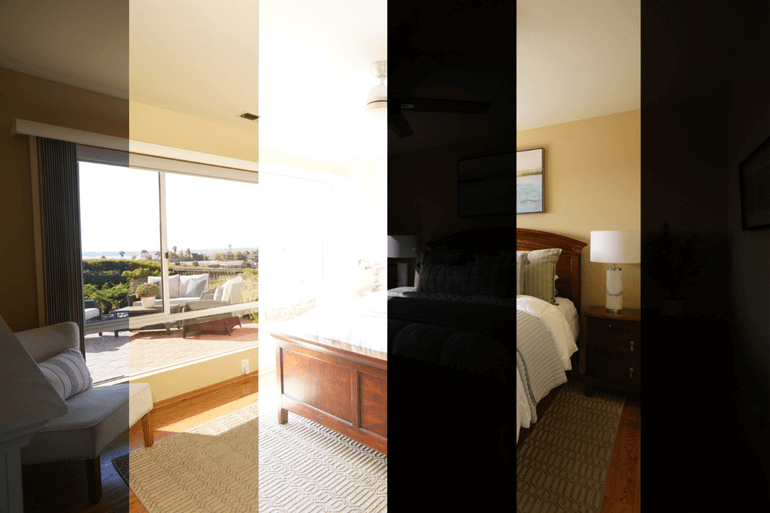

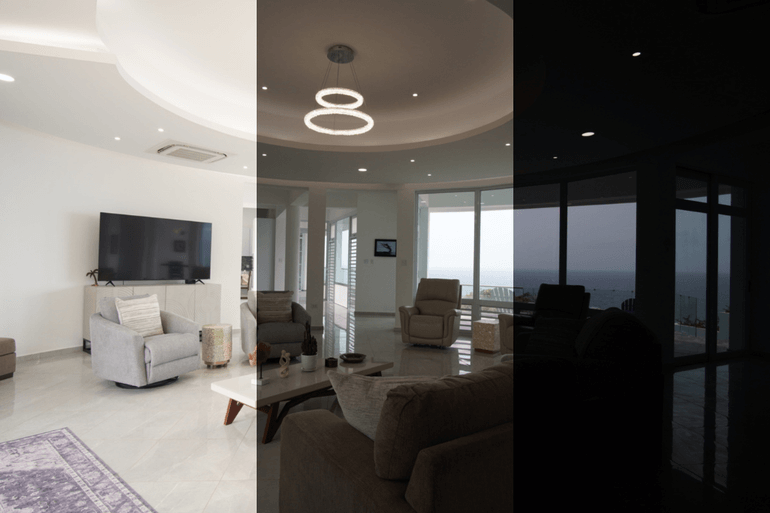
HDR is especially useful whenever you’re dealing with lighting extremes. Whether it’s a room flooded with sunlight or an exterior shot under harsh light, HDR ensures balance and clarity.
Common HDR scenarios include:
✔ Bright living rooms
✔ Bedrooms with window glare
✔ Kitchens with reflective surfaces
✔ Exteriors with shadows and sun
Because of this versatility, HDR remains one of the most valuable techniques for real estate photographers.
Common HDR Editing Mistakes to Avoid❌
While HDR is powerful, improper editing can easily ruin an image. To maintain professionalism, avoid:
🚫 Oversaturated colors
🚫 Cartoon-like contrast
🚫 Halos around edges
🚫 Over-brightened whites
🚫 Or, excess clarity
The best HDR editing feels natural. If the viewer notices “HDR effects,” the image has likely gone too far.
Pro Tips for Natural HDR Results
To ensure the highest quality output, professional photographers can rely on these best practices:
⭐ Shoot RAW for maximum flexibility
⭐ Keep ISO low
⭐ Always use a tripod
⭐ Avoid scene movement
⭐ Lastly, consider manual blending for luxury homes
With consistent technique, HDR becomes one of your most valuable tools.
HDR FAQ❓
Is HDR always necessary?
Not always. If the lighting is even, a single exposure often works fine. However, HDR is ideal when extreme contrast exists.
How many exposures should I bracket?
Most professional real estate photographers use 3 to 5 exposures.
Does HDR look fake?
Only when over-processed. Well-edited HDR looks natural.
Can HDR work for exterior real estate photography?
Absolutely—especially when balancing bright skies and shadowed exteriors.
What software works best for HDR editing?
Lightroom, Photoshop, Aurora HDR, and Photomatix are industry favorites.
Final Thoughts
HDR photography continues to transform real estate imagery by allowing photographers to capture full lighting detail, emotional warmth, and visual depth in every shot.
When done right, HDR images not only improve listing quality but also increase engagement, enhance buyer experience, and help agents win more business.
And when real estate photo editing becomes overwhelming, you never have to do it alone.
PhotoUp’s professional editing team is here to turn your HDR brackets into powerful, polished, and high-impact images—so you can focus on shooting, scaling your business, and delighting your clients.
Let’s take a look at how to easily get started with PhotoUp.
Spending Too Much Time Editing HDR Photos?⏱️
As powerful as HDR editing is, it can quickly become time-consuming—especially when managing large volumes of real estate photos.
That’s why many photographers choose to outsource their editing to a professional service like PhotoUp.
PhotoUp’s expert real estate photo editors can help you:
- Professionally process HDR brackets
- Deliver realistic, magazine-quality results
- Provide 12–24-hour turnaround
- Help photographers save time and scale faster
Even better, services start at just $1.50 per image for on-demand editing, making professional editing both accessible and affordable.
Additionally, Dedicated Editing can go as low as $0.50 per image, depending on your style and editing batch.
Browse Top Dedicated
Real Estate Photo Editors
Ready-to-hire editors for real estate photo editing, and more.
A One-Stop Shop for Real Estate Marketing
PhotoUp does so much more than just editing! We are a complete one-stop shop for real estate marketing and also offer additional services such as:

We have everything you need to create impressive real estate photography that will impress clients and sell listings faster at higher rates!
Adding more product offerings to your toolkit will also make you more valuable to your clients and can help grow your real estate photography business.
It’s a win-win solution!
How to Get Started
Our user-friendly platform lets you upload, review, and approve edits seamlessly, giving you more control over the final product while saving time and money.
Getting started is super easy – this is what to do:
Step 1. Sign up for a free PhotoUp account.
Step 2. Upload your photos to our easy-to-use software.
Step 3. Choose the level of editing that you need and provide instructions (optional).
Step 4. Wait for PhotoUp professional editors to edit and return the photos in less than 24 hours (48 hours for virtual staging).
Step 5. Download and start using your beautifully edited photos.
It’s as simple as that to get your professionally edited photos returned to you in less than 24 hours!
So, don’t let your real estate photography look amateurish…
👉 Sign up for a free PhotoUp account today and let our expert editors help you create realistic and detailed HDR photos!
For a limited time, you’ll receive a bonus of 10 free credits you can use on any of our services when signing up for an account.
We hope this blog post helped you learn how to edit HDR photos for real estate photography. Before you go, you may also want to check out the following resources:
- Mastering Interior Photo Editing: 10 Powerful Techniques
- Quickly Enhance the Inside of Your Home With Interior Photo Editing
- The #1 Edit to Create Stunning Real Estate Photos
- The Power of Visual Appeal to Skyrocket Real Estate Sales
- 8 Secret Real Estate Photo Editing Tricks for Breathtaking Listings

