


This post will show you how to remove flash shadows in Photoshop for image editing of real estate photography.
Shadows can add contrast and dimension to an image, but they can also be distracting and make your real estate photography look less professional.
The good news is that it’s easy to remove distracting shadows with the help of Photoshop.
But before we show you how to remove flash shadows in Photoshop, let’s take a look at when shadows are bad in real estate photography (and photography in general).
What Are Undesirable Shadows in Real Estate Photography?
Shadows can be a beautiful addition to your photography. They can add depth, contrast, composition, and balance to an image.
For instance, shadows create an excellent contrast for black and white photos. But they can also be distracting, and make your real estate photography look bad.
For this reason, photographers love working in the morning and late afternoon when they can access the soft even light that’s available at these times.
In contrast to this easy-to-work-with light, shooting around midday often creates harsh, unwanted shadows.
Typically, the sun is out blaring in the midday hours, giving you undesirable shadows, such as the following:
- Shadows from the sun or light to the side, a shadow cast from one object to the next
- Shadows from the sun or light overhead
- Shadows from harsh flash use indoors, often seen slightly behind or next to an object against a wall
More Than Industry Leading
Real Estate Photo Editing
PhotoUp is the end-to-end business platform for real estate photographers.

How to Remove Flash Shadows in Photoshop (6 Simple Steps)
Now, that you know examples of undesirable shadows, let’s show you how to remove flash shadows in Photoshop using 6 simple steps next.
To get started, you can either watch the video tutorial or continue reading the text below:
Assuming that you have already enfused the photo, it is now time to add the basic adjustment to it.
Step 1. First, make the photo bright and well-balanced.
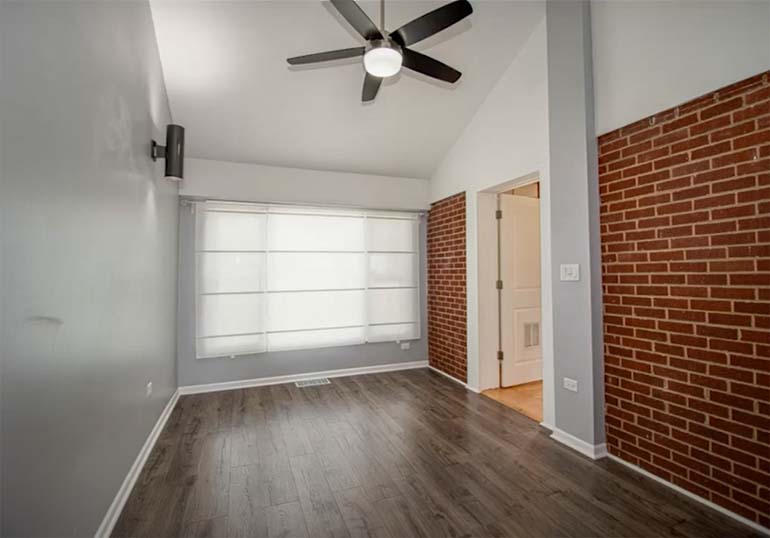
Step 2. When you’re done adjusting the photo, move it to Photoshop. Here we are going to remove the flash shadow of the fan in the ceiling.
Step 3. Next, duplicate the Layer, and use the Path Tool to soften the shadow.
Step 4. Then, use the Clone Stamp Tool to remove the shadow. You can adjust the Opacity depending on how you need it. Just keep Patching till the shadow is completely gone.
Step 5. Now, select the ceiling using the Magic Wand Tool, and use the Dodge Tool to lighten the dark area.
Step 6. Lastly, use the Brush Tool to remove the color cast on the ceiling. Additionally, you can add more adjustments in Lightroom if you want.
And there you have it!
Best Image Editing for Real Estate Photography
No matter the type of photography, it’s the editing that makes your photos look exceptional.
If you need help with image editing for real estate photography, or any type of photography, PhotoUp’s professional editors can help you edit your photos for as low as $0.75 per image.
Browse Top Dedicated
Real Estate Photo Editors
Ready-to-hire editors for real estate photo editing, and more.
Our dedicated team has the technical expertise to handle any size of photo editing job, big or small.
All you need to do is sign up for a free account, place your first order and your photographs will be delivered in less than 24 hours.
We’ll be more than happy to take that task off your plate while using all the tools at our disposal to take your photos to the next level.
Get started with PhotoUp today, and let us help you enhance your images!
We hope this post helped you learn about image editing for real estate photography and how to remove flash shadows in Photoshop.
Before you go, you may also want to check out the following resources:

